Deploying Lambda container image locally with Elastic Container Registry (ECR) using LocalStack
Introduction
Section titled “Introduction”Lambda is a powerful serverless compute system that enables you to break down your application into smaller, independent functions. These functions can be deployed as individual units within the AWS ecosystem. Lambda offers seamless integration with various AWS services and supports multiple programming languages for different runtime environments. To deploy Lambda functions programmatically, you have two options: uploading a ZIP file containing your code and dependencies or packaging your code in a container image and deploying it through Elastic Container Registry (ECR).
ECR is an AWS-managed registry that facilitates the storage and distribution of containerized software. With ECR, you can effectively manage your image lifecycles, versioning, and tagging, separate from your application. It seamlessly integrates with other AWS services like ECS, EKS, and Lambda, enabling you to deploy your container images effortlessly. Creating container images for your Lambda functions involves using Docker and implementing the Lambda Runtime API according to the Open Container Initiative (OCI) specifications.
LocalStack for AWS extends support for Lambda functions using container images through ECR. It enables you to deploy your Lambda functions locally using LocalStack. In this tutorial, we will explore creating a Lambda function using a container image and deploying it locally with the help of LocalStack.
Prerequisites
Section titled “Prerequisites”Before diving into this tutorial, make sure you have the following prerequisites:
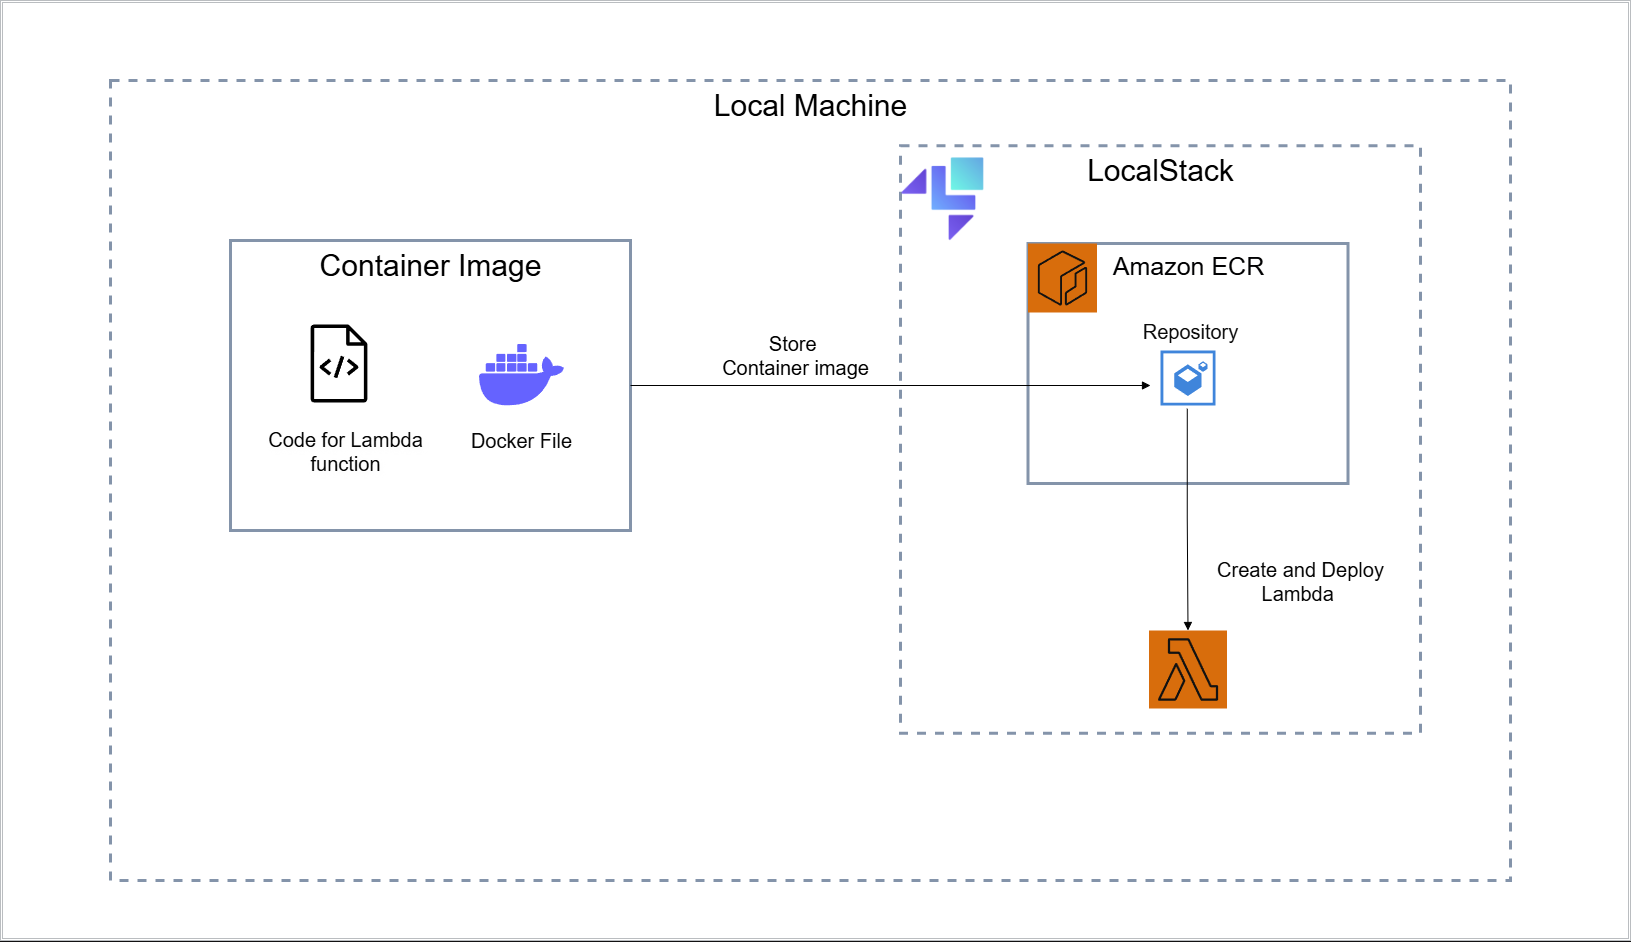
Architecture Diagram
Section titled “Architecture Diagram”The following diagram shows the architecture that we are going to follow :
Creating a Lambda function
Section titled “Creating a Lambda function”To package and deploy a Lambda function as a container image, we’ll create a Lambda function containing our code and a Dockerfile. Create a new directory for your lambda function and navigate to it:
mkdir -p lambda-container-imagecd lambda-container-imageInitialize the directory by creating two files: handler.py and Dockerfile.
Use the following commands to create the files:
touch handler.py DockerfileOpen the handler.py file and add the following Python code, which represents a simple Lambda function that returns the message 'Hello from LocalStack Lambda container image!':
def handler(event, context): print('Hello from LocalStack Lambda container image!')In the code above, the handler function is executed by the Lambda service whenever a trigger event occurs.
It serves as the entry point for the Lambda function within the runtime environment and accepts event and context as parameters, providing information about the event and invocation properties, respectively.
Following these steps, you have created the foundation for your Lambda function and defined its behaviour using Python code.
In the following sections, we will package this code and its dependencies into a container image using the Dockerfile.
Building the image
Section titled “Building the image”To package our Lambda function as a container image, we must create a Dockerfile containing the necessary instructions for building the image.
Open the Dockerfile and add the following content.
This Dockerfile uses the python:3.8 base image provided by AWS for Lambda and copies the handler.py file into the image.
It also specifies the function handler as handler.handler to ensure the Lambda runtime can locate it where the Lambda handler is available.
FROM public.ecr.aws/lambda/python:3.8
COPY ./handler.py ./
CMD [ "handler.handler" ]With the Dockerfile prepared, you can now build the container image using the following command, to check if everything works as intended:
docker build .By executing these steps, you have defined the Dockerfile that instructs Docker on how to build the container image for your Lambda function. The resulting image will contain your function code and any specified dependencies.
Publishing the image to ECR
Section titled “Publishing the image to ECR”Now that the initial setup is complete let’s explore how to leverage LocalStack’s AWS emulation by pushing our image to ECR and deploying the Lambda container image.
Start LocalStack by executing the following command.
Make sure to replace <your-auth-token> with your actual Auth Token:
LOCALSTACK_AUTH_TOKEN=<your-auth-token> ECR_ENDPOINT_STRATEGY=off DEBUG=1 localstack start -dOnce the LocalStack container is running, we can create a new ECR repository to store our container image.
Use the awslocal CLI to achieve this.
Run the following command to create the repository, replacing localstack-lambda-container-image with the desired name for your repository:
awslocal ecr create-repository --repository-name localstack-lambda-container-image{ "repository": { "repositoryArn": "arn:aws:ecr:us-east-1:000000000000:repository/localstack-lambda-container-image", "registryId": "000000000000", "repositoryName": "localstack-lambda-container-image", "repositoryUri": "localhost.localstack.cloud:4510/localstack-lambda-container-image", "createdAt": <timestamp>, "imageTagMutability": "MUTABLE", "imageScanningConfiguration": { "scanOnPush": false }, "encryptionConfiguration": { "encryptionType": "AES256" } }}Next, build the image and push it to the ECR repository. Execute the following commands:
docker build -t localhost:4510/localstack-lambda-container-image .docker push localhost:4510/localstack-lambda-container-imageIn the above commands, we specify the repositoryUri as the image name to push the image to the ECR repository.
After executing these commands, you can verify that the image is successfully pushed to the repository by using the describe-images command:
awslocal ecr describe-images --repository-name localstack-lambda-container-image{ "imageDetails": [ { "registryId": "000000000000", "repositoryName": "localstack-lambda-container-image", "imageDigest": "sha256:459fce12258ff1048925e0f4e7fb039d8b54111a8e3cca5db4acb434a9e8af37", "imageTags": [ "latest" ], "imageSizeInBytes": 184217147, "imagePushedAt": <timestamp>, "imageManifestMediaType": "application/vnd.docker.distribution.manifest.v2+json", "artifactMediaType": "application/vnd.docker.container.image.v1+json" } ]}By running this command, you can confirm that the image is now in the ECR repository. It ensures it is ready for deployment as a Lambda function using LocalStack’s AWS emulation capabilities.
Deploying the Lambda function
Section titled “Deploying the Lambda function”To deploy the container image as a Lambda function, we will create a new Lambda function using the create-function command.
Run the following command to create the function:
awslocal lambda create-function \ --function-name localstack-lambda-container-image \ --package-type Image \ --code ImageUri="localhost.localstack.cloud:4510/localstack-lambda-container-image" \ --role arn:aws:iam::000000000000:role/lambda-role \ --handler handler.handler{ "FunctionName": "localstack-lambda-container-image", "FunctionArn": "arn:aws:lambda:us-east-1:000000000000:function:localstack-lambda-container-image", "Role": "arn:aws:iam::000000000000:role/lambda-role", "Handler": "handler.handler", "CodeSize": 0, "Description": "", "Timeout": 3, "MemorySize": 128, "LastModified": <timestamp>, "CodeSha256": "9be73524cd5aa70fbcee3fc8d7aac4eb7e2a644e9ef2b13031719077a65c0031", "Version": "$LATEST", "TracingConfig": { "Mode": "PassThrough" }, "RevisionId": "cab4268c-2d56-4591-821a-9154e157b984", "State": "Pending", "StateReason": "The function is being created.", "StateReasonCode": "Creating", "PackageType": "Image", "Architectures": [ "x86_64" ], "EphemeralStorage": { "Size": 512 }, "SnapStart": { "ApplyOn": "None", "OptimizationStatus": "Off" }}The command provided includes several flags to create the Lambda function. Here’s an explanation of each flag:
ImageUri: Specifies the image URI of the container image you pushed to the ECR repository (localhost.localstack.cloud:4510/localstack-lambda-container-imagein this case. Use the returnrepositoryUrifrom the create-repository command).package-type: Sets the package type to Image to indicate that the Lambda function will be created using a container image.function-name: Specifies the name of the Lambda function you want to create.runtime: Defines the runtime environment for the Lambda function. In this case, it’s specified as provided, indicating that the container image will provide the runtime.role: Sets the IAM role ARN that the Lambda function should assume. In the example, a mock role ARN is used. For an actual role, please refer to the IAM documentation.
Testing the application
Section titled “Testing the application”To invoke the Lambda function, you can use the invoke command:
awslocal lambda invoke --function-name localstack-lambda-container-image /tmp/lambda.out{ "StatusCode": 200, "ExecutedVersion": "$LATEST"}The command above will execute the Lambda function locally within the LocalStack environment. The response will include the StatusCode and ExecutedVersion. You can find the logs of the Lambda invocation in the Lambda container output:
Hello from LocalStack Lambda container image!Conclusion
Section titled “Conclusion”In conclusion, the Lambda container image support enables you to use Docker to package your custom code and dependencies for Lambda functions. With the help of LocalStack, you can seamlessly package, deploy, and invoke Lambda functions locally. It empowers you to develop, debug, and test your Lambda functions with a wide range of AWS services. For more advanced usage patterns, you can explore features like Lambda Hot Reloading and Lambda Debugging.
To further explore and experiment with the concepts covered in this tutorial, you can access the code and accompanying Makefile on our localstack-pro-samples repository on GitHub.