Creating reproducible machine learning applications using Cloud Pods for persistent state snapshots
Introduction
Section titled “Introduction”LocalStack Cloud Pods enable you to create persistent state snapshots of your LocalStack instance, which can then be versioned, shared, and restored. It allows next-generation state management and team collaboration for your local cloud development environment, which you can utilize to create persistent shareable cloud sandboxes. Cloud Pods works directly with the LocalStack CLI to save, merge, and restore snapshots of your LocalStack state. You can always tear down your LocalStack instance and restore it from a snapshot at any point in time.
Cloud Pods is supported in LocalStack Team. With LocalStack Team, you can utilize the Cloud Pods CLI that allows you to inspect your Cloud Pods, version them using tags, and push them to the LocalStack platform for storage and collaboration.
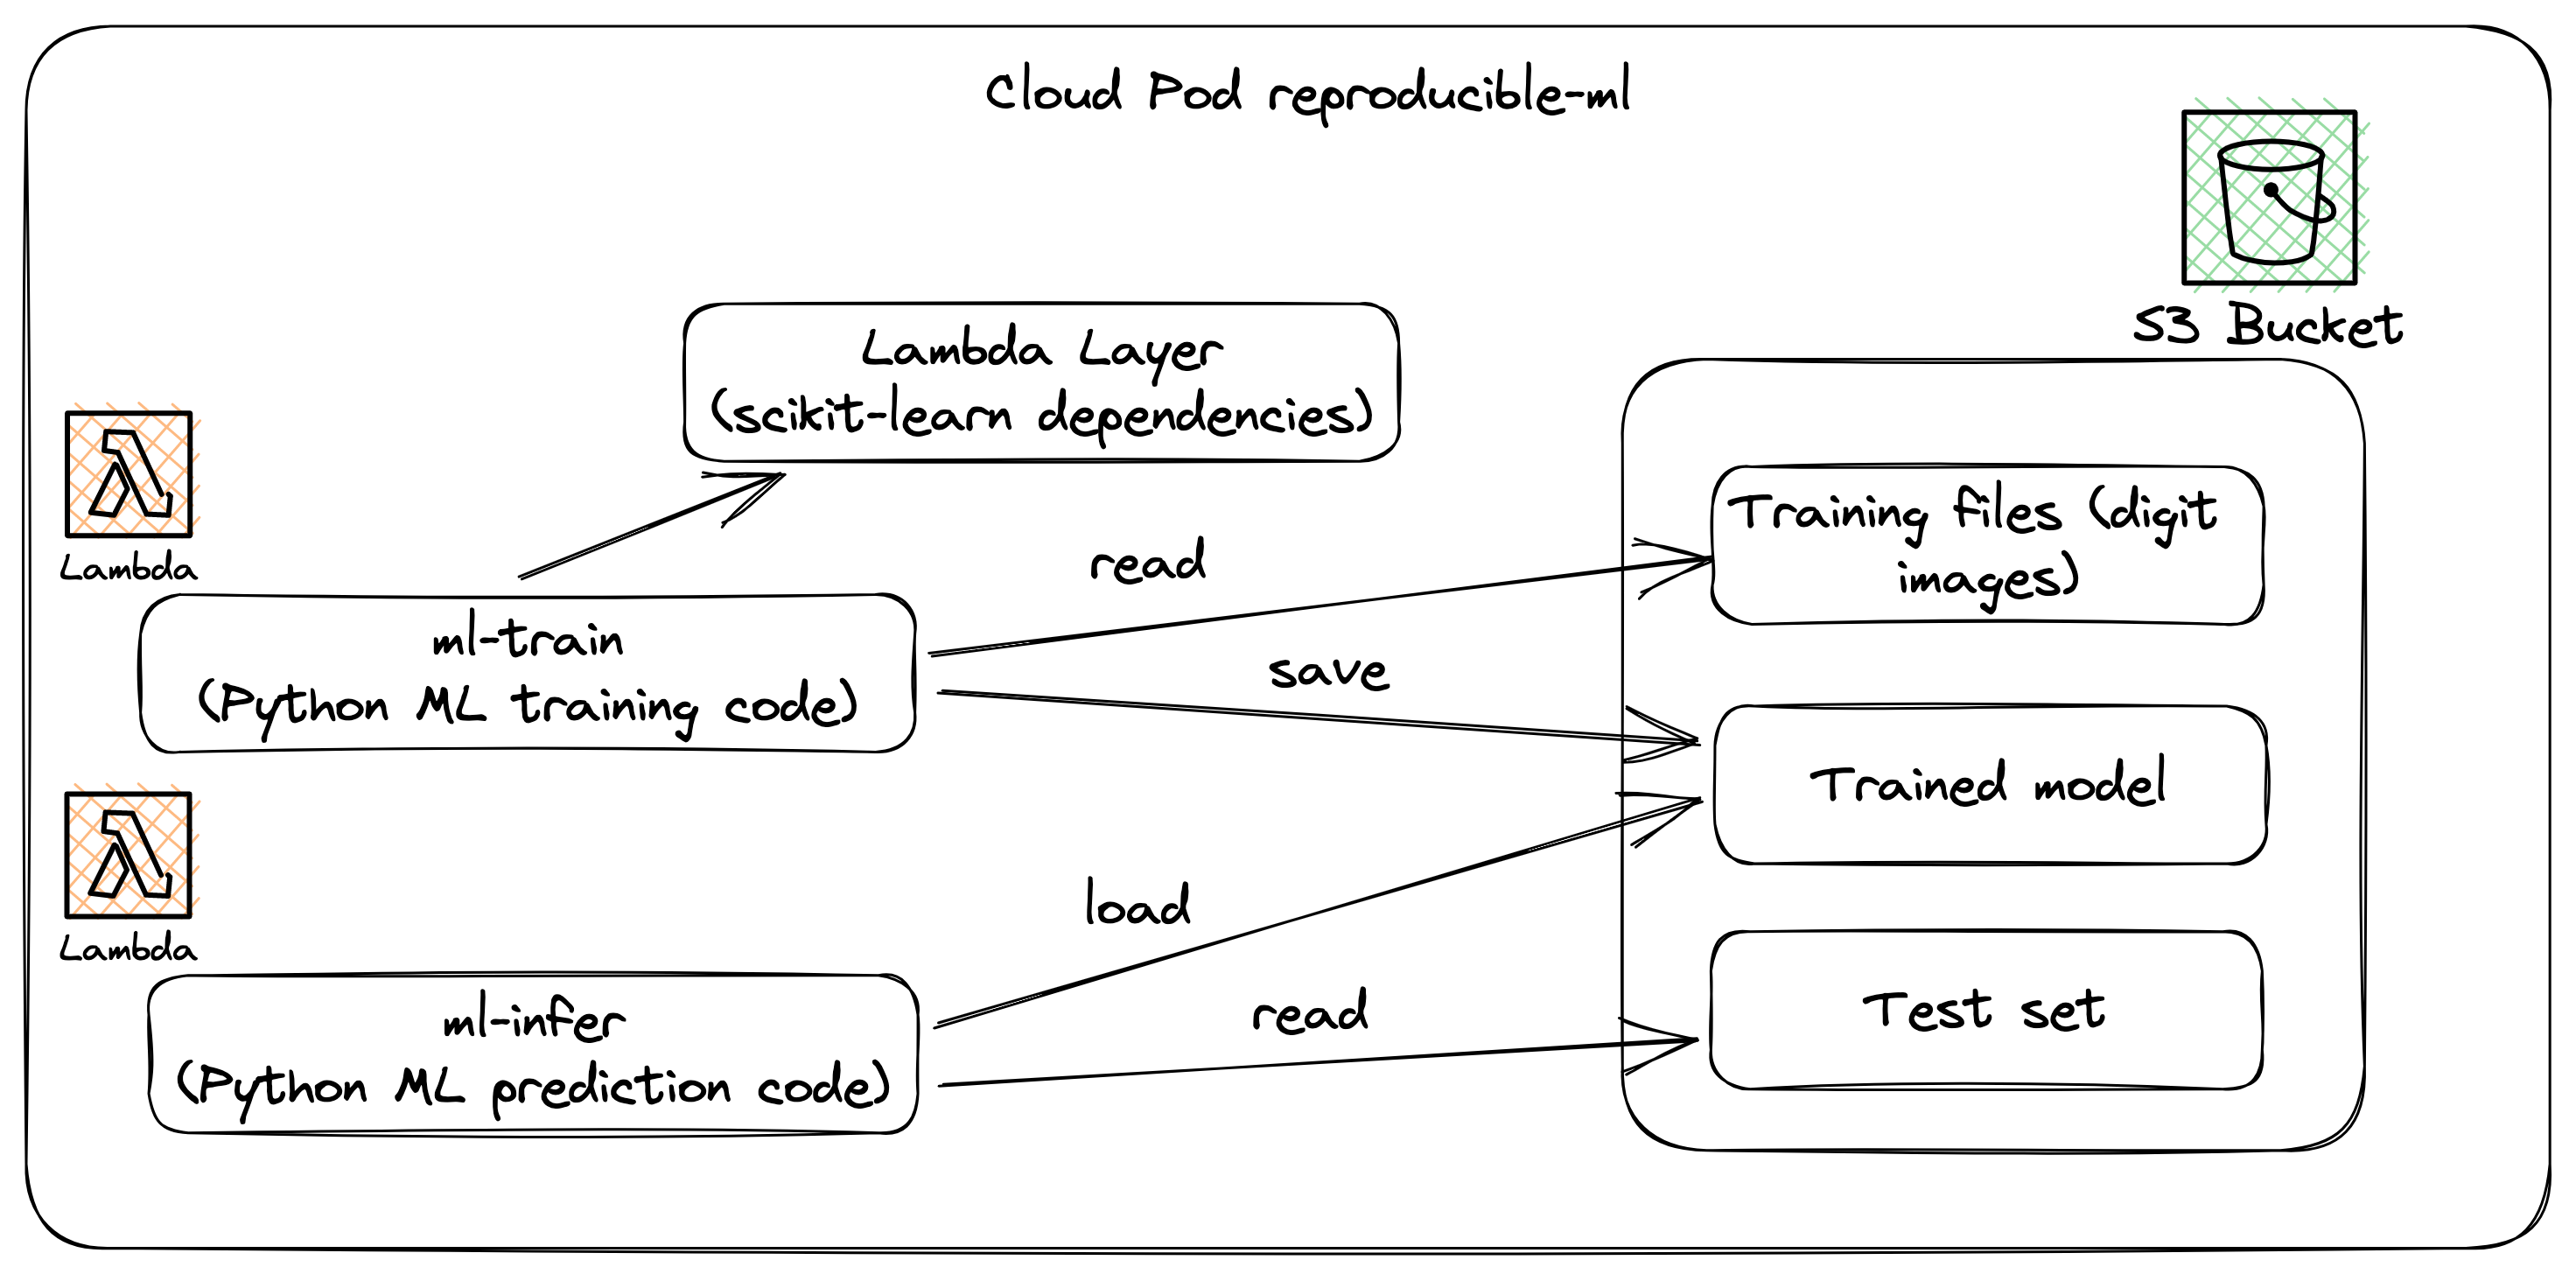
In this tutorial, we will use LocalStack for AWS to train a simple machine-learning model that recognizes handwritten digits on an image. We will rely on Cloud Pods to create a reproducible sample by using:
- S3 to create a bucket to host our training data
- Lambda to create a function to train and save the model to an S3 bucket
- Lambda layer to host the dependencies for our training code
- Lambda to create a secondary function to download and run some predictions with the saved model
We will then create a Cloud Pod to save the state of our LocalStack instance and restore it from the Cloud Pod to share it with our team.
Prerequisites
Section titled “Prerequisites”For this tutorial, you will need the following:
If you don’t have a subscription to LocalStack for AWS, you can request a trial license upon sign-up. For this tutorial to work, you must have the LocalStack CLI installed, which must be version 1.3 or higher. The Cloud Pods CLI is shipped with the LocalStack CLI, so you don’t need to install it separately.
Training the machine learning model
Section titled “Training the machine learning model”We will use the Optical Recognition of Handwritten Digits Data Set to train a simple machine-learning model to recognise handwritten texts. It contains images of individual digits, represented as arrays of pixel values, along with their corresponding labels, indicating the correct digit that each image represents. You can download the dataset from UCI’s Machine Learning Repository (linked above) or from our samples repository. To train our model, we will upload our dataset on a local S3 bucket and use a Lambda function to train the model.
Create a new file named train.py and import the required libraries:
import osimport boto3import numpyfrom sklearn import datasets, svm, metricsfrom sklearn.utils import Bunchfrom sklearn.model_selection import train_test_splitfrom joblib import dump, loadimport ioWe will now create a separate function named load_digits to load the dataset from the S3 bucket and return it as a Bunch object.
The Bunch object is a container object that allows us to access the dataset’s attributes as dictionary keys.
It is similar to a Python dictionary but provides attribute-style access and can be used to store the dataset and its attributes.
def load_digits(*, n_class=10, return_X_y=False, as_frame=False):    # download files from S3    s3_client = boto3.client("s3")    s3_client.download_file(Bucket="reproducible-ml", Key="digits.csv.gz", Filename="/tmp/digits.csv.gz")
    data = numpy.loadtxt('/tmp/digits.csv.gz', delimiter=',')    target = data[:, -1].astype(numpy.int, copy=False)    flat_data = data[:, :-1]    images = flat_data.view()    images.shape = (-1, 8, 8)
    if n_class < 10:        idx = target < n_class        flat_data, target = flat_data[idx], target[idx]        images = images[idx]
    feature_names = ['pixel_{}_{}'.format(row_idx, col_idx)                     for row_idx in range(8)                     for col_idx in range(8)]
    frame = None    target_columns = ['target', ]    if as_frame:        frame, flat_data, target = datasets._convert_data_dataframe(            "load_digits", flat_data, target, feature_names, target_columns)
    if return_X_y:        return flat_data, target
    return Bunch(data=flat_data,                 target=target,                 frame=frame,                 feature_names=feature_names,                 target_names=numpy.arange(10),                 images=images)
The above code uses the boto3 library to download the data file from an S3 bucket.
The file is then loaded into a NumPy array using the numpy.loadtxt function, and the target values (i.e. the labels corresponding to each image) are extracted from the last column of the array.
The images are then reshaped into 2-dimensional arrays, and the function has been configured to return only a subset of the available classes by filtering the target values.
Finally, the function returns an object containing the data, target values, and metadata.
Let us now define a handler function that would be executed by the Lambda every time a trigger event occurs.
In this case, we would like to use the above function to load the dataset and train a model using the Support Vector Machine (SVM) algorithm.
def handler(event, context):
    digits = load_digits()
    # flatten the images    n_samples = len(digits.images)    data = digits.images.reshape((n_samples, -1))
    # Create a classifier: a support vector classifier    clf = svm.SVC(gamma=0.001)
    # Split data into 50% train and 50% test subsets    X_train, X_test, y_train, y_test = train_test_split(        data, digits.target, test_size=0.5, shuffle=False    )
    # Learn the digits on the train subset    clf.fit(X_train, y_train)
    # Dump the trained model to S3    s3_client = boto3.client("s3")    buffer = io.BytesIO()    dump(clf, buffer)    s3_client.put_object(Body=buffer.getvalue(), Bucket="reproducible-ml", Key="model.joblib")
    # Save the test-set to the S3 bucket    numpy.save('/tmp/test-set.npy', X_test)    with open('/tmp/test-set.npy', 'rb') as f:        s3_client.put_object(Body=f, Bucket="reproducible-ml", Key="test-set.npy")
First, we loaded the images and flattened them into 1-dimensional arrays.
Then, we created a training and a test set using the train_test_split function from the sklearn.model_selection module.
We trained an SVM classifier on the training set using the fit method.
Finally, we uploaded the trained model, together with the test set, to an S3 bucket for later usage.
Perform predictions with the model
Section titled “Perform predictions with the model”Now, we will create a new file called infer.py which will contain a second handler function.
This function will be used to perform predictions on new data with the model we trained previously.
import boto3import numpyfrom joblib import load
def handler(event, context):    # download the model and the test set from S3    s3_client = boto3.client("s3")    s3_client.download_file(Bucket="reproducible-ml", Key="test-set.npy", Filename="/tmp/test-set.npy")    s3_client.download_file(Bucket="reproducible-ml", Key="model.joblib", Filename="/tmp/model.joblib")
    with open("/tmp/test-set.npy", "rb") as f:        X_test = numpy.load(f)
    clf = load("/tmp/model.joblib")
    predicted = clf.predict(X_test)    print("--> prediction result:", predicted)
To perform inference on the test set, we will download both the trained SVN model and the test set that we previously uploaded to the S3 bucket. Using these resources, we will predict the values of the digits in the test set.
Deploying the Lambda functions
Section titled “Deploying the Lambda functions”Before creating our Lambda functions, let us start LocalStack to use emulated S3 and Lambda services to deploy and train our model. Let’s start LocalStack:
DEBUG=1 LOCALSTACK_AUTH_TOKEN=<your-auth-token> localstack start -dWe have specified DEBUG=1 to get the printed LocalStack logs from our Lambda invocation in the console.
We can now create an S3 bucket to upload our Lambda functions and the dataset:
zip lambda.zip train.pyzip infer.zip infer.pyawslocal s3 mb s3://reproducible-mlawslocal s3 cp lambda.zip s3://reproducible-ml/lambda.zipawslocal s3 cp infer.zip s3://reproducible-ml/infer.zipawslocal s3 cp digits.csv.gz s3://reproducible-ml/digits.csv.gzIn the above commands, we first create two zip files for our Lambda functions: lambda.zip and infer.zip.
These zip files contain the code for training the machine learning model and do predictions with it, respectively.
Next, we create an S3 bucket called reproducible-ml and upload the zip files and the dataset to it.
Finally, we use the awslocal CLI to create the two Lambda functions
awslocal lambda create-function --function-name ml-train \ --runtime python3.8 \ --role arn:aws:iam::000000000000:role/lambda-role \ --handler train.handler \ --timeout 600 \ --code '{"S3Bucket":"reproducible-ml","S3Key":"lambda.zip"}' \ --layers arn:aws:lambda:us-east-1:446751924810:layer:python-3-8-scikit-learn-0-23-1:2awslocal lambda create-function --function-name ml-predict \ --runtime python3.8 \ --role arn:aws:iam::000000000000:role/lambda-role \ --handler infer.handler \ --timeout 600 \ --code '{"S3Bucket":"reproducible-ml","S3Key":"infer.zip"}' \ --layers arn:aws:lambda:us-east-1:446751924810:layer:python-3-8-scikit-learn-0-23-1:2For each function, we provide the function name, runtime (python3.8), handler function (train.handler and infer.handler, respectively), and the location of the zip files in the S3 bucket.
We have also specified the python-3-8-scikit-learn-0-23-1 layer to be used by the Lambda function.
This layer includes the scikit-learn library and its dependencies.
We can now invoke the first Lambda function using the awslocal CLI:
awslocal lambda invoke --function-name ml-train /tmp/test.tmpThe first Lambda function will train the model and upload it to the S3 bucket. Finally, we can invoke the second Lambda function to do predictions with the model.
awslocal lambda invoke --function-name ml-predict /tmp/test.tmpThe logs of the Lambda invocation should be visible in the LocalStack container output (with DEBUG=1 enabled):
null>START RequestId: 65dc894d-25e0-168e-dea1-a3e8bfdb563b Version: $LATEST> --> prediction result: [8 8 4 9 0 8 9 8 1 2 3 4 5 6 7 8 9 0 1 2 3 4 5 6 7 8 9 0 1 2 3 4 9 6 7 8 9......> 9 5 4 8 8 4 9 0 8 9 8]> END RequestId: 6...Creating a Cloud Pod
Section titled “Creating a Cloud Pod”After deploying the Lambda functions, we can create a Cloud Pod to share our local infrastructure and instance state with other LocalStack users in the organization.
To save the current state of our LocalStack instance, we can use the save command:
localstack pod save reproducible-mlCloud Pod reproducible-ml successfully createdTo list available the Cloud Pods you can use the list command:
localstack pod list┏━━━━━━━━━━━━━━┳━━━━━━━━━━━━━━━━━┓┃ local/remote ┃ Name ┃┡━━━━━━━━━━━━━━╇━━━━━━━━━━━━━━━━━┩│ local+remote │ reproducible-ml │└──────────────┴─────────────────┘You can also inspect the contents of a Cloud Pod using the inspect command:
localstack pod inspect reproducible-mlWhile you save a Cloud Pod, it is automatically published on the LocalStack platform and can be shared with other users in your organization. While saving an already existing Cloud Pod, we would create a new version, which is eventually uploaded to the LocalStack platform.
You can also attach an optional message and a list of services to a Cloud Pod using the --message and --services flags.
You can check all the Cloud Pods in your organization over the LocalStack Web Application.
Now that we have created a Cloud Pod, we can ask one of our team members to start LocalStack and load the Cloud Pod using the load command.
localstack pod load reproducible-mlThe load command will retrieve the content of our Cloud Pod named reproducible-ml from the LocalStack platform and inject it into our running LocalStack instance.
Upon successfully loading the Cloud Pod, the Lambda function can be invoked again, and the log output should be the same as before.
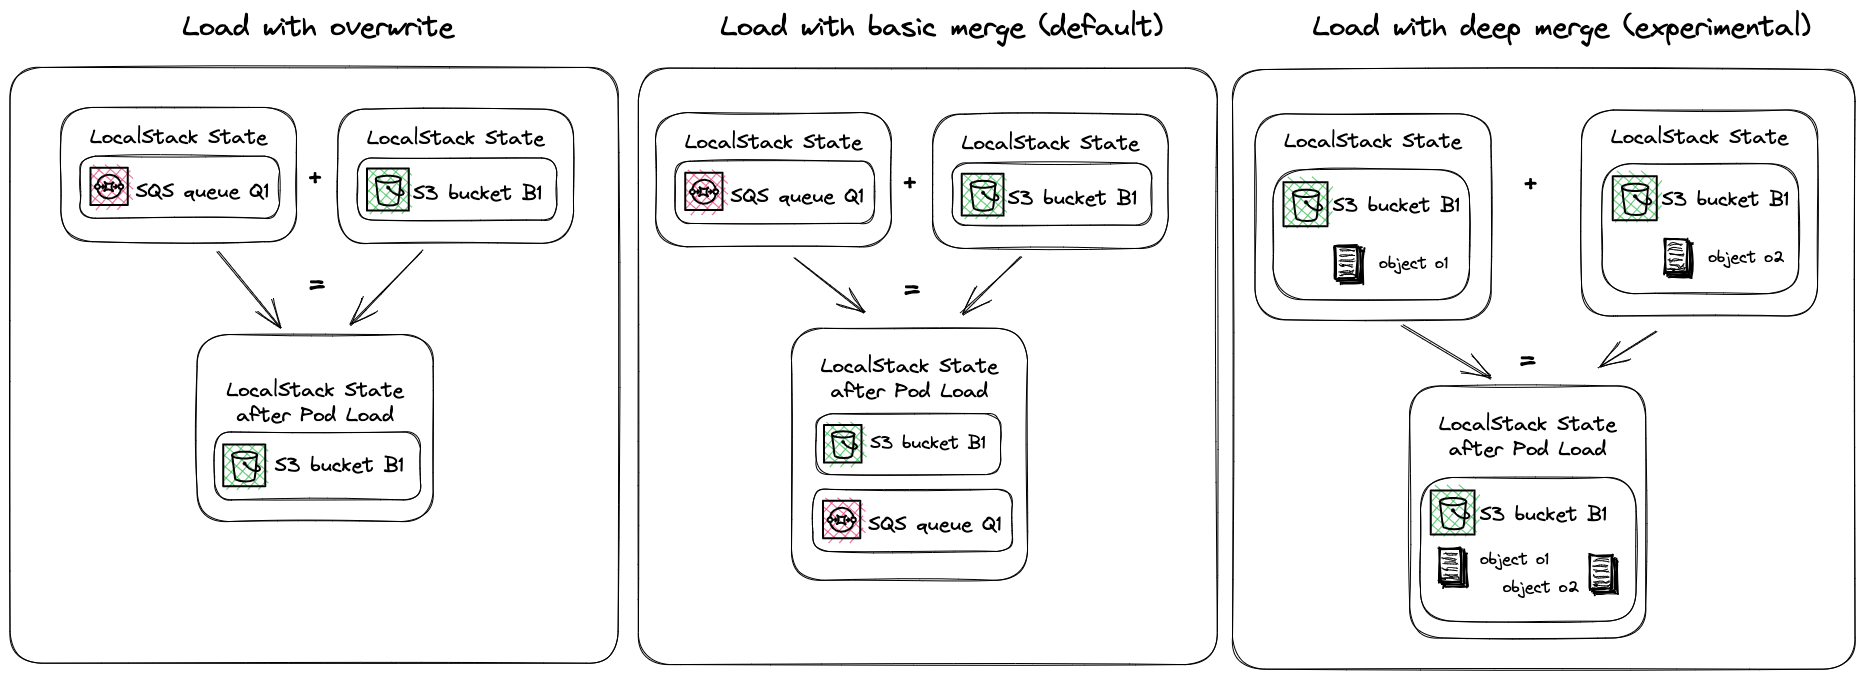
LocalStack Cloud Pods also feature different merge strategies to merge the state of a Cloud Pod with the current LocalStack instance.
You can use the --merge flag to specify the merge strategy.
The available merge strategies are:
- Load with overwrite: This is the default merge strategy. It will load the state of the Cloud Pod into the current LocalStack instance and overwrite the existing state.
- Load with basic merge: This merge strategy will load the state of the Cloud Pod into the current LocalStack instance and merge the existing state with the state of the Cloud Pod.
- Load with deep merge: This merge strategy will load the state of the Cloud Pod into the current LocalStack instance and merge the existing state with the state of the Cloud Pod. It will also merge the existing state with the state of the Cloud Pod recursively.
Testing the Application
Section titled “Testing the Application”After deploying and invoking the Lambdas, first verify the end-to-end ML workflow via the data loading, training, and inference. After successfully running the application and saving a Cloud Pod, re-running the application after Pod restore should yield identical results.
Expected Outputs from Training
Section titled “Expected Outputs from Training”Invoke ml-train with: awslocal lambda invoke --function-name ml-train /tmp/test.tmp
- Logs show dataset load (1797 samples), training on 50% split, and S3 uploads for
model.joblibandtest-set.npy. - No explicit accuracy during training (focus is on savings), but the SVM classifier fits successfully.
Expected Outputs from Inference (ml-predict Invocation)
Section titled “Expected Outputs from Inference (ml-predict Invocation)”Invoke ml-predict with: awslocal lambda invoke --function-name ml-predict /tmp/test.tmp
- Downloads model and test set from S3.
- Runs predictions on the test set (898 samples).
- Sample prediction result (first 20):
[8 8 4 9 0 8 9 8 1 2 3 4 5 6 7 8 9 0 1 2] - Expected accuracy: ~96.9% (calculated as
accuracy_score(y_test, predicted)—e.g., 870/898 correct). Full logs in LocalStack output (withDEBUG=1): –> prediction result: [8 8 4 9 0 8 9 8 1 2 3 4 5 6 7 8 9 0 1 2 3 4 5 6 7 8 9 0 1 2 3 4 9 6 7 8 9 … 9 5 4 8 8 4 9 0 8 9 8]
To compute accuracy locally (optional extension): Add to infer.py after predictions:
from sklearn.metrics import accuracy_score# Assuming y_test saved similarlyy_test = np.load('y-test.npy') # You'd need to save this during trainingaccuracy = accuracy_score(y_test, predicted)print(f"Model accuracy: {accuracy:.4f}")Expected Model accuracy: 0.9689
Validation After Pod Restore
Section titled “Validation After Pod Restore”- Save Pod:
localstack pod save reproducible-ml - (In a new instance) Load:
localstack pod load reproducible-ml - Re-invoke
ml-predict: Outputs should match exactly, proving state persistence (S3 objects, Lambdas intact).
If a mismatch occurs, check the Pod’s merge strategy (default: overwrite) or logs for S3/Lambda errors.
Conclusion
Section titled “Conclusion”In conclusion, LocalStack Cloud Pods facilitate collaboration and debugging among team members by allowing the sharing of local cloud infrastructure and instance state. These Cloud Pods can be used to create reproducible environments for various purposes, including machine learning. By using Cloud Pods, teams can work together to create a reproducible environment for their application and share it with other team members. Additionally, Cloud Pods can be used to pre-seed continuous integration (CI) pipelines with the necessary instance state to bootstrap testing environments or to troubleshoot failures in the CI pipeline.
For more information about LocalStack Cloud Pods, refer to the documentation provided.
The code for this tutorial, including a Makefile to execute it step-by-step, is available in the localstack-pro-samples repository on GitHub on GitHub.