Host a static website locally using Simple Storage Service (S3) and Terraform with LocalStack
Introduction
Section titled “Introduction”AWS Simple Storage Service (S3) is a proprietary object storage solution that can store an unlimited number of objects for many use cases. S3 is a highly scalable, durable and reliable service that we can use for any use case involving file-based storage: hosting a static site, handling big data analytics, managing application logs, storing web assets and much more!
With S3, objects are stored in buckets. A bucket is effectively a directory, while an object is a file. Every object (file) stores the name of the file (key), the contents (value), a version ID and the associated metadata. You can also use S3 to host to server static content as a static website. The static content might include HTML, CSS, JavaScript, images, and other assets that make up your website.
LocalStack supports the S3 API, which means you can use the same API calls to interact with S3 in LocalStack as you would with AWS. Using LocalStack, you can create and manage S3 buckets and objects locally, use AWS SDKs and third-party integrations to work with S3, and test your applications without making any significant alterations. LocalStack also supports the creation of S3 buckets with static website hosting enabled.
In this tutorial, we will deploy a static website using an S3 bucket over a locally emulated AWS infrastructure on LocalStack.
We will use Terraform to automate the creation & management of AWS resources by declaring them in the HashiCorp Configuration Language (HCL).
We will also learn about tflocal, a CLI wrapper created by LocalStack, that allows you to run Terraform locally against LocalStack.
Prerequisites
Section titled “Prerequisites”For this tutorial, you will need:
Architecture
Section titled “Architecture”The following diagram illustrates the architecture of the static website hosting setup using S3 and Terraform:
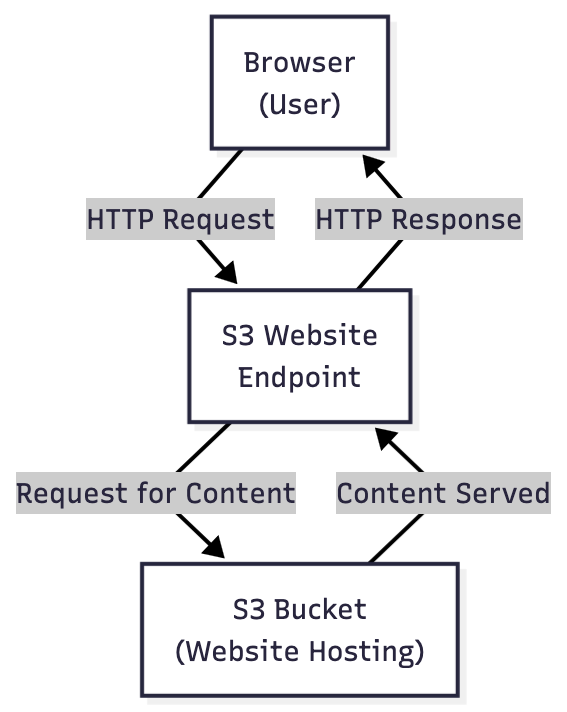
In this architecture:
- A browser makes an HTTP request to the S3 website endpoint
- LocalStack’s S3 service serves the static content from the configured bucket
- The bucket contains HTML files and optional assets
- Terraform provisions and configures all resources locally
Creating a static website
Section titled “Creating a static website”We will create a simple static website using plain HTML to get started.
To create a static website deployed over S3, we need to create an index document and a custom error document.
We will name our index document index.html and our error document error.html.
Let’s create a directory named s3-static-website-localstack where we’ll store our project files, with a www/ subdirectory that holds the website content:
mkdir -p s3-static-website-localstack/wwwcd s3-static-website-localstackInside www/, create an index.html file with the following content:
<!DOCTYPE html><html lang="en"> <head> <meta http-equiv="Content-Type" content="text/html" /> <meta charset="utf-8" /> <title>Static Website</title> </head> <body> <p>Static Website deployed locally over S3 using LocalStack</p> </body></html>S3 will serve this file when a user visits the root URL of your static website, serving as the default page.
In a similar fashion, you can configure a custom error document that contains a user-friendly error message.
Create a file named error.html next to index.html inside www/ and add the following code:
<!DOCTYPE html><html lang="en"> <head> <meta charset="utf-8"> <title>404</title> </head> <body> <p>Something is amiss.</p> </body></html>S3 will return the above file content only for HTTP 4XX error codes.
Some browsers might choose to display their custom error message if a user tries to access a resource that does not exist.
In this case, browsers might ignore the above error document.
With the initial setup complete, we can now move on to creating a static website using S3 via awslocal, LocalStack’s wrapper for the AWS CLI.
Hosting a static website using S3
Section titled “Hosting a static website using S3”To create a static website using S3, we need to create a bucket, enable static website hosting, and upload the files to the bucket.
We will use the awslocal CLI for these operations.
Navigate to the root directory of the project and create a bucket named testwebsite using LocalStack’s S3 API:
awslocal s3api create-bucket --bucket testwebsiteWith the bucket created, we can now attach a policy to it to allow public access and its contents.
Let’s create a file named bucket_policy.json in the project root (next to the www/ folder) and add the following code:
{ "Version": "2012-10-17", "Statement": [ { "Sid": "PublicReadGetObject", "Effect": "Allow", "Principal": "*", "Action": "s3:GetObject", "Resource": "arn:aws:s3:::testwebsite/*" } ]}Let’s now attach the policy to the bucket:
awslocal s3api put-bucket-policy --bucket testwebsite --policy file://bucket_policy.jsonWith the policy attached, we can now sync the contents of our www/ directory to the bucket:
awslocal s3 sync ./www/ s3://testwebsiteWe’ll now enable static website hosting on the bucket and configure the index and error documents:
awslocal s3 website s3://testwebsite/ --index-document index.html --error-document error.htmlIf you are deploying a static website using S3 on real AWS cloud, your S3 website endpoint will follow one of these two formats:
http://<BUCKET_NAME>.s3-website-<REGION>.amazonaws.comhttp://<BUCKET_NAME>.s3-website.<REGION>.amazonaws.com
In LocalStack, the S3 website endpoint follows the following format: http://<BUCKET_NAME>.s3-website.localhost.localstack.cloud:4566.
You can navigate to http://testwebsite.s3-website.localhost.localstack.cloud:4566/ to view your static website.
Orchestrating infrastructure using Terraform
Section titled “Orchestrating infrastructure using Terraform”You can automate the above process by orchestrating your AWS infrastructure using Terraform. Terraform is an infrastructure as code (IaC) tool that allows you to create, manage, and version your infrastructure. Terraform uses a declarative configuration language called HashiCorp Configuration Language (HCL) to describe your infrastructure.
Before that, we would need to manually configure the local service endpoints and credentials for Terraform to integrate with LocalStack.
We will use the AWS Provider for Terraform to interact with the many resources supported by AWS in LocalStack.
Create a new file named provider.tf and specify mock credentials for the AWS provider:
provider "aws" { region = "us-east-1" access_key = "fake" secret_key = "fake"}We would also need to avoid issues with routing and authentication (as we do not need it).
Therefore we need to supply some general parameters.
Additionally, we have to point the individual services to LocalStack.
We can do this by specifying the endpoints parameter for each service that we intend to use.
Our provider.tf file should look like this:
provider "aws" { access_key = "test" secret_key = "test" region = "us-east-1"
# only required for non virtual hosted-style endpoint use case. # https://registry.terraform.io/providers/hashicorp/aws/latest/docs#s3_use_path_style s3_use_path_style = false skip_credentials_validation = true skip_metadata_api_check = true
endpoints { s3 = "http://s3.localhost.localstack.cloud:4566" s3control = "http://localhost.localstack.cloud:4566" }}With the provider configured, we can now configure the variables for our S3 bucket.
Create a new file named variables.tf and add the following code:
variable "bucket_name" { description = "Name of the s3 bucket. Must be unique." type = string}
variable "tags" { description = "Tags to set on the bucket." type = map(string) default = {}}We take a user input for the bucket name and tags.
Next, we will define the output variables for our Terraform configuration.
Create a new file named outputs.tf and add the following code:
output "arn" { description = "ARN of the bucket" value = aws_s3_bucket.s3_bucket.arn}
output "name" { description = "Name (id) of the bucket" value = aws_s3_bucket.s3_bucket.id}
output "domain" { description = "Domain name of the bucket" value = "s3-website.localhost.localstack.cloud:4566"}
output "website_endpoint" { description = "Website endpoint URL" value = "http://${aws_s3_bucket.s3_bucket.id}.s3-website.localhost.localstack.cloud:4566"}The output variables are the ARN, name, LocalStack S3 website domain, and the full website endpoint URL of the bucket.
We hardcode the domain and website_endpoint values to point at LocalStack so that the outputs surface a URL you can open directly.
The native aws_s3_bucket_website_configuration attributes return the AWS-formatted endpoint (<bucket>.s3-website-<region>.amazonaws.com), which would be misleading in a LocalStack-only setup.
With all the configuration files in place, we can now create the S3 bucket.
Create a new file named main.tf and create the S3 bucket using the following code:
resource "aws_s3_bucket" "s3_bucket" { bucket = var.bucket_name tags = var.tags}To configure the static website hosting, we will use the aws_s3_bucket_website_configuration resource.
Add the following code to the main.tf file:
resource "aws_s3_bucket_website_configuration" "s3_bucket" { bucket = aws_s3_bucket.s3_bucket.id
index_document { suffix = "index.html" }
error_document { key = "error.html" }
}To set the bucket policy, we will use the aws_s3_bucket_policy resource.
Add the following code to the main.tf file:
resource "aws_s3_bucket_acl" "s3_bucket" { bucket = aws_s3_bucket.s3_bucket.id acl = "public-read"}
resource "aws_s3_bucket_policy" "s3_bucket" { bucket = aws_s3_bucket.s3_bucket.id
policy = jsonencode({ Version = "2012-10-17" Statement = [ { Sid = "PublicReadGetObject" Effect = "Allow" Principal = "*" Action = "s3:GetObject" Resource = [ aws_s3_bucket.s3_bucket.arn, "${aws_s3_bucket.s3_bucket.arn}/*", ] }, ] })}In the above code, we are setting the ACL of the bucket to public-read and setting the bucket policy to allow public access to the bucket.
Pick up an appropriate policy based on your use case.
Let’s use the aws_s3_object resource to upload the files to the bucket.
Add the following code to the main.tf file:
resource "aws_s3_object" "object_www" { depends_on = [aws_s3_bucket.s3_bucket] for_each = fileset("${path.root}", "www/*.html") bucket = var.bucket_name key = basename(each.value) source = each.value etag = filemd5("${each.value}") content_type = "text/html" acl = "public-read"}The above code uploads every .html file under www/ to the bucket and sets each object’s ACL to public-read.
With all the configuration files in place, we can now initialize the Terraform configuration.
Run the following command to initialize the Terraform configuration:
terraform init
...Terraform has been successfully initialized!...
We can create an execution plan based on our Terraform configuration for the AWS resources. Run the following command to create an execution plan:
terraform planFinally, we can apply the Terraform configuration to create the AWS resources. Run the following command to apply the Terraform configuration:
terraform apply
var.bucket_name  Name of the s3 bucket.Must be unique.
  Enter a value: testwebsite...arn = "arn:aws:s3:::testwebsite"domain = "s3-website.localhost.localstack.cloud:4566"name = "testwebsite"website_endpoint = "http://testwebsite.s3-website.localhost.localstack.cloud:4566"
In the above command, we specified testwebsite as the bucket name to keep it consistent with the awslocal flow above and the testing commands further down.
You can specify any bucket name since LocalStack is ephemeral, and stopping your LocalStack container will delete all the created resources.
The above command output includes the ARN, name, LocalStack website domain, and the website endpoint URL of the bucket.
You can navigate directly to the printed website_endpoint to view your site, since the endpoint uses localhost.localstack.cloud, no real AWS resources have been created.
You can optionally use the tflocal CLI as a drop-in replacement for the official Terraform CLI. tflocal uses the Terraform Override mechanism to create a temporary localstack_providers_override.tf file, which is deleted after the infrastructure is created.
It mitigates the need to create the provider.tf file manually.
You can use tflocal to create the infrastructure by running the following commands:
tflocal inittflocal plantflocal applyTesting the application
Section titled “Testing the application”After deploying your static website, it’s important to verify that everything is working correctly. Here are several ways to test your S3-hosted static website:
Accessing the website
Section titled “Accessing the website”Navigate to the LocalStack S3 website endpoint in your browser:
http://testwebsite.s3-website.localhost.localstack.cloud:4566/You should see your index.html content displayed, which in our case shows: “Static Website deployed locally over S3 using LocalStack”.
Testing with curl
Section titled “Testing with curl”You can also test the website using curl from your terminal:
curl http://testwebsite.s3-website.localhost.localstack.cloud:4566/This should return the HTML content of your index.html file.
Verifying the error page
Section titled “Verifying the error page”To test the custom error document, try accessing a non-existent page:
curl http://testwebsite.s3-website.localhost.localstack.cloud:4566/nonexistent.htmlYou should receive the content from your error.html file: “Something is amiss.” with an appropriate HTTP 4XX status code.
Checking bucket configuration
Section titled “Checking bucket configuration”You can verify the bucket’s website configuration using awslocal:
awslocal s3api get-bucket-website --bucket testwebsiteThis command should return the index and error document configuration for your bucket.
Listing bucket contents
Section titled “Listing bucket contents”To confirm all your files were uploaded correctly:
awslocal s3 ls s3://testwebsite/This will display all the files in your bucket, including index.html, error.html, and any additional assets.
Conclusion
Section titled “Conclusion”In this tutorial, we have seen how to use LocalStack to create an S3 bucket and configure it to serve a static website. We have also seen how you can use Terraform to provision AWS infrastructure in an emulated local environment using LocalStack. You can use the LocalStack App to view the created buckets and files on the LocalStack Resource dashboard for S3 and upload more files or perform other operations on the bucket. Using LocalStack, you can perform various operations using emulated S3 buckets and other AWS services without creating any real AWS resources.
The code for this tutorial can be found in our LocalStack Terraform samples over GitHub.
Please make sure to adjust the paths for the HTML files in main.tf.
Further documentation for S3 is available on our S3 documentation.