Relational Database Service (RDS)
Introduction
Section titled “Introduction”Relational Database Service (RDS) is a managed database service provided by Amazon Web Services (AWS) that allows users to setup, operate, and scale relational databases in the cloud. RDS allows you to deploy and manage various relational database engines like MySQL, PostgreSQL, MariaDB, and Microsoft SQL Server. RDS handles routine database tasks such as provisioning, patching, backup, recovery, and scaling.
LocalStack allows you to use the RDS APIs in your local environment to create and manage RDS clusters and instances for testing & integration purposes. The supported APIs are available on the API coverage section for RDS and RDS Data, which provides information on the extent of RDS’s integration with LocalStack.
Getting started
Section titled “Getting started”This guide is designed for users new to RDS and assumes basic knowledge of the AWS CLI and our awslocal wrapper script.
Start your LocalStack container using your preferred method. We will demonstrate the following with the AWS CLI:
- Creating an RDS cluster.
- Generating a
SecretsManagersecret containing the database password. - Executing a basic
SELECT 123 querythrough the RDS Data API.
LocalStack’s RDS implementation also supports the RDS Data API, which allows executing data queries against RDS clusters over a JSON/REST interface.
Create an RDS cluster
Section titled “Create an RDS cluster”To create an RDS cluster, you can use the CreateDBCluster API.
The following command creates a new cluster with the name db1 and the engine aurora-postgresql.
Instances for the cluster must be added manually.
awslocal rds create-db-cluster \ --db-cluster-identifier db1 \ --engine aurora-postgresql \ --database-name test \ --master-username myuser \ --master-user-password mypassword{ "DBCluster": { ... "Endpoint": "localhost", "Port": 4510, # may vary "DBClusterArn": "arn:aws:rds:us-east-1:000000000000:cluster:db1", ... }}To add an instance you can run the following command:
awslocal rds create-db-instance \ --db-instance-identifier db1-instance \ --db-cluster-identifier db1 \ --engine aurora-postgresql \ --db-instance-class db.t3.largeCreate a SecretsManager secret
Section titled “Create a SecretsManager secret”To create a SecretsManager secret, you can use the CreateSecret API.
Before creating the secret, you need to create a JSON file containing the credentials for the database.
The following command creates a file called mycreds.json with the credentials for the database.
cat << 'EOF' > mycreds.json{ "engine": "aurora-postgresql", "username": "myuser", "password": "mypassword", "host": "localhost", "dbname": "test", "port": "4510"}EOFRun the following command to create the secret:
awslocal secretsmanager create-secret \ --name dbpass \ --secret-string file://mycreds.json{ "ARN": "arn:aws:secretsmanager:us-east-1:000000000000:secret:dbpass-cfnAX", "Name": "dbpass", "VersionId": "fffa1f4a-2381-4a2b-a977-4869d59a16c0"}Execute a query
Section titled “Execute a query”To execute a query, you can use the ExecuteStatement API.
Make sure to replace the secret-arn with the ARN from the secret you just created in the previous step, and check that the resource-arn matches the cluster-arn that you have created before.
The following command executes a query against the database.
The query returns the value 123.
awslocal rds-data execute-statement \ --database test \ --resource-arn arn:aws:rds:us-east-1:000000000000:cluster:db1 \ --secret-arn arn:aws:secretsmanager:us-east-1:000000000000:secret:dbpass-cfnAX \ --include-result-metadata --sql 'SELECT 123'{ "columnMetadata": [ { "arrayBaseColumnType": 0, "isAutoIncrement": false, "isCaseSensitive": false, "isCurrency": false, "isSigned": true, "label": "?column?", "name": "?column?", "nullable": 0, "precision": 10, "scale": 0, "schemaName": "", "tableName": "", "type": 4, "typeName": "int4" } ], "numberOfRecordsUpdated": 0, "records": [ [ { "longValue": 123 } ] ]}Alternative clients, such as psql, can also be employed to interact with the database.
You can retrieve the hostname and port of your created instance either from the preceding output or by using the DescribeDbInstances API.
psql -d test -U test -p 4513 -h localhost -WSupported DB engines
Section titled “Supported DB engines”Presently, you can spin up PostgreSQL, MariaDB, MySQL, and MSSQL (SQL Server) databases directly on your local machine, using LocalStack’s RDS implementation.
However, certain configurations of RDS clusters and instances currently offer only CRUD functionality.
For instance, the storage-encrypted flag is returned as configured, but active support for actual storage encryption is not yet available.
PostgreSQL Engine
Section titled “PostgreSQL Engine”When you establish an RDS DB cluster or instance using the postgres/aurora-postgresql DB engine along with a specified EngineVersion, LocalStack will dynamically install and configure the corresponding PostgreSQL version as required.
Presently, you have the option to choose major versions ranging from 13 to 17.
If you select a major version beyond this range, the system will automatically default to version 17.
It’s important to note that the selection of minor versions is not available.
The latest major version will be installed within the Docker environment.
If you wish to prevent the installation of customized versions, adjusting the RDS_PG_CUSTOM_VERSIONS environment variable to 0 will enforce the use of the default PostgreSQL version 17.
Instances and clusters with the PostgreSQL engine have the capability to both create and restore snapshots.
MariaDB Engine
Section titled “MariaDB Engine”MariaDB will be set up as an operating system package within LocalStack. However, currently, the option to choose a particular version is not available. As of now, snapshots are not supported for MariaDB.
MySQL Engine
Section titled “MySQL Engine”A MySQL server will be launched in a new Docker container upon requesting the MySQL engine.
The engine-version will serve as the tag for the Docker image, allowing you to freely select the desired MySQL version from those available on the official MySQL Docker Hub.
If you have a specific image in mind, you can also use the environment variable MYSQL_IMAGE=<my-image:tag>.
It’s essential to understand that the MasterUserPassword you define for the database cluster/instance will be used as the MYSQL_ROOT_PASSWORD environment variable for the root user within the MySQL container.
The user specified in MasterUserName will use the same password and will have complete access to the database.
As of now, snapshots are not supported for MySQL.
Microsoft SQL Server Engine
Section titled “Microsoft SQL Server Engine”To utilize MSSQL databases, it’s necessary to expressly agree to the terms of the Microsoft SQL Server End-User Licensing Agreement (EULA) by configuring MSSQL_ACCEPT_EULA=Y within the LocalStack container environment.
The arm64 architecture is not currently officially supported for MSSQL.
For the MSSQL engine, the database server is initiated in a fresh Docker container using the latest image.
As of now, snapshots are not supported for MSSQL.
Default Usernames and Passwords
Section titled “Default Usernames and Passwords”The following details concern default usernames, passwords, and database names for local RDS clusters created by LocalStack:
- The default values for
master-usernameanddb-nameare both test. For themaster-user-password, the default is test, except for MSSQL databases, which employ Test123! as the default master password. - When setting up a new RDS instance, you have the flexibility to utilize any
master-username, with the exception of postgres. The system will automatically generate the user. - It’s important to remember that the username postgres has special significance, preventing the creation of a new RDS instance under this particular name.
- Using the
db-namepostgres might lead to issues for older versions of LocalStack, please try to avoid using it.
IAM Authentication Support
Section titled “IAM Authentication Support”IAM authentication tokens can be employed to establish connections with RDS.
As of now, this functionality is supported for PostgreSQL within LocalStack.
However, IAM authentication is not yet validated at this stage.
Consequently, any database user assigned the rds_iam role will obtain a valid token, thereby gaining the ability to connect to the database.
In this example, you will be able to verify the IAM authentication process for RDS Postgres:
- Establish a database instance and obtain the corresponding host and port information.
- Connect to the database using the master username and password.
Subsequently, generate a new user and assign the
rds_iamrole as follows:CREATE USER <username> WITH LOGINGRANT rds_iam TO <username>
- Create a token for the
<username>using thegenerate-db-auth-tokencommand. - Connect to the database utilizing the user you generated and the token obtained in the previous step as the password.
Create a database instance
Section titled “Create a database instance”The following command creates a new database instance with the name mydb and the engine postgres.
The database will be created with a single instance, which will be used as the master instance.
MASTER_USER=helloMASTER_PW='MyPassw0rd!'DB_NAME=testawslocal rds create-db-instance \ --master-username $MASTER_USER \ --master-user-password $MASTER_PW \ --db-instance-identifier mydb \ --engine postgres \ --db-name $DB_NAME \ --enable-iam-database-authentication \ --db-instance-class db.t3.smallConnect to the database
Section titled “Connect to the database”You can retrieve the hostname and port of your created instance either from the preceding output or by using the DescribeDbInstances API.
Run the following command to retrieve the host and port of the instance:
PORT=$(awslocal rds describe-db-instances --db-instance-identifier mydb | jq -r ".DBInstances[0].Endpoint.Port")HOST=$(awslocal rds describe-db-instances --db-instance-identifier mydb | jq -r ".DBInstances[0].Endpoint.Address")Next, you can connect to the database using the master username and password:
PGPASSWORD=$MASTER_PW psql -d $DB_NAME -U $MASTER_USER -p $PORT -h $HOST -w -c 'CREATE USER myiam WITH LOGIN'PGPASSWORD=$MASTER_PW psql -d $DB_NAME -U $MASTER_USER -p $PORT -h $HOST -w -c 'GRANT rds_iam TO myiam'Create a token
Section titled “Create a token”You can create a token for the user you generated using the generate-db-auth-token command:
TOKEN=$(awslocal rds generate-db-auth-token --username myiam --hostname $HOST --port $PORT)You can now connect to the database utilizing the user you generated and the token obtained in the previous step as the password:
PGPASSWORD=$TOKEN psql -d $DB_NAME -U myiam -w -p $PORT -h $HOSTSSL/TLS Support
Section titled “SSL/TLS Support”LocalStack’s RDS PostgreSQL emulation supports SSL/TLS-encrypted client connections, so you can test applications that require sslmode=require.
SSL/TLS support is currently available for the postgres engine.
Connect using SSL
Section titled “Connect using SSL”Once your DB instance is running, request an encrypted connection from any PostgreSQL client by passing the sslmode parameter.
With psql:
PGPASSWORD=$MASTER_PW psql "host=$HOST port=$PORT dbname=$DB_NAME user=$MASTER_USER sslmode=require"Certificate verification with sslmode=verify-ca or sslmode=verify-full is not currently supported.
Limitations
Section titled “Limitations”LocalStack currently enables SSL/TLS connections for PostgreSQL DB instances, but does not enforce SSL-only connections.
The rds.force_ssl parameter is accepted for compatibility, but it is not enforced.
Clients can still connect without SSL.
Global Database Support
Section titled “Global Database Support”LocalStack extends support for Aurora Global Database with certain limitations:
- Creating a global database will result in the generation of a single local database. All clusters and instances associated with the global database will share a common endpoint.
- It’s important to note that clusters removed from a global database lose their ability to function as standalone clusters, differing from their intended behavior on AWS.
- At present, the capability for persistence within global databases is not available.
RDS PostgreSQL Extensions for AWS Service Integrations
Section titled “RDS PostgreSQL Extensions for AWS Service Integrations”LocalStack supports certain extensions and functions that are provided in RDS to interact with other AWS services. At the moment, primarily extension functions for the PostgreSQL engine are supported.
aws_lambda extension
Section titled “aws_lambda extension”The aws_lambda extension can be used in local RDS PostgreSQL databases to interact with the Lambda API.
For example, in the SQL code snippet below, we are loading the aws_lambda extension, then generate a full ARN from a function name, and finally invoke the Lambda function directly from the SQL query:
CREATE EXTENSION IF NOT EXISTS aws_lambda CASCADE;-- create a Lambda function ARNSELECT aws_commons.create_lambda_function_arn('my_function');-- invoke a Lambda function directly from a SQL querySELECT aws_lambda.invoke('my_function', '{\"body\": \"Hello!\"}'::json);aws_s3 extension
Section titled “aws_s3 extension”The aws_s3 extension can be used in local RDS PostgreSQL databases to interact with the S3 API.
In the SQL code snippet below, we are loading the aws_s3 extension, then use the table_import_from_s3(..) function to populate the data in a table table1 from a CSV file test.csv stored in a local S3 bucket mybucket1:
CREATE EXTENSION IF NOT EXISTS aws_s3 CASCADE;SELECT aws_s3.table_import_from_s3( 'table1', 'c1, c2, c3', '(format csv)', aws_commons.create_s3_uri('mybucket1', 'test.csv', 'us-east-1'))Analogously, we can use the query_export_to_s3(..) extension function to export data from a table table2 into a CSV file test.csv in local S3 bucket mybucket2:
CREATE EXTENSION IF NOT EXISTS aws_s3 CASCADE;SELECT aws_s3.query_export_to_s3( 'SELECT * FROM table2', aws_commons.create_s3_uri('mybucket2', 'test.csv', 'us-east-1'), options := 'FORMAT csv')Additional extensions
Section titled “Additional extensions”In addition to the aws_* extensions described in the sections above, LocalStack RDS supports the following PostgreSQL extensions (some of which are bundled with the PostGIS extension):
address_standardizer_data_usfuzzystrmatchpostgispostgis_rasterpostgis_tiger_geocoderpostgis_topologypgvector
Resource Browser
Section titled “Resource Browser”The LocalStack Web Application provides a Resource Browser for managing RDS instances and clusters. You can access the Resource Browser by opening the LocalStack Web Application in your browser, navigating to the Resources section, and then clicking on RDS under the Database section.
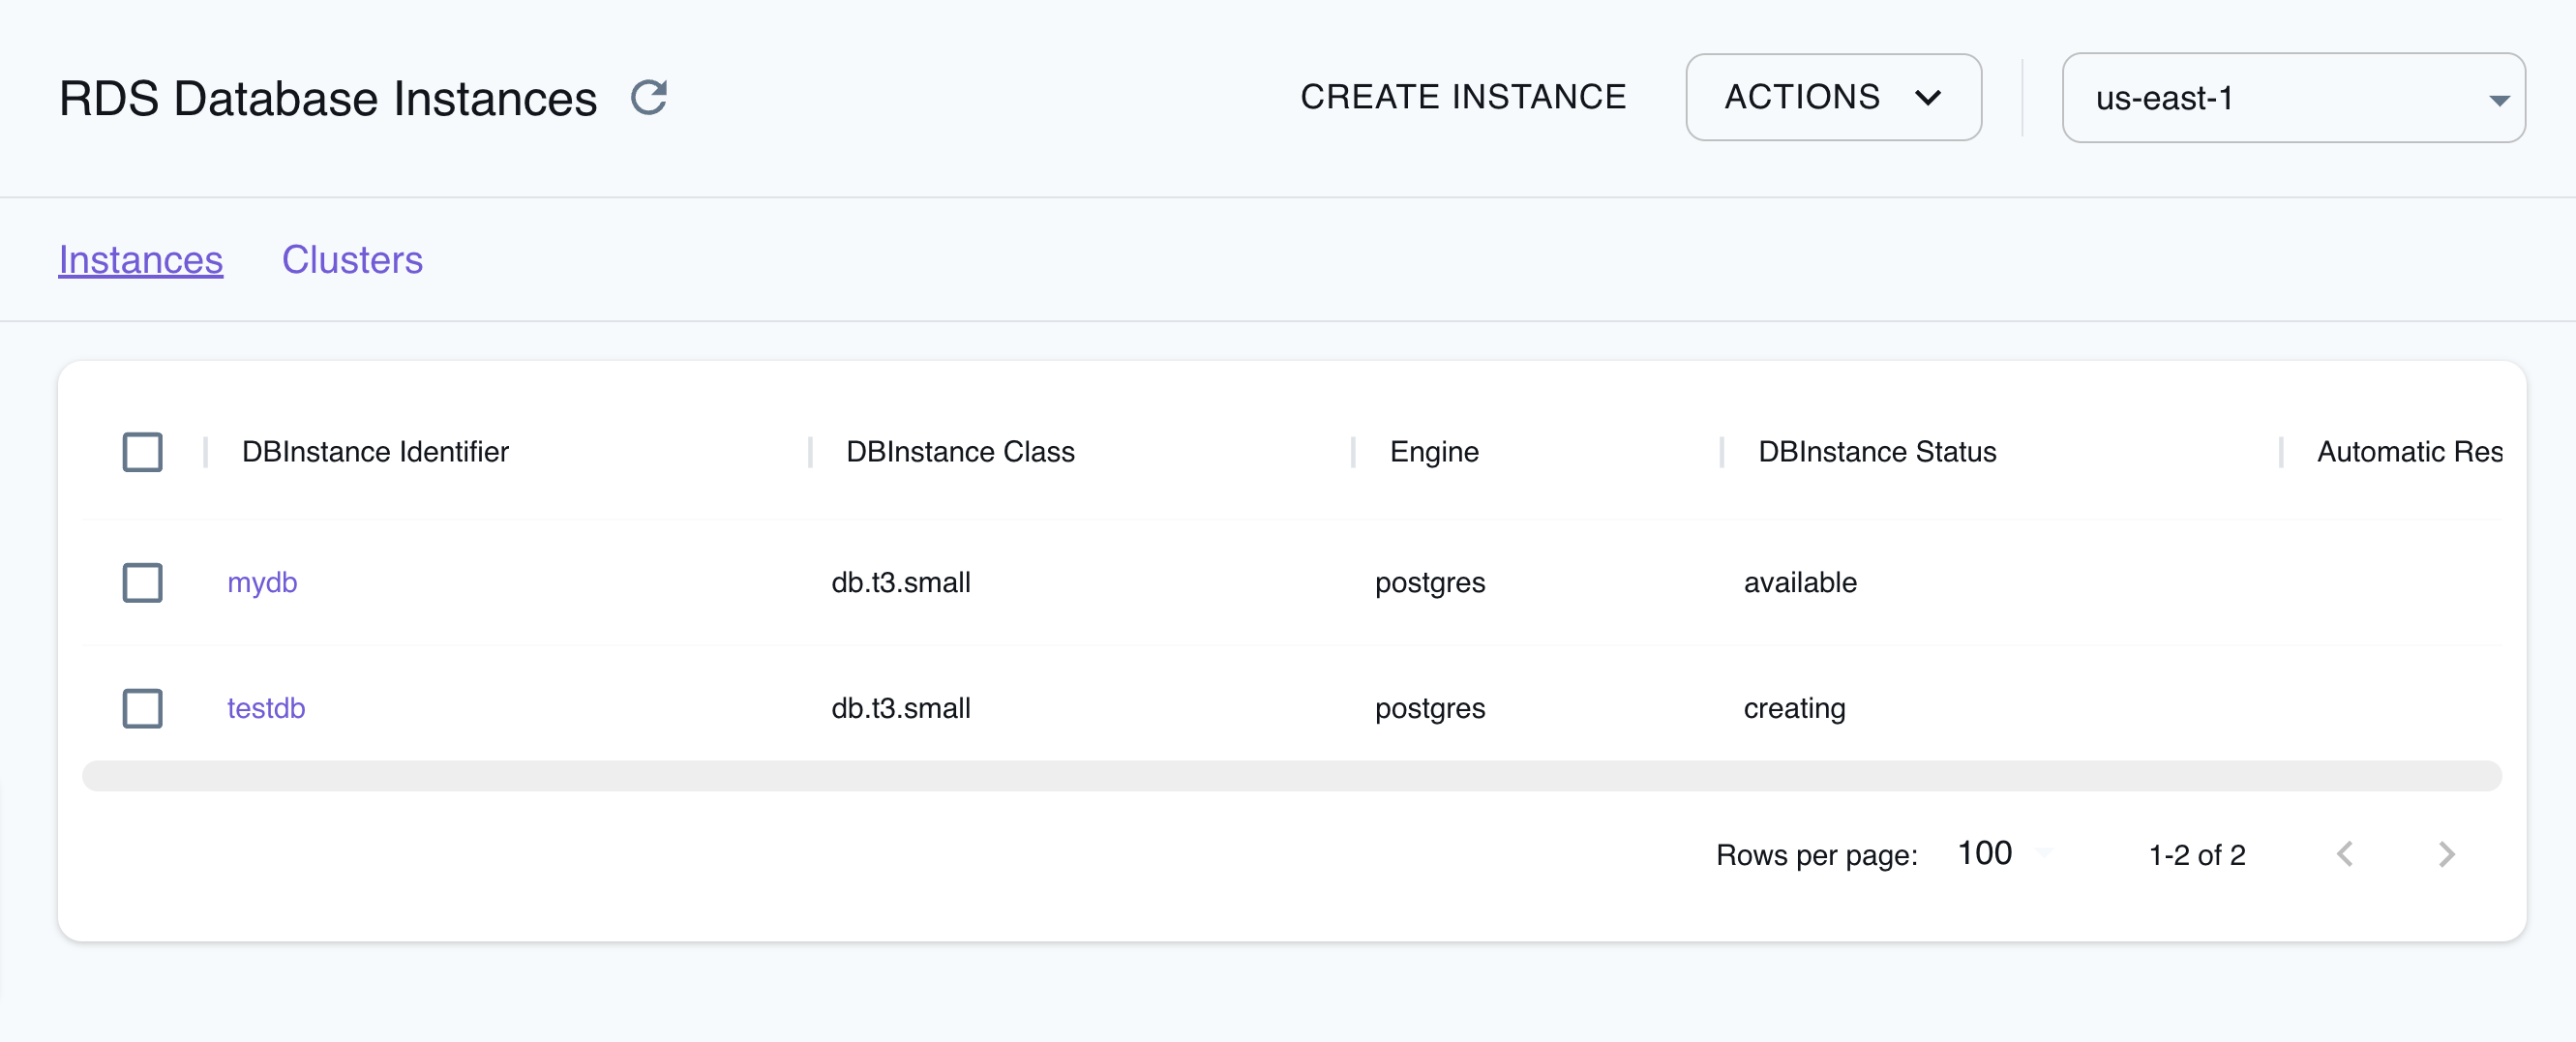
The Resource Browser allows you to perform the following actions:
- Create Instance: Create a new RDS instance by specifying the instance name, engine, DBInstance Class & Identifier, and other parameters.
- Create Cluster: Create a new RDS cluster by specifying the database name, engine, DBCluster Identifier, and other parameters.
- View Instance & Cluster: View an existing RDS instance or cluster by clicking the instance/cluster name.
- Edit Instance & Cluster: Edit an existing RDS instance or cluster by clicking the instance/cluster name and clicking the EDIT INSTANCE or EDIT CLUSTER button.
- Remove Instance & Cluster: Remove an existing RDS instance or cluster by clicking the instance/cluster name and clicking the ACTIONS followed by Remove Selected button.
Examples
Section titled “Examples”The following code snippets and sample applications provide practical examples of how to use RDS in LocalStack for various use cases:
- AppSync GraphQL APIs for DynamoDB and RDS Aurora PostgreSQL
- Amazon RDS initialization using CDK, Lambda, ECR, and Secrets Manager
- Serverless RDS Proxy with API Gateway, Lambda, and Aurora RDS
- Running queries against an RDS database
- Running cloud integration tests against LocalStack’s RDS with Testcontainers
API Coverage
Section titled “API Coverage”| Operation ▲ | Implemented ▼ | Verified on Kubernetes |
|---|
API Coverage (RDS Data)
Section titled “API Coverage (RDS Data)”| Operation ▲ | Implemented ▼ | Verified on Kubernetes |
|---|