Simple Email Service (SES)
Introduction
Section titled “Introduction”Simple Email Service (SES) is an emailing service that can be integrated with other cloud-based services. It provides API to facilitate email templating, sending bulk emails and more.
The supported APIs are available on the API coverage page for SESv1 and SESv2.
Getting Started
Section titled “Getting Started”This is an introductory guide to get started with SES.
Basic knowledge of the AWS CLI and LocalStack awslocal command is assumed.
Start LocalStack using your preferred method.
To be able to send emails, we need to create a verified identity. A verified identity appears as part of the ‘From’ field in the sent email.
A singular email identity can be added using the VerifyEmailIdentity operation.
awslocal ses verify-email-identity --email hello@example.com
awslocal ses list-identities{ "Identities": [ "hello@example.com" ]}Next, emails can be sent using the SendEmail operation.
awslocal ses send-email \ --from "hello@example.com" \ --message 'Body={Text={Data="This is the email body"}},Subject={Data="This is the email subject"}' \ --destination 'ToAddresses=jeff@aws.com'{ "MessageId": "labpqxukegeaftfh-ymaouvvy-ribr-qeoy-izfp-kxaxbfcfsgbh-wpewvd"}Retrieve Sent Emails
Section titled “Retrieve Sent Emails”LocalStack keeps track of all sent emails for retrospection. Sent messages can be retrieved in following ways:
-
API endpoint: LocalStack provides a service endpoint (
/_aws/ses) which can be used to return in-memory saved messages. AGETcall returns all messages. Query parametersidandemailcan be used to filter by message ID and message source respectively.Terminal window curl --silent localhost.localstack.cloud:4566/_aws/ses?email=hello@example.com | jq .Output {"messages": [{"Id": "dqxhhgoutkmylpbc-ffuqlkjs-ljld-fckp-hcph-wcsrkmxhhldk-pvadjc","Region": "eu-central-1","Destination": {"ToAddresses": ["jeff@aws.com"]},"Source": "hello@example.com","Subject": "This is the email subject","Body": {"text_part": "This is the email body","html_part": null},"Timestamp": "2023-09-11T08:37:13"}]}A
DELETEcall clears all messages from the memory. The query parameteridcan be used to delete only a specific message.Terminal window curl -X DELETE localhost.localstack.cloud:4566/_aws/ses?id=dqxhhgoutkmylpbc-ffuqlkjs-ljld-fckp-hcph-wcsrkmxhhldk-pvadjc -
Filesystem: All messages are saved to the state directory (see filesystem layout). The files are saved as JSON in the
ses/subdirectory and named by the message ID.
SMTP Integration
Section titled “SMTP Integration”LocalStack for AWS supports sending emails via an SMTP server. To enable this, set the connections parameters and access credentials for the server in the configuration. Refer to the Configuration guide for details.
Resource Browser
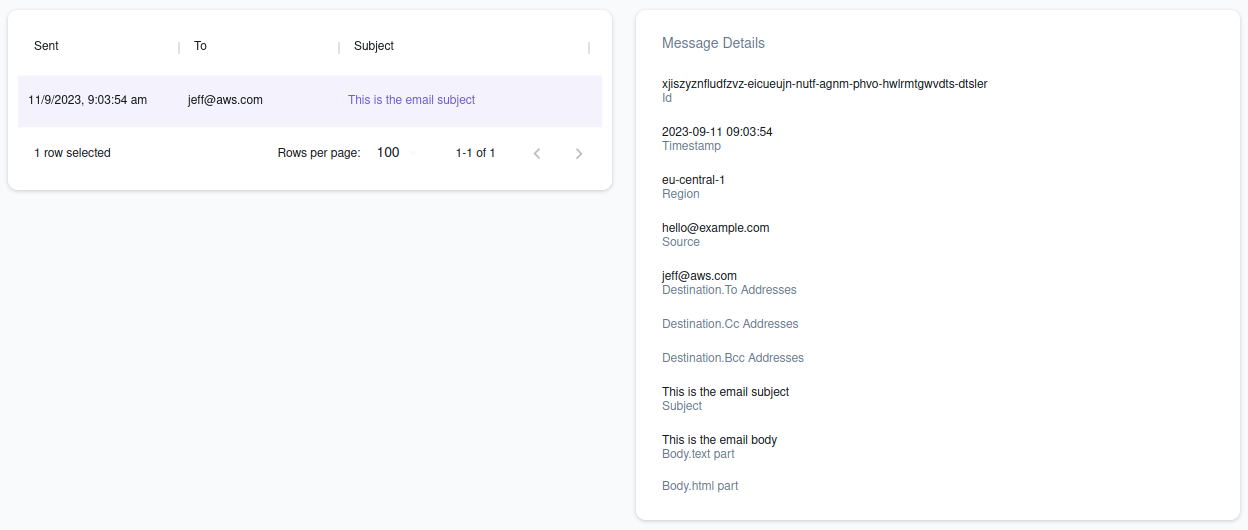
Section titled “Resource Browser”LocalStack Web Application provides a resource browser for managing email identities and introspecing sent emails.
The Resource Browser allows you to perform following actions:
- Create Email Identity: Create an email identity by clicking Create Identity and specifying the email address.
- View Sent Emails: View all sent emails from an email identity by clicking the email address. You can the view the details of a sent email by selecting them from the list.
- Send Emails: On selecting an email identity, click Send Message and specify destination fields (To, CC and BCC addresses) and the body (Plaintext, HTML) to send an email.
Current Limitations
Section titled “Current Limitations”- It is currently not possible to receive emails via SES in LocalStack.
- All operations related to Receipt Rules are mocked.
API Coverage (SESv1)
Section titled “API Coverage (SESv1)”| Operation ▲ | Implemented ▼ | Verified on Kubernetes |
|---|
API Coverage (SESv2)
Section titled “API Coverage (SESv2)”| Operation ▲ | Implemented ▼ | Verified on Kubernetes |
|---|