Cloud Pods
Introduction
Section titled “Introduction”Cloud pods are persistent state snapshots of your LocalStack instance that can easily be stored, versioned, shared, and restored. Cloud Pods can be used for various purposes, such as:
- Save and manage snapshots of active LocalStack instances.
- Share state snapshots with your team to debug collectively.
- Automate your testing pipelines by pre-seeding CI environments.
- Create reproducible development and testing environments locally.
Installation
Section titled “Installation”You can save and load the persistent state of Cloud Pods, you can use the Cloud Pods command-line interface (CLI). LocalStack provides a remote storage backend that can be used to store the state of your running application and share it with your team members. You can interact with the Cloud Pods over the storage backend via the LocalStack Web Application.
Cloud Pods CLI is included in the LocalStack CLI installation, so there’s no need for additional installations to begin using it.
If you’re a licensed user, we suggest setting the LOCALSTACK_AUTH_TOKEN as an environment variable.
This enables you to access the complete range of LocalStack Cloud Pods features.
You can access the Cloud Pods CLI by running the pod command from your terminal.
localstack pod --helpUsage: localstack pod [OPTIONS] COMMAND [ARGS]... Manage the state of your instance via Cloud Pods.
Options: -h, --help Show this message and exit.
Commands: delete Delete a Cloud Pod inspect list List all available Cloud Pods load remote Manage cloud pod remotes save Create a new Cloud Pod versionsGetting started
Section titled “Getting started”This guide is designed for users new to Cloud Pods and assumes basic knowledge of the LocalStack CLI and our awslocal wrapper script.
Start your LocalStack container using your preferred method. We will demonstrate how you can save a snapshot of your active LocalStack instance into your LocalStack account, and pull it to a running instance.
Create AWS resources
Section titled “Create AWS resources”You can use the awslocal CLI to create new AWS resources within your active LocalStack instance.
For example, you can create an S3 bucket and add data to it using the awslocal CLI:
awslocal s3 mb s3://testecho "hello world" > /tmp/hello-worldawslocal s3 cp /tmp/hello-world s3://test/hello-worldawslocal s3 ls s3://test/Save your Cloud Pod state
Section titled “Save your Cloud Pod state”You can now save your Pod state using the save command, specifying the desired Cloud Pod name as the first argument.
This action will save the pod and register it with the LocalStack Web Application:
localstack pod save s3-testCloud Pod `s3-test` successfully created ✅Version: 1Remote: platformServices: s3Optionally, you can include a message with the saved Cloud Pod using the --message flag.
You can access the list of available Cloud Pods for both you and your organization by utilizing the list command:
localstack pod list┏━━━━━━━━━━━━━━━━━━━━━━━━━━━━━━┳━━━━━━━━━━━━━┳━━━━━━━━━━━━━━━━━━━━━┓┃ Name ┃ Max Version ┃ Last Change ┃┡━━━━━━━━━━━━━━━━━━━━━━━━━━━━━━╇━━━━━━━━━━━━━╇━━━━━━━━━━━━━━━━━━━━━┩│ s3-test │ 1 │ 2024-01-04 11:03:00 │└──────────────────────────────┴─────────────┴─────────────────────┘With the save command you can create multiple versions of a Cloud Pod.
For instance, let us create a SQS queue and second version of s3-test.
awslocal sqs create-queue --queue-name test-queue
localstack pod save s3-testCloud Pod `s3-test` successfully created ✅Version: 2Remote: platformServices: s3,sqsWe can now use the command versions to list all the created version for a Cloud Pod.
localstack pod versions s3-test┏━━━━━━━━━┳━━━━━━━━━━━━━━━━━━━━━┳━━━━━━━━━━━━━━━━━━━━━━━━━┳━━━━━━━━━━┳━━━━━━━━━━━━━┓┃ Version ┃ Creation Date ┃ LocalStack Version ┃ Services ┃ Description ┃┡━━━━━━━━━╇━━━━━━━━━━━━━━━━━━━━━╇━━━━━━━━━━━━━━━━━━━━━━━━━╇━━━━━━━━━━╇━━━━━━━━━━━━━┩│ 1 │ 2024-01-04 11:03:00 │ 3.1.1. │ s3 │ ││ 2 │ 2024-02-28 14:01:45 │ 3.1.1. │ s3,sqs │ │└─────────┴─────────────────────┴─────────────────────────┴──────────┴─────────────┘Pull your Pod state
Section titled “Pull your Pod state”On a separate machine, start LocalStack while ensuring the Auth Token is properly configured.
Then, retrieve the previously created Cloud Pod by employing the load command, specifying the Cloud Pod name as the first argument:
localstack pod load s3-testCloud Pod s3-test successfully loadedYou can examine the S3 buckets within the Cloud Pod:
awslocal s3 ls s3://test/2022-10-04 22:33:54 12 hello-worldYou can also load a specific version by appending a version number to the pod name after a colon. If not specified, the latest version will be loaded.
localstack pod load s3-test:1Cloud Pod s3-test:1 successfully loadedAfter loading the Cloud Pod’s content, you can use the state inspect command to observe the state of the running LocalStack instance.
localstack state inspect --format json{ "000000000000": { "S3": { "global": { "listBuckets": { "Buckets": [ { "Name": "test", "CreationDate": "2023-10-03T07:19:31.000Z" } ], } } } }}For comprehensive instructions, navigate to our Command-Line Interface (CLI) Guide. To access your Cloud Pods through the LocalStack Web Application, navigate to the Cloud Pods browser.
Web Application
Section titled “Web Application”The LocalStack Web Application enables you to :
- Browse your Cloud Pods and access your version history.
- Export & import Cloud Pods to and from LocalStack instances.
- View Cloud Pods metadata, resources, regions, and version history.
Browse Cloud Pods
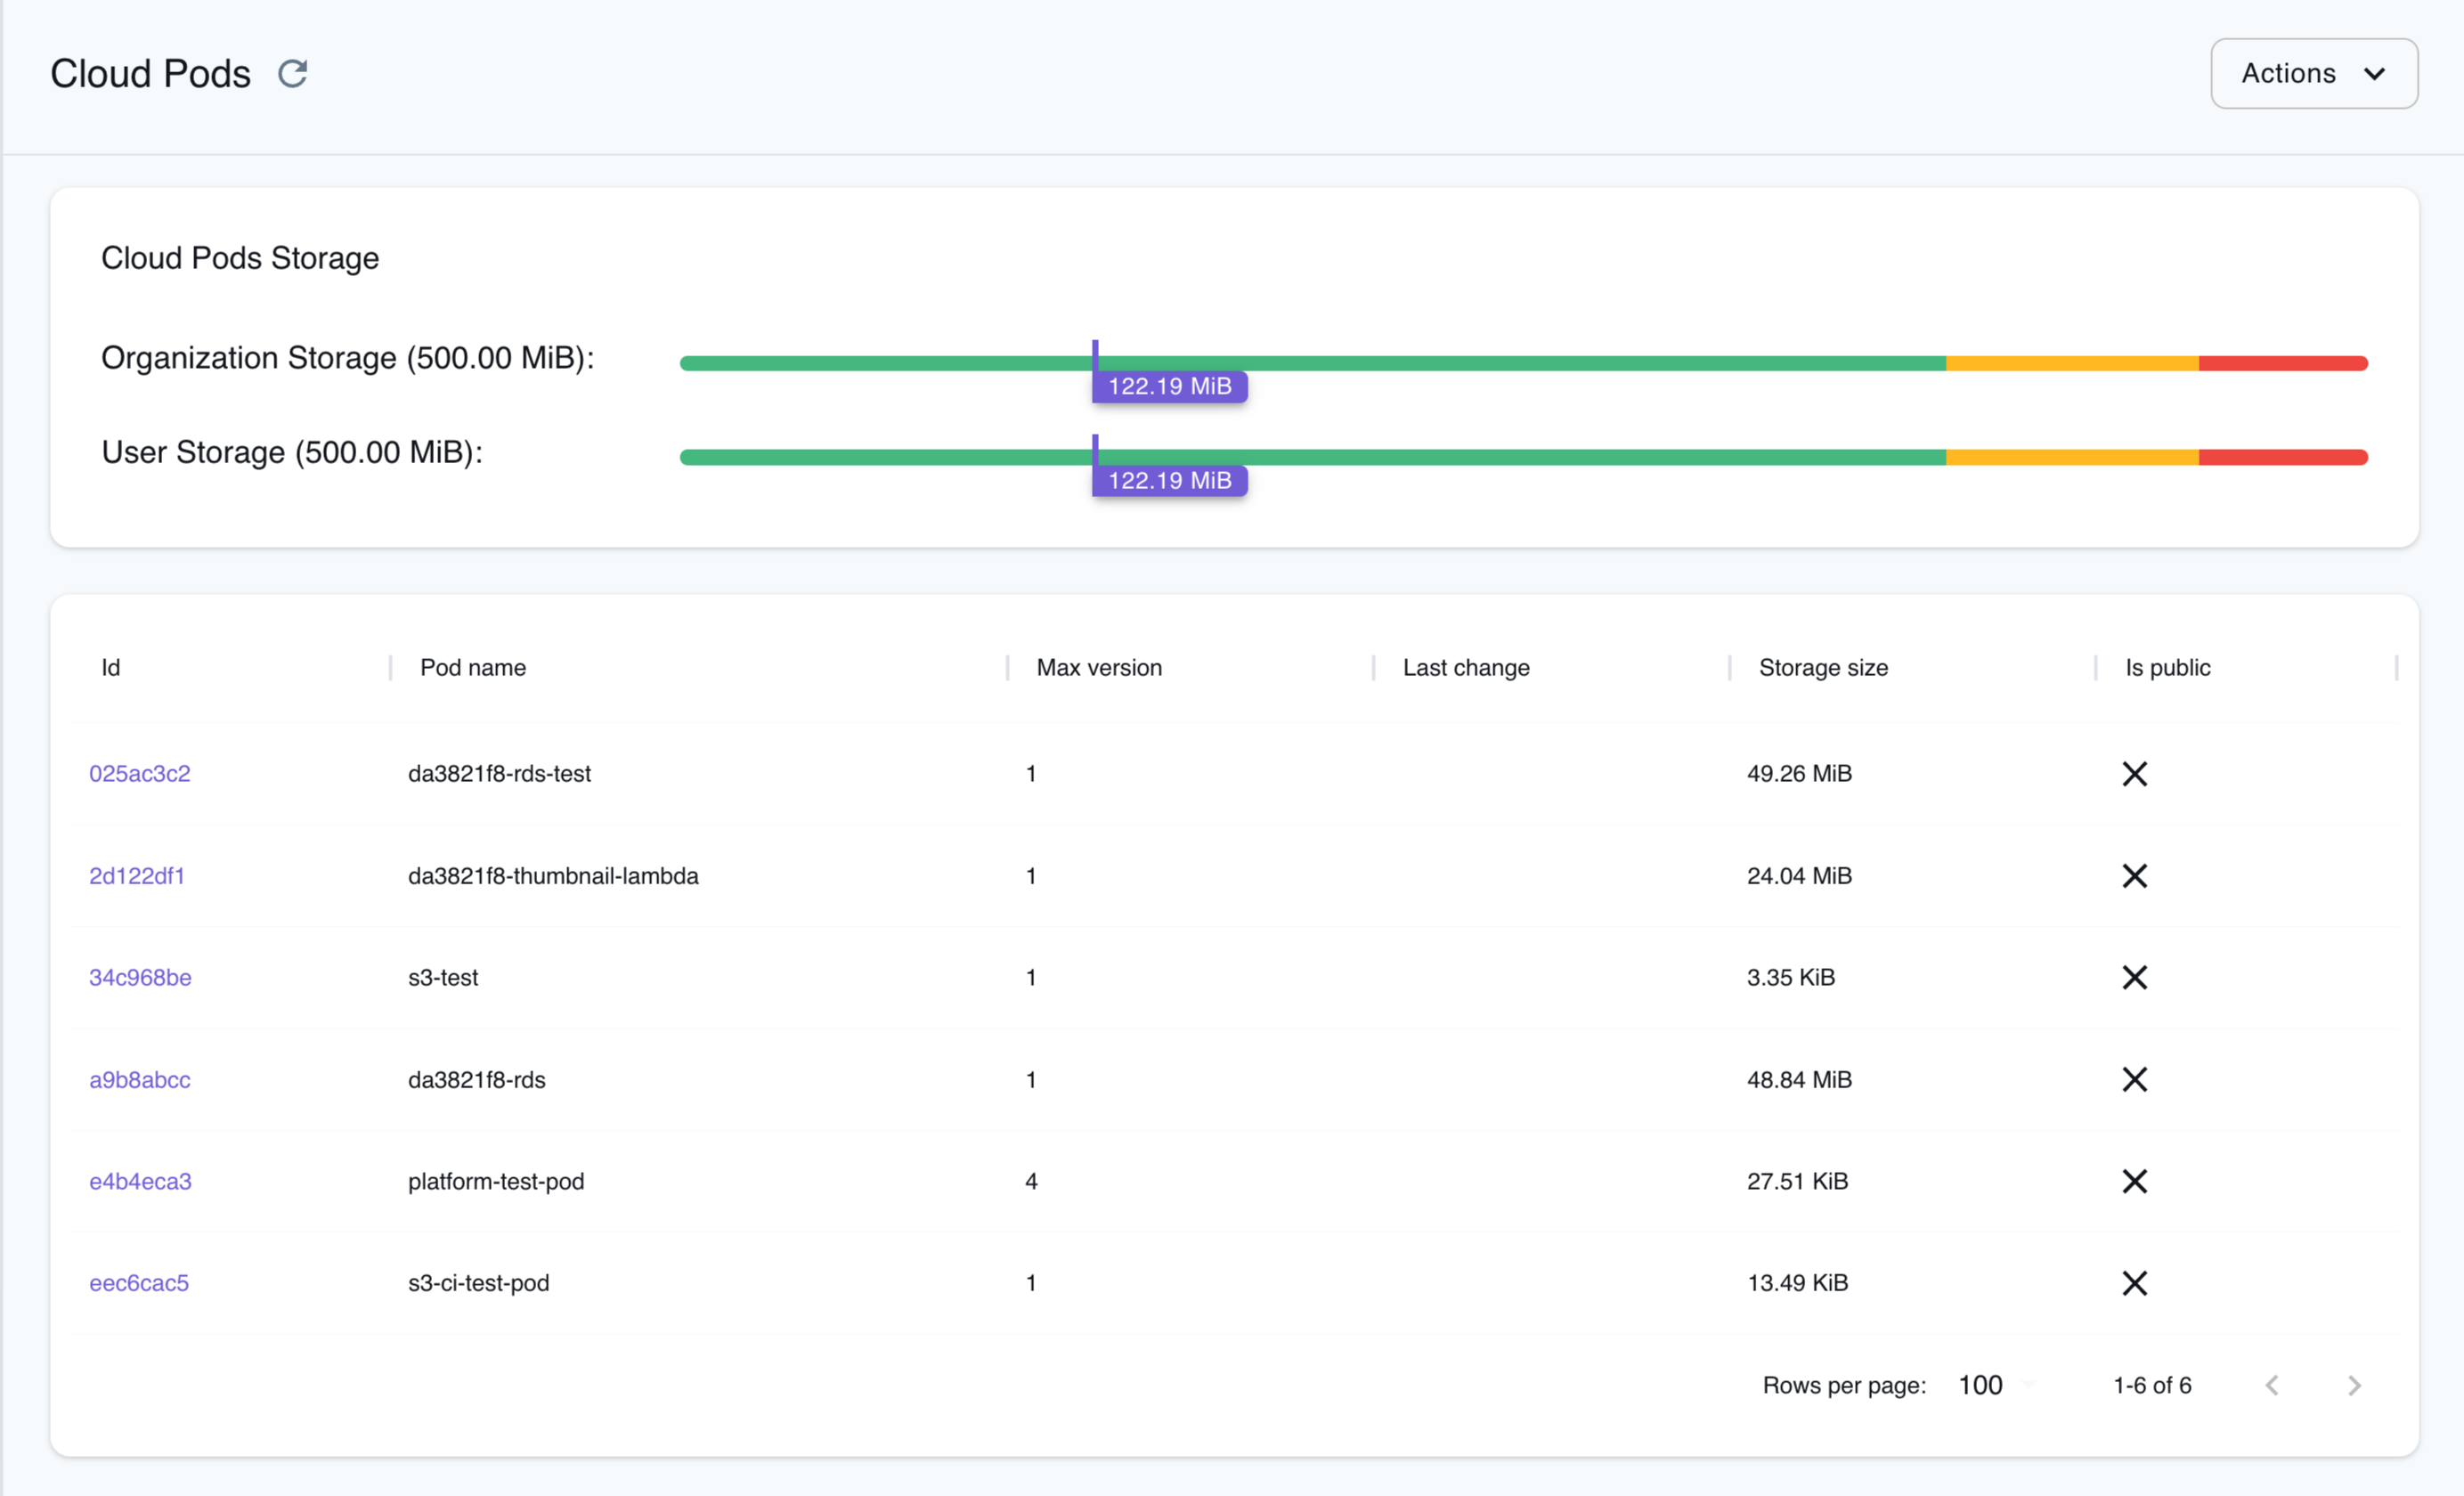
Section titled “Browse Cloud Pods”Cloud Pods Browser allows you to view, manage, and explore your Cloud Pods through the LocalStack Web Application. With Cloud Pods, you can have individual or shared ownership of a snapshot of your LocalStack instance.
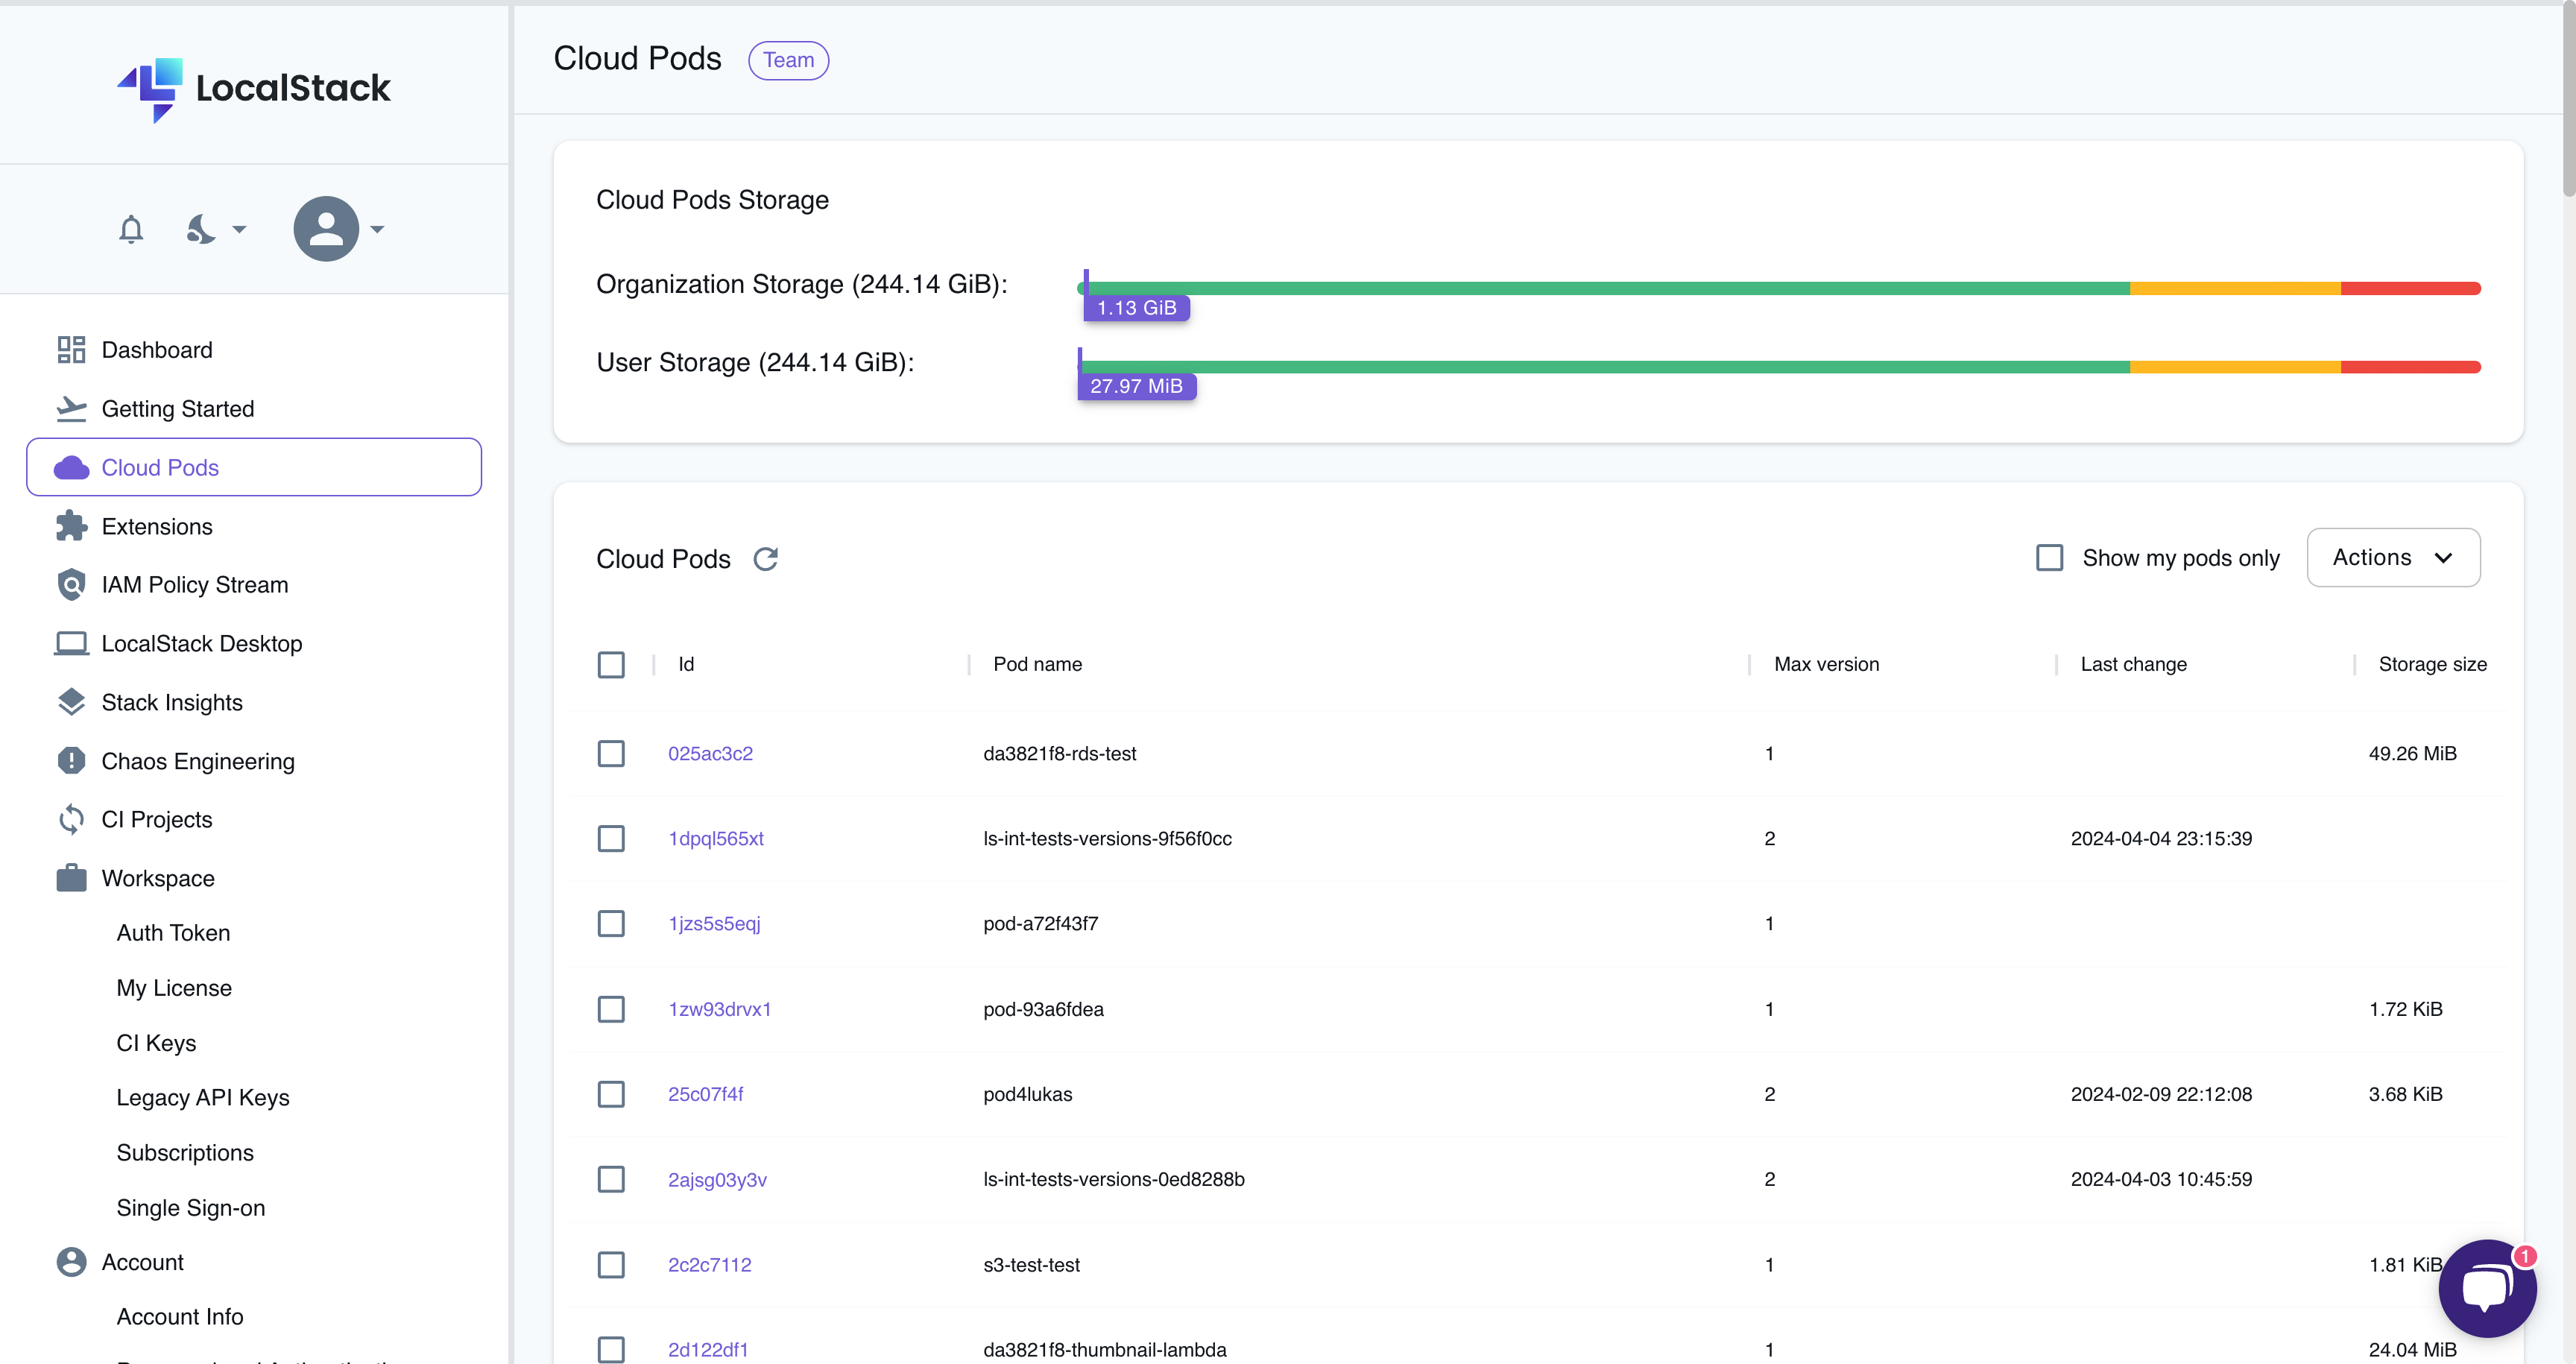
The Cloud Pods Browser provides the following functionalities:
- View Cloud Pods: View all Cloud Pods saved by you or your organization.
- View Versions: View the version history of a Cloud Pod and access previous versions of specific Cloud Pods by clicking on the Cloud Pod’s name.
- View Cloud Pod Details: View the details of a specific Cloud Pod version by clicking on the version.
- View Cloud Pod storage: View the organization storage usage and user storage usage on top of the Cloud Pods Browser.
- Delete Cloud Pod: Delete a Cloud Pod by selecting the Cloud Pod and navigating to the Actions button, followed by Delete.
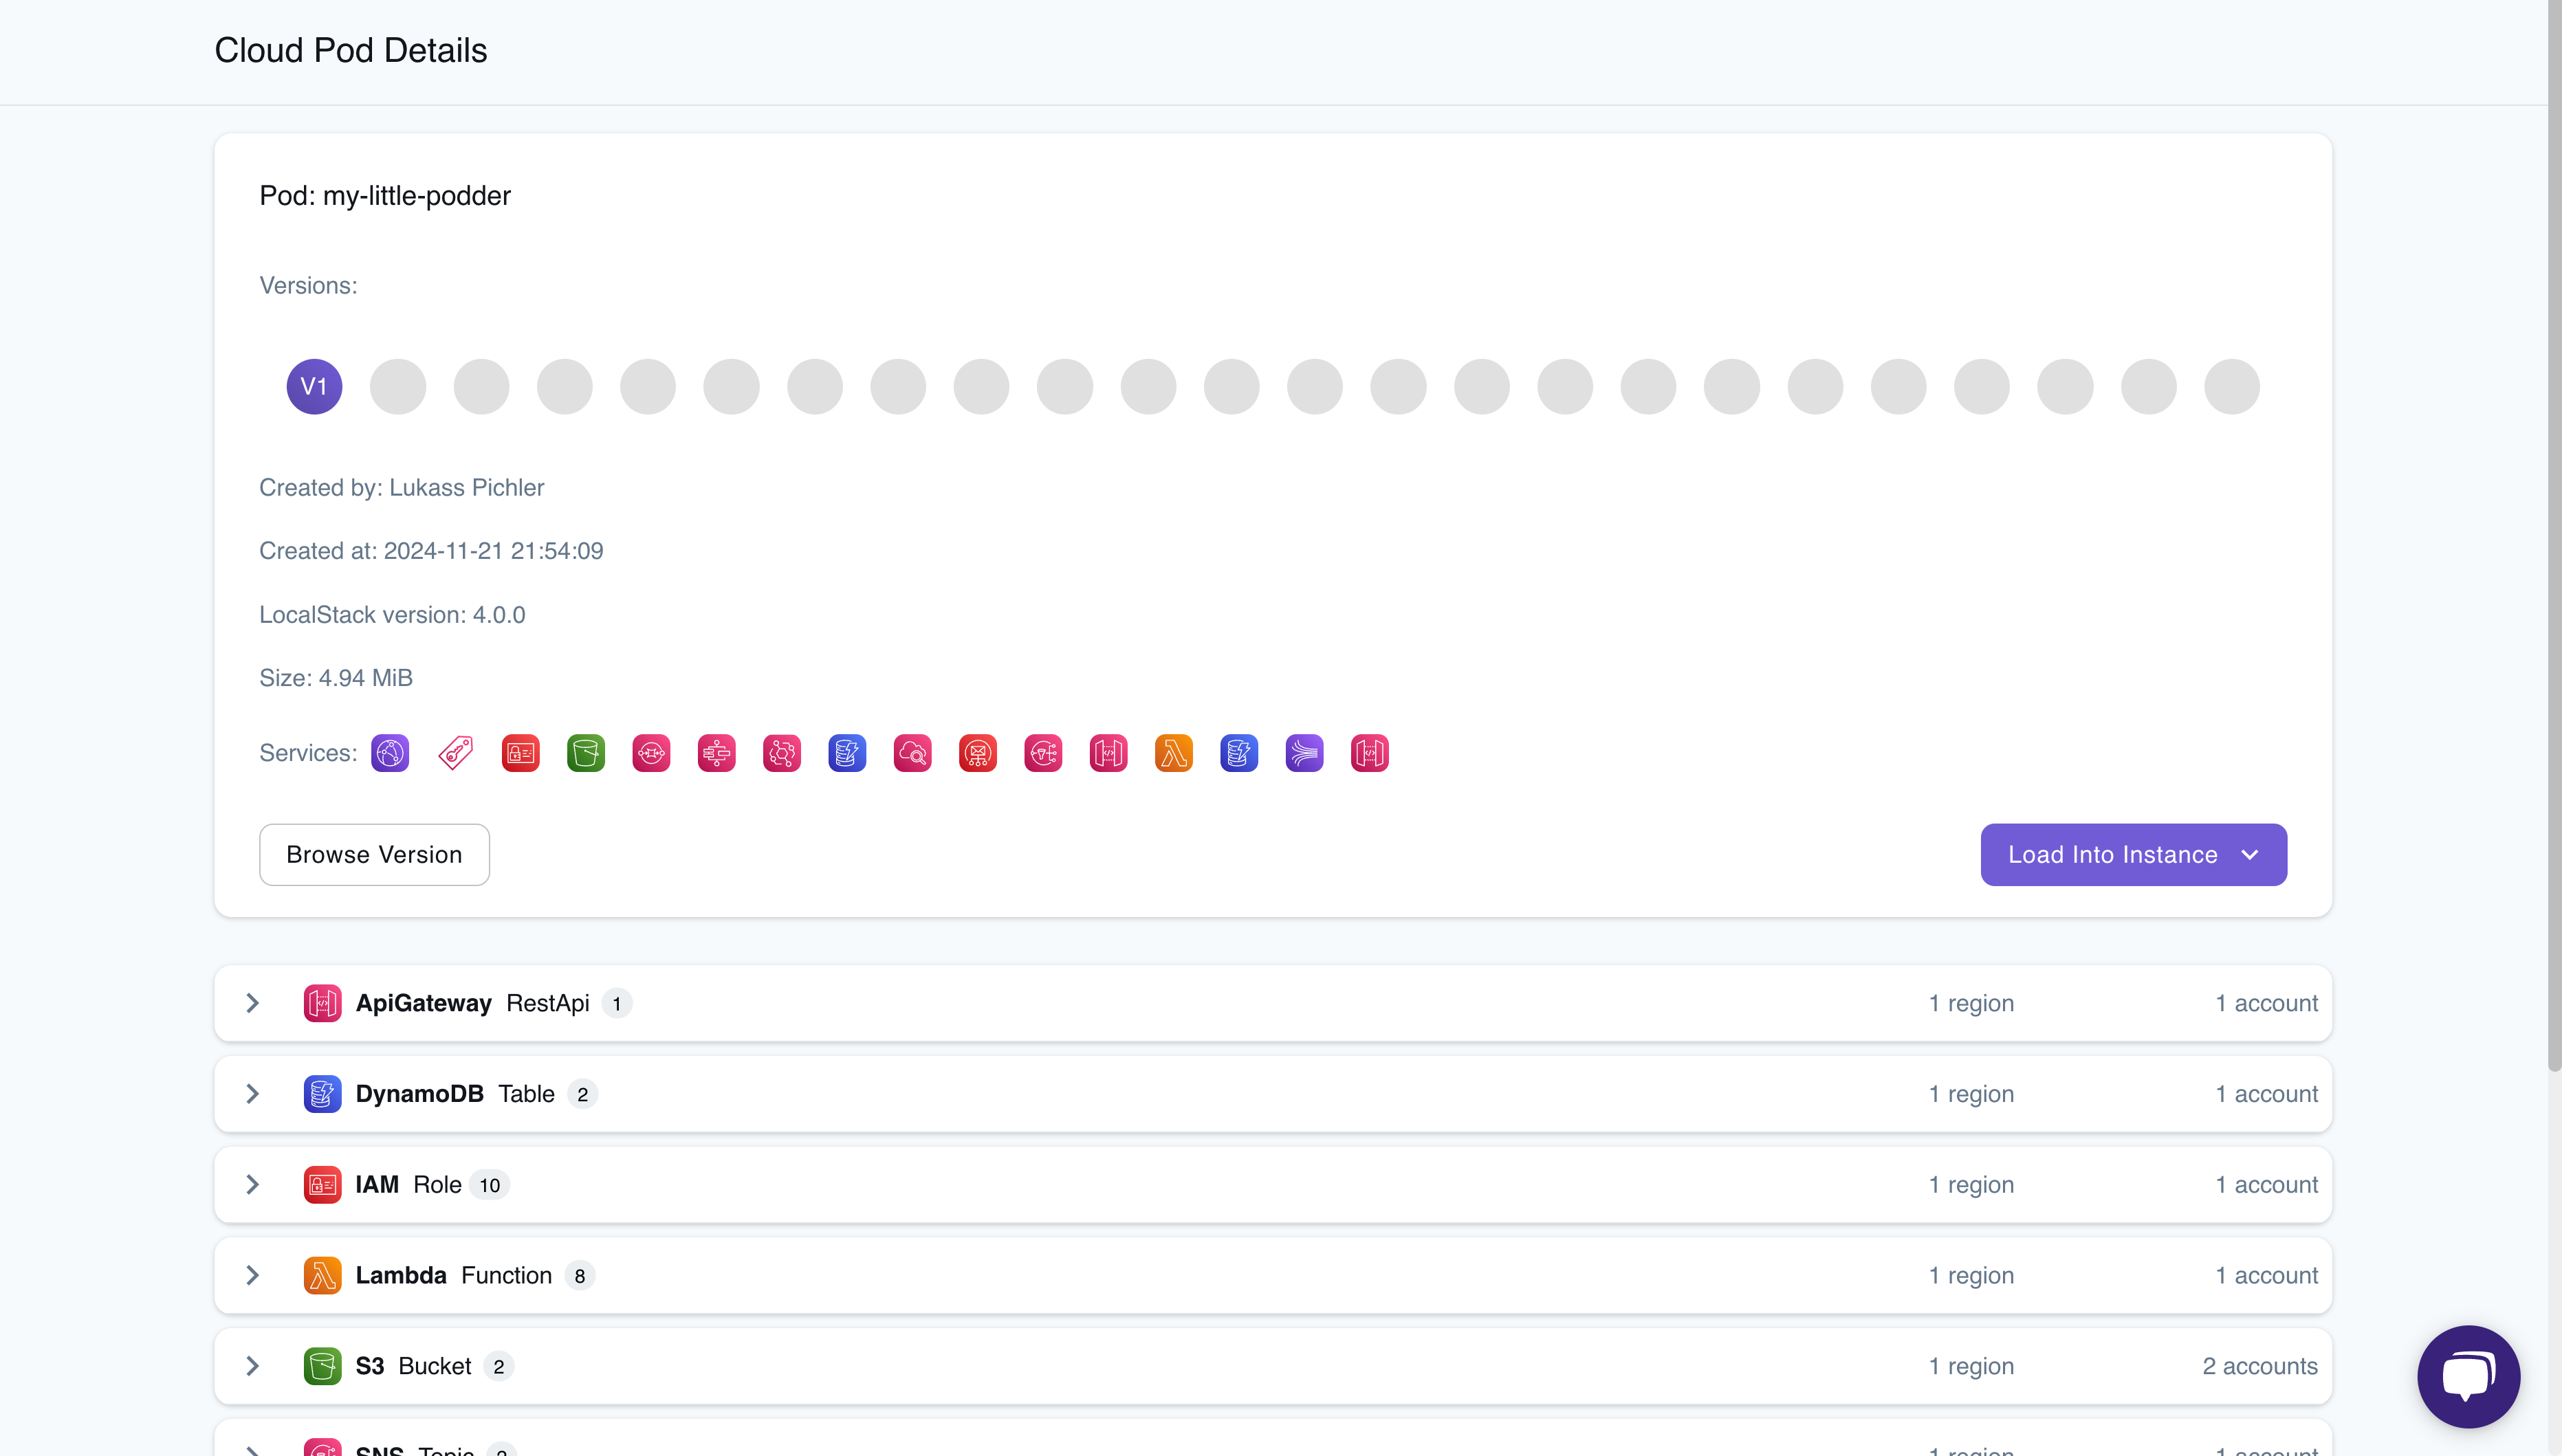
View Cloud Pods metadata
Section titled “View Cloud Pods metadata”You can view Cloud Pods metadata by selecting any Cloud Pod in the Cloud Pods Browser. The metadata includes details such as:
- The user who created the Cloud Pod
- The creation timestamp
- The LocalStack version used to create the Cloud Pod
- The size of the Cloud Pod
- The service resources contained in the Cloud Pod
You can view detailed information within a Cloud Pod, including available resources, categorized services with configurations, and quick access to resource identifiers and endpoints—all without loading the Cloud Pod into your LocalStack runtime.
To save metadata with resource details in the Cloud Pod, ensure your LocalStack container is running and save the Cloud Pod with ENABLE_POD_RESOURCES=1.
Cloud Pods saved without this configuration enabled will not display granular details.
Export & Import Cloud Pods
Section titled “Export & Import Cloud Pods”You can export and import your LocalStack infrastructure state as a Cloud Pod using the LocalStack Web Application. This feature is particularly useful when you need to use a user-friendly interface to manage your Cloud Pods, without the need to interact with the CLI.
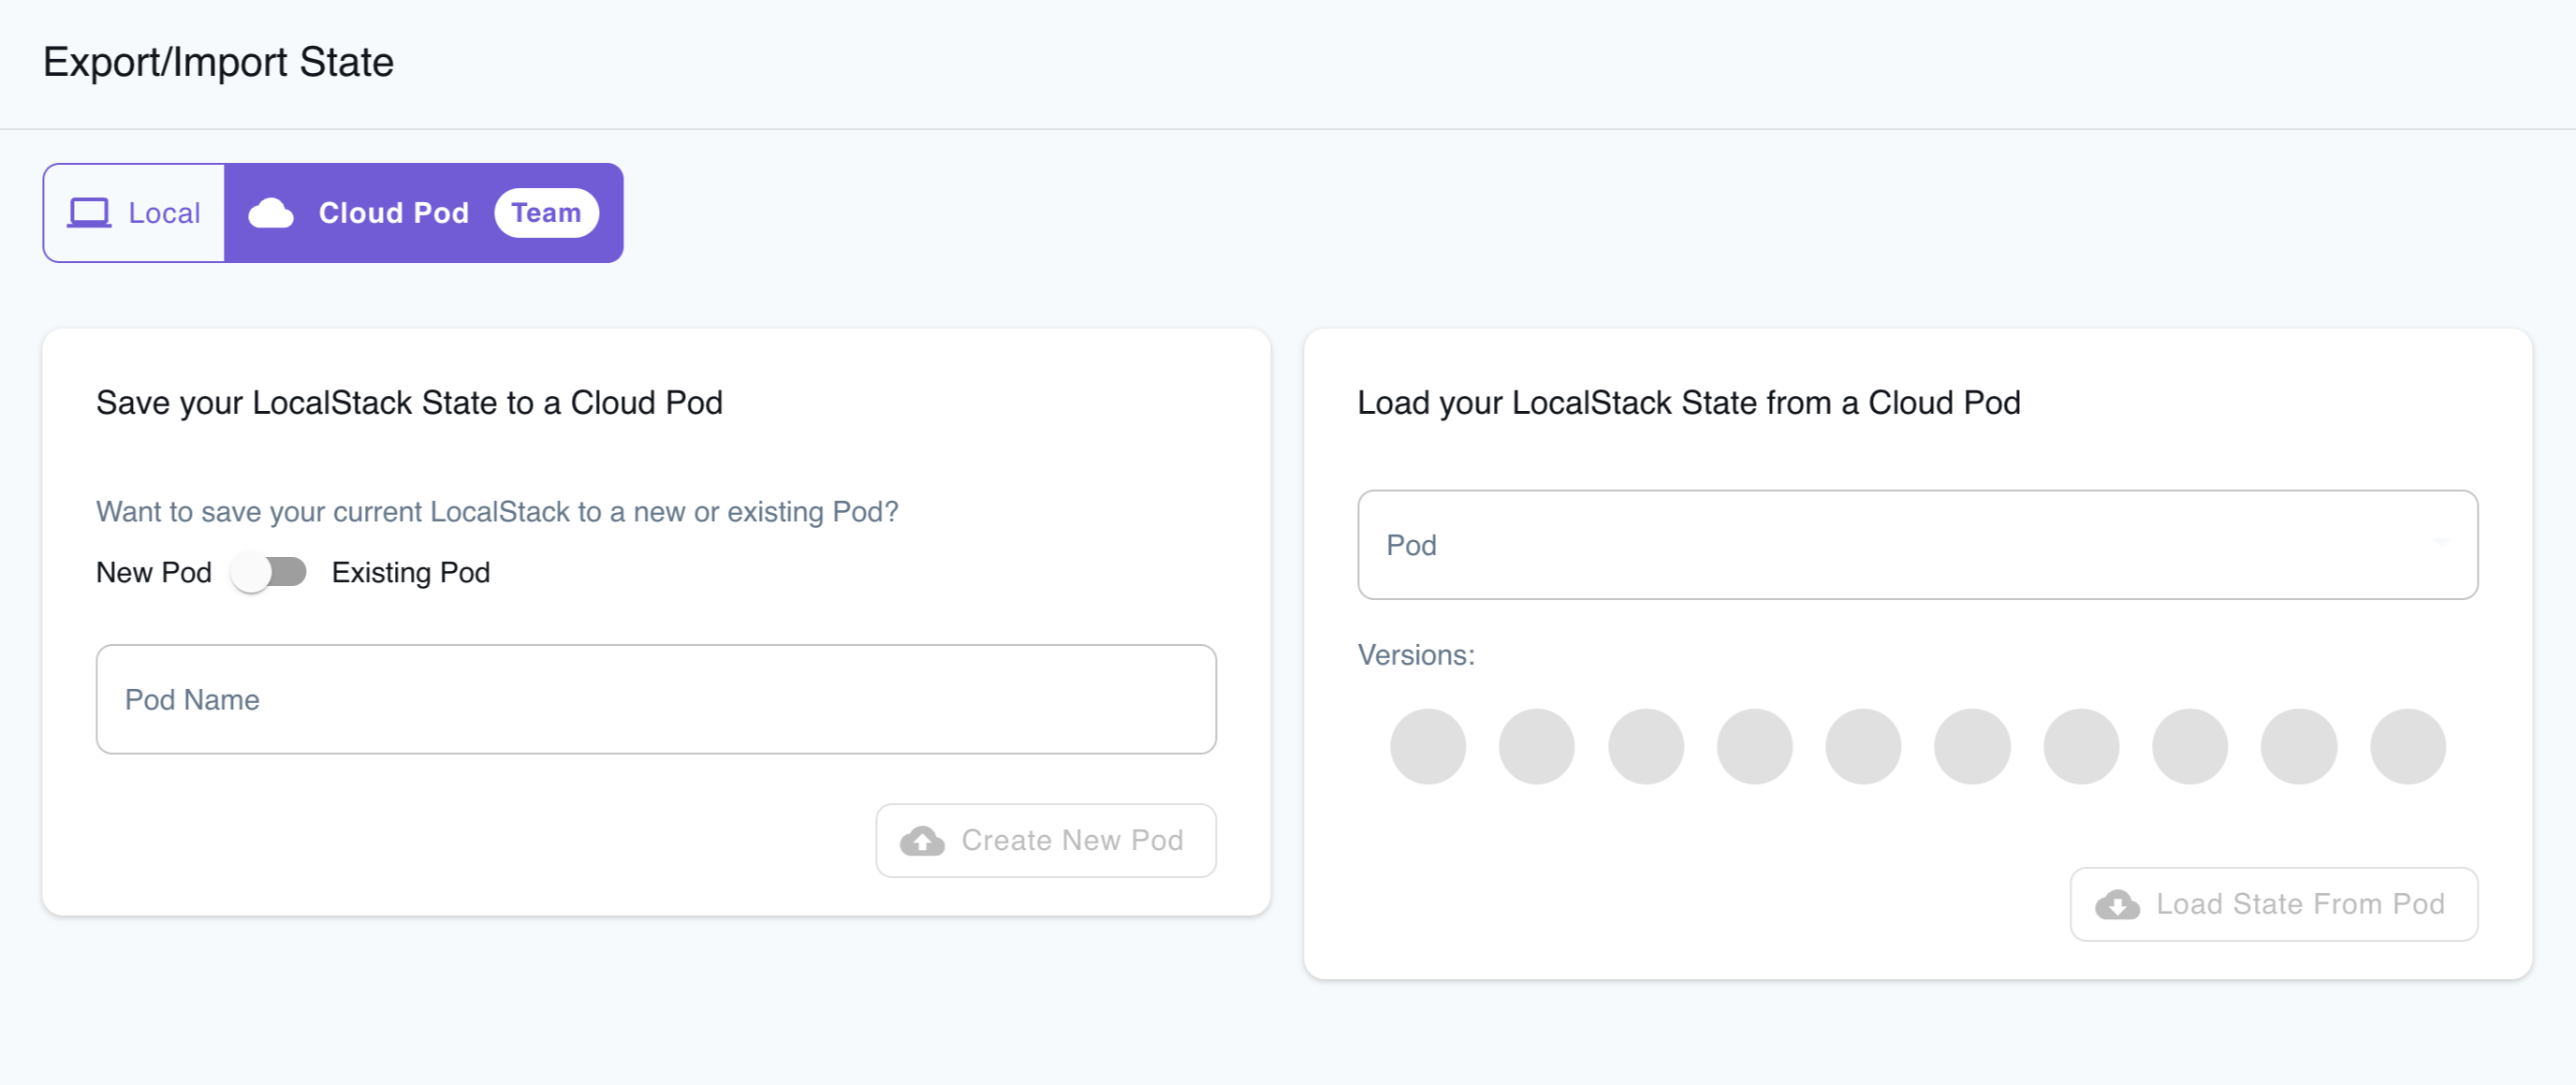
Export the State
Section titled “Export the State”To export the state, follow these steps:
- Navigate to the Cloud Pod tab within the Export/Import State page.
- Create AWS resources locally as needed.
- Enter the Pod name and toggle between the New Pod and Existing Pod options.
- Enter the services to save resources for. By default, all available service resources are saved.
- Click on Create New Pod.
A new Cloud Pod will be created and will be available for import into another LocalStack instance. You can check out the list of available Cloud Pods in the Cloud Pod page.
Import the State
Section titled “Import the State”To import the state, follow these steps:
- Navigate to the Cloud Pod tab within the Export/Import State page.
- Choose the Cloud Pod from the drop-down list.
- Click on Load State From Pod.
To confirm the successful injection of the container state, visit the respective Resource Browser for the services and verify the resources.
Auto Loading Cloud Pods
Section titled “Auto Loading Cloud Pods”In addition to loading Cloud Pods through the Command-Line Interface (CLI) or the Web Application, you can configure the automatic loading of one or more Cloud Pods upon the startup of the LocalStack container.
Environmental variables
Section titled “Environmental variables”To automatically load a Cloud Pod at startup, utilize the AUTO_LOAD_POD configuration variable.
AUTO_LOAD_POD can accept multiple Cloud Pod names separated by commas.
To autoload multiple Cloud Pods, such as foo-pod and bar-pod, use: AUTO_LOAD_POD=foo-pod,bar-pod.
The order of Cloud Pods in AUTO_LOAD_POD dictates their loading sequence.
When autoloading multiple Cloud Pods, later pods might overwrite the state of earlier ones if they share the same service, account, and region.
AUTO_LOAD_POD=foo-pod localstack startservices: localstack: container_name: "localstack-main" image: localstack/localstack-pro ports: - "127.0.0.1:4566:4566" - "127.0.0.1:4510-4559:4510-4559" environment: - LOCALSTACK_AUTH_TOKEN=${LOCALSTACK_AUTH_TOKEN:?} - DEBUG=1 - AUTO_LOAD_POD=foo-pod,bar-pod volumes: - "./volume:/var/lib/localstack" - "/var/run/docker.sock:/var/run/docker.sock"docker run \ -e LOCALSTACK_AUTH_TOKEN=${LOCALSTACK_AUTH_TOKEN:?} \ -e AUTO_LOAD_POD=foo-pod \ -v ./volume:/var/lib/localstack \ -p 4566:4566 \ localstack/localstack-proConfiguration file
Section titled “Configuration file”LocalStack allows for the use of configuration files to automatically load Cloud Pods during startup.
Within the container, LocalStack searches through the /etc/localstack/init-pod.d directory for two file types: zip files created using the localstack state export command, and txt files, where each line represents the name of a Cloud Pod.
Take the following example of a project layout:
- docker-compose.yml
Directoryinit-pods.d
- pod-list.txt
- my-state.pod.zip
The pod-list.txt contains the following:
foo-podbar-podLocalStack, upon mounting init-pods.d to the appropriate location, will sequentially load foo-pod and bar-pod as listed in pod-list.txt, and then proceed to load my-state.pod.zip.
The docker compose file for correctly mounting init-pods.d will look like:
services: localstack: container_name: "localstack-main" image: localstack/localstack-pro ports: - "127.0.0.1:4566:4566" - "127.0.0.1:4510-4559:4510-4559" environment: - LOCALSTACK_AUTH_TOKEN=${LOCALSTACK_AUTH_TOKEN:?} - DEBUG=1 volumes: - "./volume:/var/lib/localstack" - "./init-pods.d:/etc/localstack/init-pods.d"Remotes
Section titled “Remotes”A remote is the location where Cloud Pods are stored. By default, Cloud Pod artifacts are stored in the LocalStack platform. However, if your organization’s data regulations or sovereignty requirements prohibit storing Cloud Pod assets in a remote storage infrastructure, you have the option to persist Cloud Pods in an on-premises storage location under your complete control.
LocalStack provides two types of alternative remotes:
- S3 bucket remote storage.
- ORAS (OCI Registry as Storage) remote storage.
Cloud Pods command-line interface (CLI) allows you to create, delete, and list remotes.
localstack pod remote --helpUsage: localstack pod remote [OPTIONS] COMMAND [ARGS]...
Manage cloud pod remotes
Options: -h, --help Show this message and exit.
Commands: add Add a remote delete Delete a remote list List the available remotesS3 bucket remote storage
Section titled “S3 bucket remote storage”The S3 remote enables you to store Cloud Pod assets in an existing S3 bucket within an actual AWS account. The initial step is to export the necessary AWS credentials within the terminal session.
export AWS_ACCESS_KEY_ID=...export AWS_SECRET_ACCESS_KEY=...A possible option is to obtain credentials via AWS SSO CLI.
Next, we establish a new remote specifically designed for an S3 bucket.
By running the following command, we create a remote named s3-storage-aws responsible for storing Cloud Pod artifacts in an S3 bucket called ls-pods-bucket-test.
The access_key_id and secret_access_key placeholders ensure the correct transmission of AWS credentials to the container.
localstack pod remote add s3-storage-aws 's3://ls-pods-bucket-test/?access_key_id={access_key_id}&secret_access_key={secret_access_key}'Lastly, you can utilize the standard pod CLI command to generate a new Cloud Pod that points to the previously established remote.
localstack pod save my-pod s3-storage-awsOnce the command has been executed, you can confirm the presence of Cloud Pod artifacts in the S3 bucket by simply running:
aws s3 ls s3://ls-pods-bucket-test2023-09-27 13:50:10 83650 localstack-pod-my-pod-state-1.zip2023-09-27 13:50:11 85103 localstack-pod-my-pod-version-1.zipYou can use the pod load command to load the same pod that was previously saved in this remote:
localstack pod load my-pod s3-storage-awsSimilarly, you can list the Cloud Pods on this specific remote with the pod list command:
localstack pod list s3-storage-awsORAS remote storage
Section titled “ORAS remote storage”The ORAS remote enables users to store Cloud Pods in OCI-compatible registries like Docker Hub, Nexus, or ECS registries. ORAS stands for “OCI Registry as Service,” and you can find additional information about this standard on the official website.
For example, let’s illustrate how you can utilize Docker Hub to store and retrieve Cloud Pods.
To begin, you must configure the new remote using the LocalStack CLI.
You’ll need to export two essential environment variables, ORAS_USERNAME and ORAS_PASSWORD, which are necessary for authenticating with Docker Hub.
export ORAS_USERNAME=docker_hub_idexport ORAS_PASSWORD=ILoveLocalStack1!You can now use the CLI to create a new remote called oras-remote.
localstack pod remote add oras-remote 'oras://{oras_username}:{oras_password}@registry.hub.docker.com/<docker_hub_id>'Lastly, you can store a pod using the newly configured remote, where my-pod represents the Cloud Pod’s name, and oras-remote is the remote’s name.
localstack pod save my-pod oras-remoteLikewise, you can execute the reverse operation to load a Cloud Pod from oras-remote using the following command:
localstack pod load my-pod oras-remoteAuto Load with remotes
Section titled “Auto Load with remotes”LocalStack also supports the auto load of a Cloud Pod from registered remotes.
The configuration is similar to what we just described.
In particular you could simply add the remote name to the text files inside the init-pods.d, as follows:
foo-pod,bar-remoteWith such a configuration, the foo-pod Cloud Pod will be loaded from the bar-remote remote.
To properly configure the remote, you need to provide the needed environment variables when starting the LocalStack container.
For instance, a S3 remote needs a AWS_ACCESS_KEY and a AWS_SECRET_ACCESS_KEY, as follows:
services: localstack: container_name: "localstack-main" image: localstack/localstack-pro ports: - "127.0.0.1:4566:4566" - "127.0.0.1:4510-4559:4510-4559" environment: - LOCALSTACK_AUTH_TOKEN=${LOCALSTACK_AUTH_TOKEN:?} - DEBUG=1 - AWS_ACCESS_KEY_ID:... - AWS_SECRET_ACCESS_KEY:... volumes: - "./volume:/var/lib/localstack" - "./init-pods.d:/etc/localstack/init-pods.d"End-to-End Encryption Enterprise
Section titled “End-to-End Encryption ”Cloud Pods artifacts are stored in S3 buckets when using the LocalStack platform as the storage remote. By default, Amazon S3 encrypts all objects before saving them on disks, while the opposite operation happens at download time. This ensures encryption at rest for Cloud Pods.
When this is not enough, LocalStack also offers end-to-end encryption for enterprise customers as a preview feature.
To activate this feature, make sure to start LocalStack with the POD_ENCRYPTION environment variable set to 1.
The next step is to generate a passphrase used to encrypt and decrypt the Cloud Pods’ artifacts.
We advise to create a strong passphrase by using the openssl utility, e,g.:
openssl rand --base64 32# 3X03eU5pgoejObUR+Y8I4QjbjeGEKjDcmVFd0FU5pCg=Users should treat the generated passphrase as a secret and they are responsible for securely sharing it within the organization.
The generated secret can now be provided as an option to the save command when creating an encrypted Cloud Pod.
localstack pod save my-secret-pod --secret 3X03eU5pgoejObUR+Y8I4QjbjeGEKjDcmVFd0FU5pCg=Loading an encrypted Cloud Pod would require a similar load command:
localstack pod load my-secret-pod --secret 3X03eU5pgoejObUR+Y8I4QjbjeGEKjDcmVFd0FU5pCg=Encryption with PGP keys
Section titled “Encryption with PGP keys”We also offer the option of using PGP keys to encrypt and decrypt Cloud Pods. The process is the following:
- Customers would have to export both their private and public keys into two files,
private.pgpandpublic.pgprespectively. - These files need to be mounted in a specific
pods.keys.dfolder when starting LocalStack, i.e.,localstack start -v $PWD/pods.keys.d:/etc/localstack/pods.keys.d. - The
secretoption passed to thesaveandloadcommand corresponds to the passphrase needed to import the private key into the LocalStack runtime.
Limitations
Section titled “Limitations”- Both browsing the Cloud Pod content via the UI and loading Cloud Pods into ephemeral instances are currently not supported for encrypted Cloud Pods.
- It is not possible to have both encrypted and non-encrypted versions for a Cloud Pod. Encryption is set at the moment of the creation and it cannot be changed.
Miscellaneous
Section titled “Miscellaneous”Unless explicitly specified, all Cloud Pods commands default to targeting the LocalStack Platform as the storage remote. It’s important to note that the CLI must be authenticated correctly with our Platform.
Custom remote configurations are stored within the LocalStack volume directory and are managed by the LocalStack container. Consequently, when sharing Cloud Pods among your team using a custom remote, each team member must define the identical remote configuration. Once added, a remote persists even after LocalStack restarts.
State Merging
Section titled “State Merging”Cloud Pods offers various strategies for integrating states into your LocalStack container. The available strategies are:
overwrite: This strategy clears the existing state and loads the new state from the Cloud Pod, completely resetting the LocalStack state.account-region-merge(default): This strategy merges services based on account and region pairs. It attempts to combine states from both the current state and the Cloud Pod for the same account and region.service-merge: This strategy merges services at the account-region level, provided there’s no overlap in resources. It prioritizes the loaded resources when merging.
The LocalStack’s default merge strategy can be changed via the MERGE_STRATEGY configuration variable.
LocalStack CLI
Section titled “LocalStack CLI”Every pod load operation uses the merge strategy set in MERGE_STRATEGY (account-region-merge by default).
When loading a Cloud Pod via the LocalStack CLI, set the --strategy <strategy> option to override the strategy in the configuration variable.
For instance, to load a Cloud Pod named test-pod-s3-sqs with the service-merge strategy, run the following command:
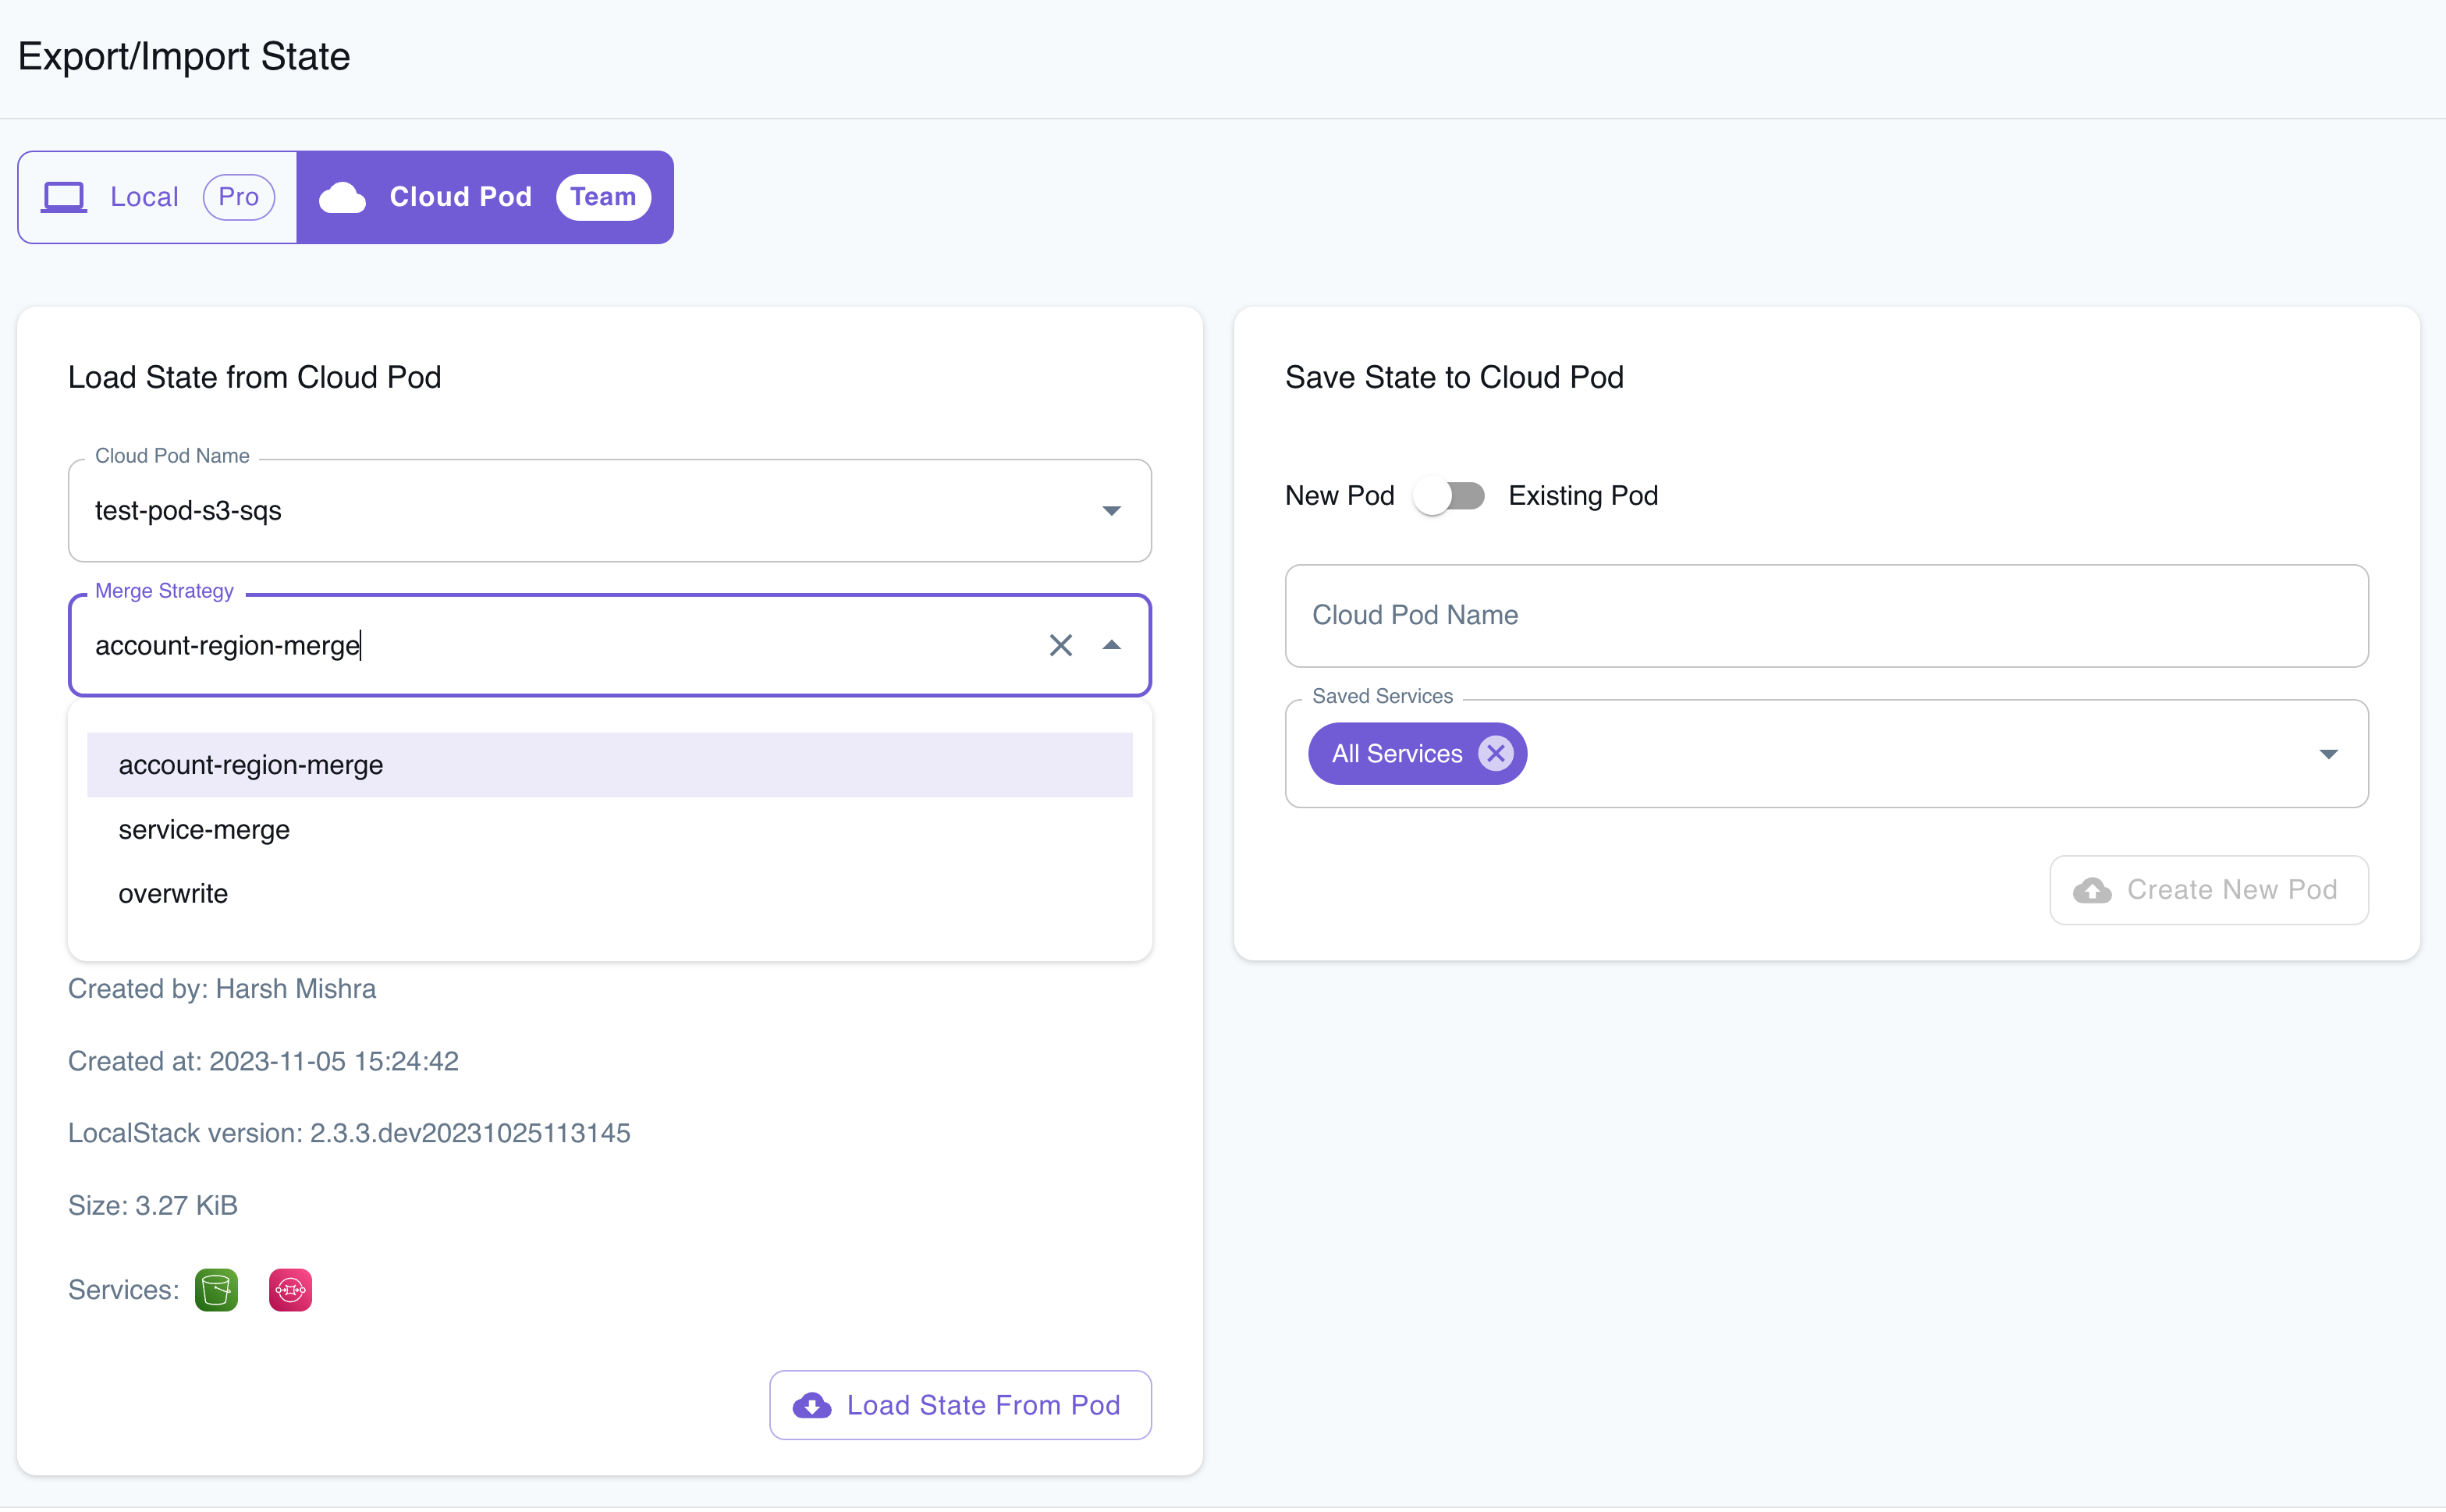
localstack pod load test-pod-s3-sqs --strategy service-mergeLocalStack Web Application
Section titled “LocalStack Web Application”To activate merge strategies, navigate to the Cloud Pods tab on the Export/Import State page. Enter the name of the Cloud Pod, select the version, choose the strategy from a dropdown, and click Load State from Pod.
Example scenario
Section titled “Example scenario”Let us take the image below as example.
The two non overlapping account/region pairs (0123456789/us-east-1 for the Cloud Pod and 0123456789/us-east-2 for the runtime) will be both present in the resulting state.
For 0123456789/eu-central-1 however, we encounter a conflict, since both the Cloud Pod and the container hold a SQS state.
With the account-region-merge strategy, the one from the Cloud Pod will be preserved.
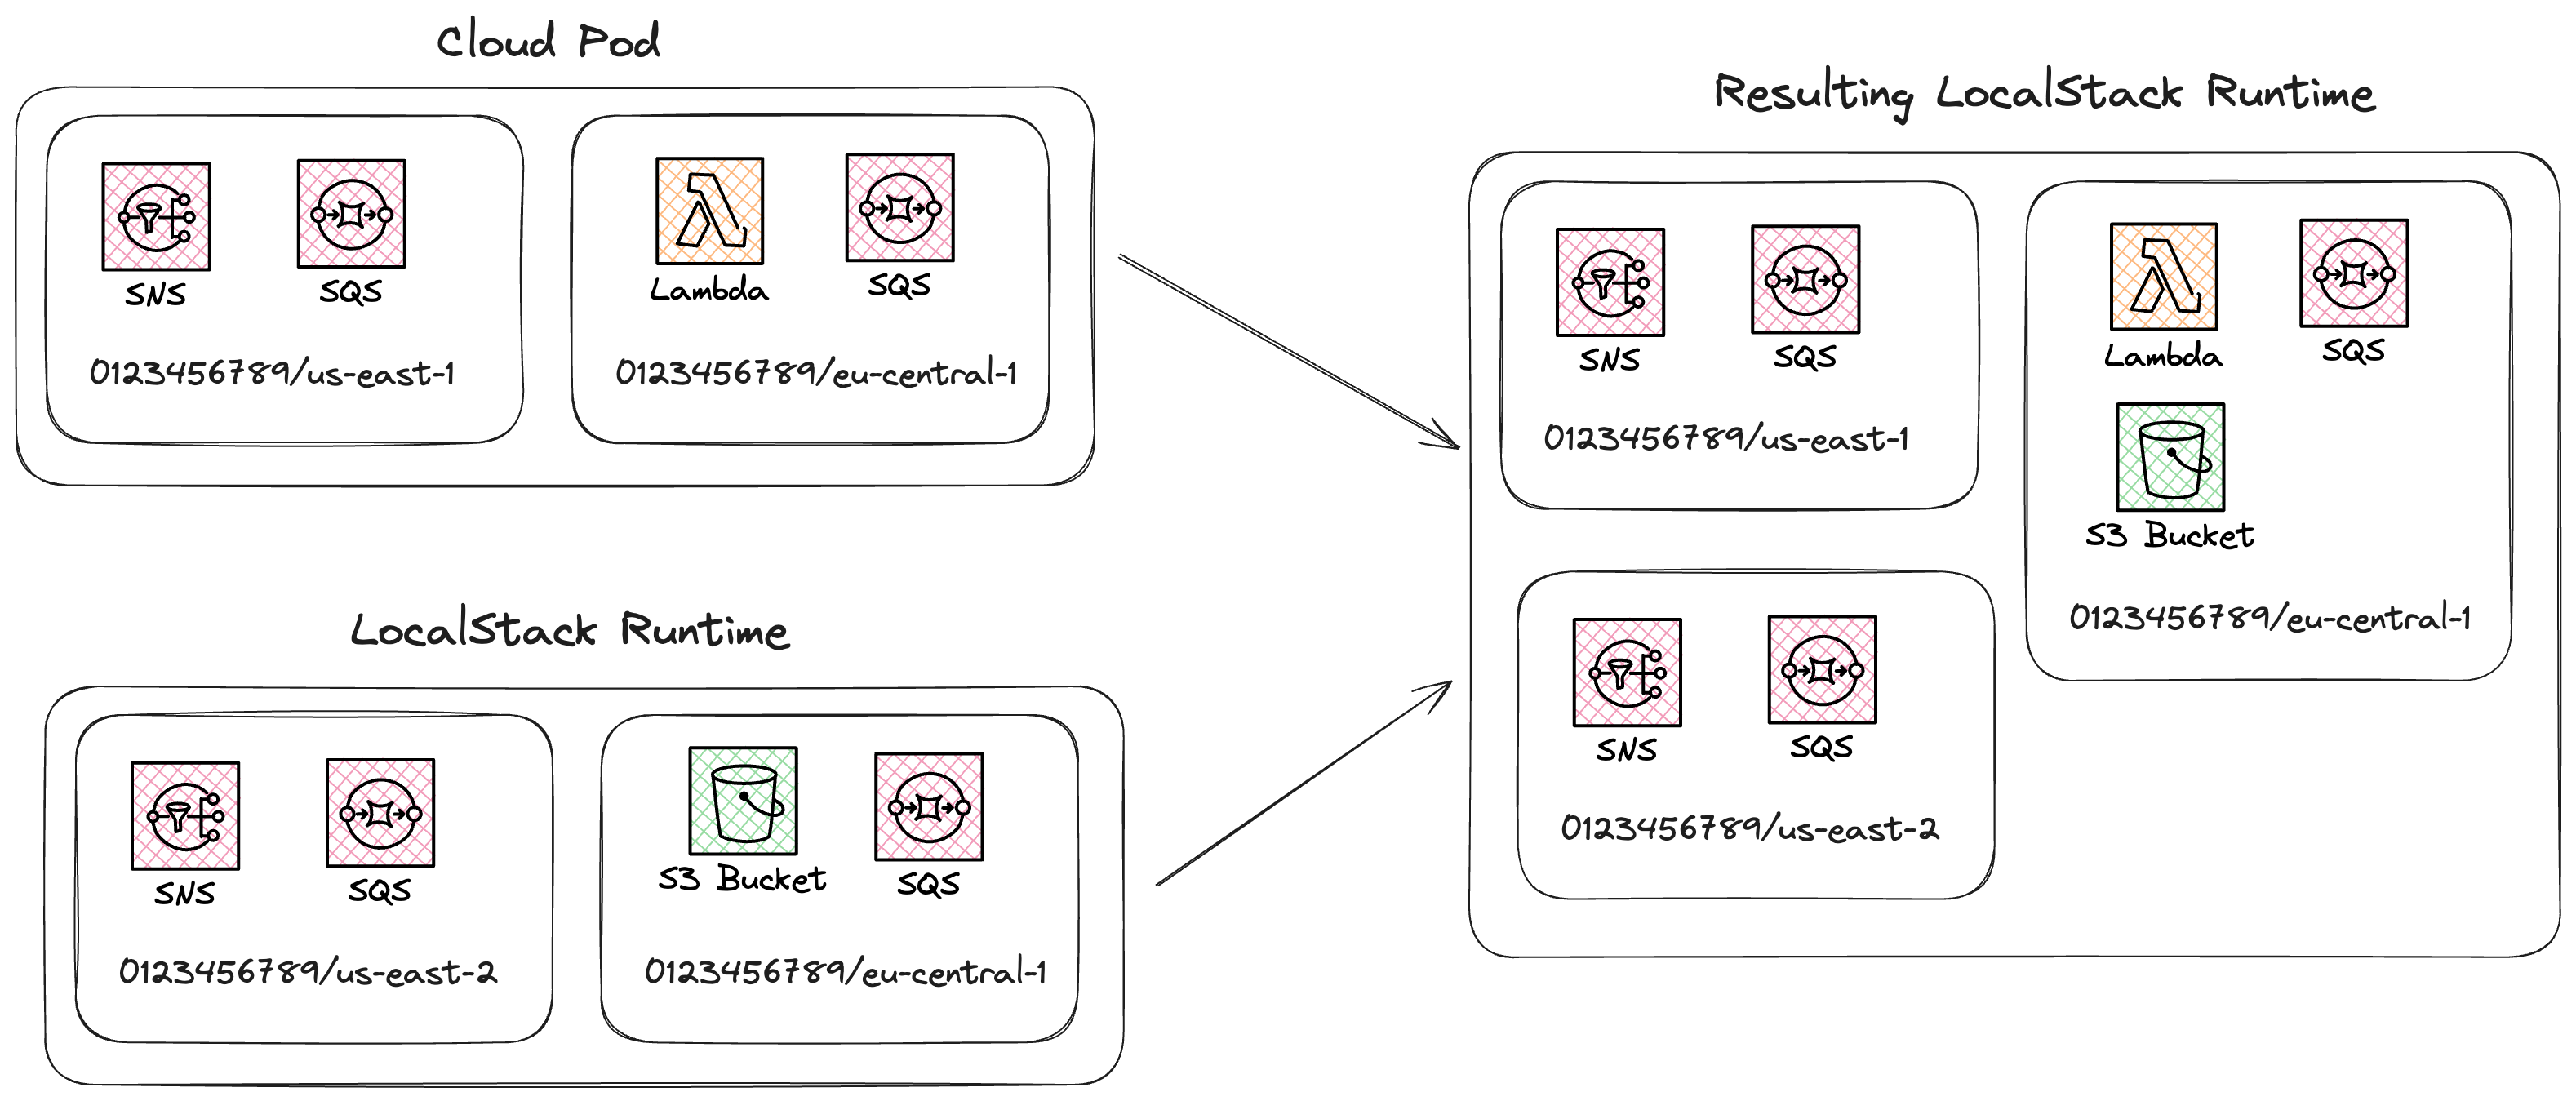
On the other hand, in the service-merge strategy, the SQS resulting state will have 2 distinct queues if the queue from the Cloud Pod and the one in the container are distinct, i.e., do not have the same ARN.
In case of an ARN conflict, only one queue, the one from the Cloud Pod, will be present in the result.
Dry Run
Section titled “Dry Run”To preview the changes that would occur when loading a Cloud Pod, you can use the --dry-run flag.
The result will depend on the selected merge strategy.
The result will be displayed in the console, and no changes will be made to the LocalStack state.
This load operation will modify the runtime state as follows:
──────────────────────────── sns ────────────────────────────+ 2 resources added.~ 1 resources modified.
──────────────────────── cognito-idp ────────────────────────+ 1 resources added.~ 0 resources modified.
──────────────────────────── sqs ────────────────────────────+ 1 resources added.~ 1 resources modified.
Cloud Pods & Persistence
Section titled “Cloud Pods & Persistence”Persistence ensures that the service state persists across container restarts.
You can enable persistence via a LocalStack config flag PERSISTENCE=1 to restore your local resources, in case you’re stopping and re-starting the LocalStack instance on the same machine.
In contrast, Cloud Pods provide more detailed control over your state.
Rather than just restoring a state during LocalStack restarts, Cloud Pods enable you to capture snapshots of your local instance using the save command and inject these snapshots into a running instance using the load command, all without needing to perform a full restart.
Current Limitations
Section titled “Current Limitations”Cloud Pods (and state management in general), come with a few limitation.
In particular, Cloud Pods states might not be correctly restored if the LocalStack version used to create the pod and the target one differ.
We detect version miss-matches when using the pod load and prompt a confirmation message to the user.
localstack pod load old-podThis Cloud Pod was created with LocalStack 2.1.0.but you are running LocalStack 3.2.1.Cloud Pods might be incompatible across different LocalStack versions.Loading a Cloud Pod with mismatching version might lead to a corrupted state of the emulator.Do you want to continue? [y/N]:In addition to this prompt, Cloud Pods are subject to the state compatibility rules shared with snapshot-based persistence.
Pods that were saved before v2026.03 cannot be loaded into LocalStack v2026.03 or later, because persistence was rewritten for several services in that release.
Set DISABLE_COMPATIBILITY_RULES=1 to bypass the checks at your own risk.
We are working to extend Cloud Pods support to all AWS services emulated in LocalStack. However, state management might not yet work reliably for every service.
Troubleshooting
Section titled “Troubleshooting”Unable to obtain Auth Token
Section titled “Unable to obtain Auth Token”When you try to save a Cloud Pod and see the error in LocalStack logs like this:
localstack.cli.exceptions.CLIError: Failed to create Cloud Pod sample-pod ❌ - Unable to obtain auth token (code 401) - please log in again.It would be good to check if you have outdated authentication credentials (bearer token from a previous LocalStack login) in the remotes.yaml file for cloud pods.
You have two options to fix this:
- Run another
localstack auth logincommand. - Find the
remotes.yamlfile in the<localstack_volume>directory on your machine and delete the file, or at least remove the"default"entry from it.
Additionally, if there is a ~/.localstack/auth.json file in your home directory, delete it as well if it still exists.
License not found
Section titled “License not found”When you try to save a Cloud Pod and see the license.not_found error in LocalStack logs like this:
lsmulti-localstack | 2024-03-15T13:06:16.358 WARN --- [functhread31] l.p.remotes.remotes : Failed to register pod sample-pod: {"error": true, "message": "licensing.license.not_found"}To fix this, clear the LocalStack cache directory and restart the LocalStack instance before trying to save the Cloud Pod again. You can find the cache directories at:
/Users/localstack/Library/Caches/localstack/Users/localstack/Library/Caches/localstack-cli
Adjust the path based on your operating system.
SSL Certificate verification failed
Section titled “SSL Certificate verification failed”If you get an SSL certificate verification error while trying to save a Cloud Pod, as shown below:
An error occurred while checking remote management for pod "cloud-pod-product-app": "MyHTTPSConnectionPool(host='api.localstack.cloud', port=443): Max retries exceeded with url: /v1/cloudpods/cloud-pod-product-app (Caused by SSLError(SSLCertVerificationError(1, "[SSL: CERTIFICATE_VERIFY_FAILED] certificate verify failed: Hostname mismatch, certificate is not valid for 'api.localstack.cloud'. (_ssl.c:1006)")))"Check if your machine’s clock is set incorrectly or if the certificate store is outdated.
This error can also occur if you use localstack as LOCALSTACK_HOST.
In this case, the DNS incorrectly resolves api.localstack.cloud to localhost, causing a certificate mismatch.
InvalidAccessKeyId during CreateBucket API call
Section titled “InvalidAccessKeyId during CreateBucket API call”You may see this error:
An error occurred (InvalidAccessKeyId) when calling the CreateBucket operation: The AWS Access Key Id you provided does not exist in our records.This usually means you’re using temporary AWS credentials, but AWS_SESSION_TOKEN is missing from the environment.
To fix this, ensure that you export the AWS_SESSION_TOKEN environment variable:
export AWS_SESSION_TOKEN=...Then, add session_token to the pod remote add URL:
localstack pod remote add s3-storage-aws 's3://ls-pods-bucket-test/?access_key_id={access_key_id}&secret_access_key={secret_access_key}&session_token={session_token}'If you’re still unable to connect to the S3 bucket, add the bucket hostname to the upstream DNS resolution list:
DNS_NAME_PATTERNS_TO_RESOLVE_UPSTREAM=ls-pods-bucket-test.s3.amazonaws.com/For more details, see the Skip LocalStack DNS Resolution section.