Creating ephemeral application previews with LocalStack and GitHub Actions
Introduction
Section titled “Introduction”LocalStack’s core cloud emulator allows you to set up your cloud infrastructure on your local machine. You can access databases, queues, and other managed services without needing to connect to a remote cloud provider. This speeds up your Software Development Life Cycle (SDLC) by making development and testing more efficient. Despite this, you still need a staging environment to do final acceptance tests before deploying your application to production.
In many cases, staging environments are costly and deploying changes to them takes a lot of time. Also, teams can only use one staging environment at a time, which makes it difficult to test changes quickly.
With LocalStack’s Ephemeral Instances, you can create short-lived, self-contained deployments of LocalStack in the cloud. These Ephemeral Instances also let you deploy your application on a remote LocalStack container, creating an Application Preview. This allows you to run end-to-end tests, preview features, and collaborate within your team or across teams asynchronously.
This tutorial will show you how to use LocalStack’s Ephemeral Instance feature to generate an Application Preview automatically for every new Pull Request (PR) using a GitHub Action workflow.
Architecture diagram of the preview flow
Section titled “Architecture diagram of the preview flow”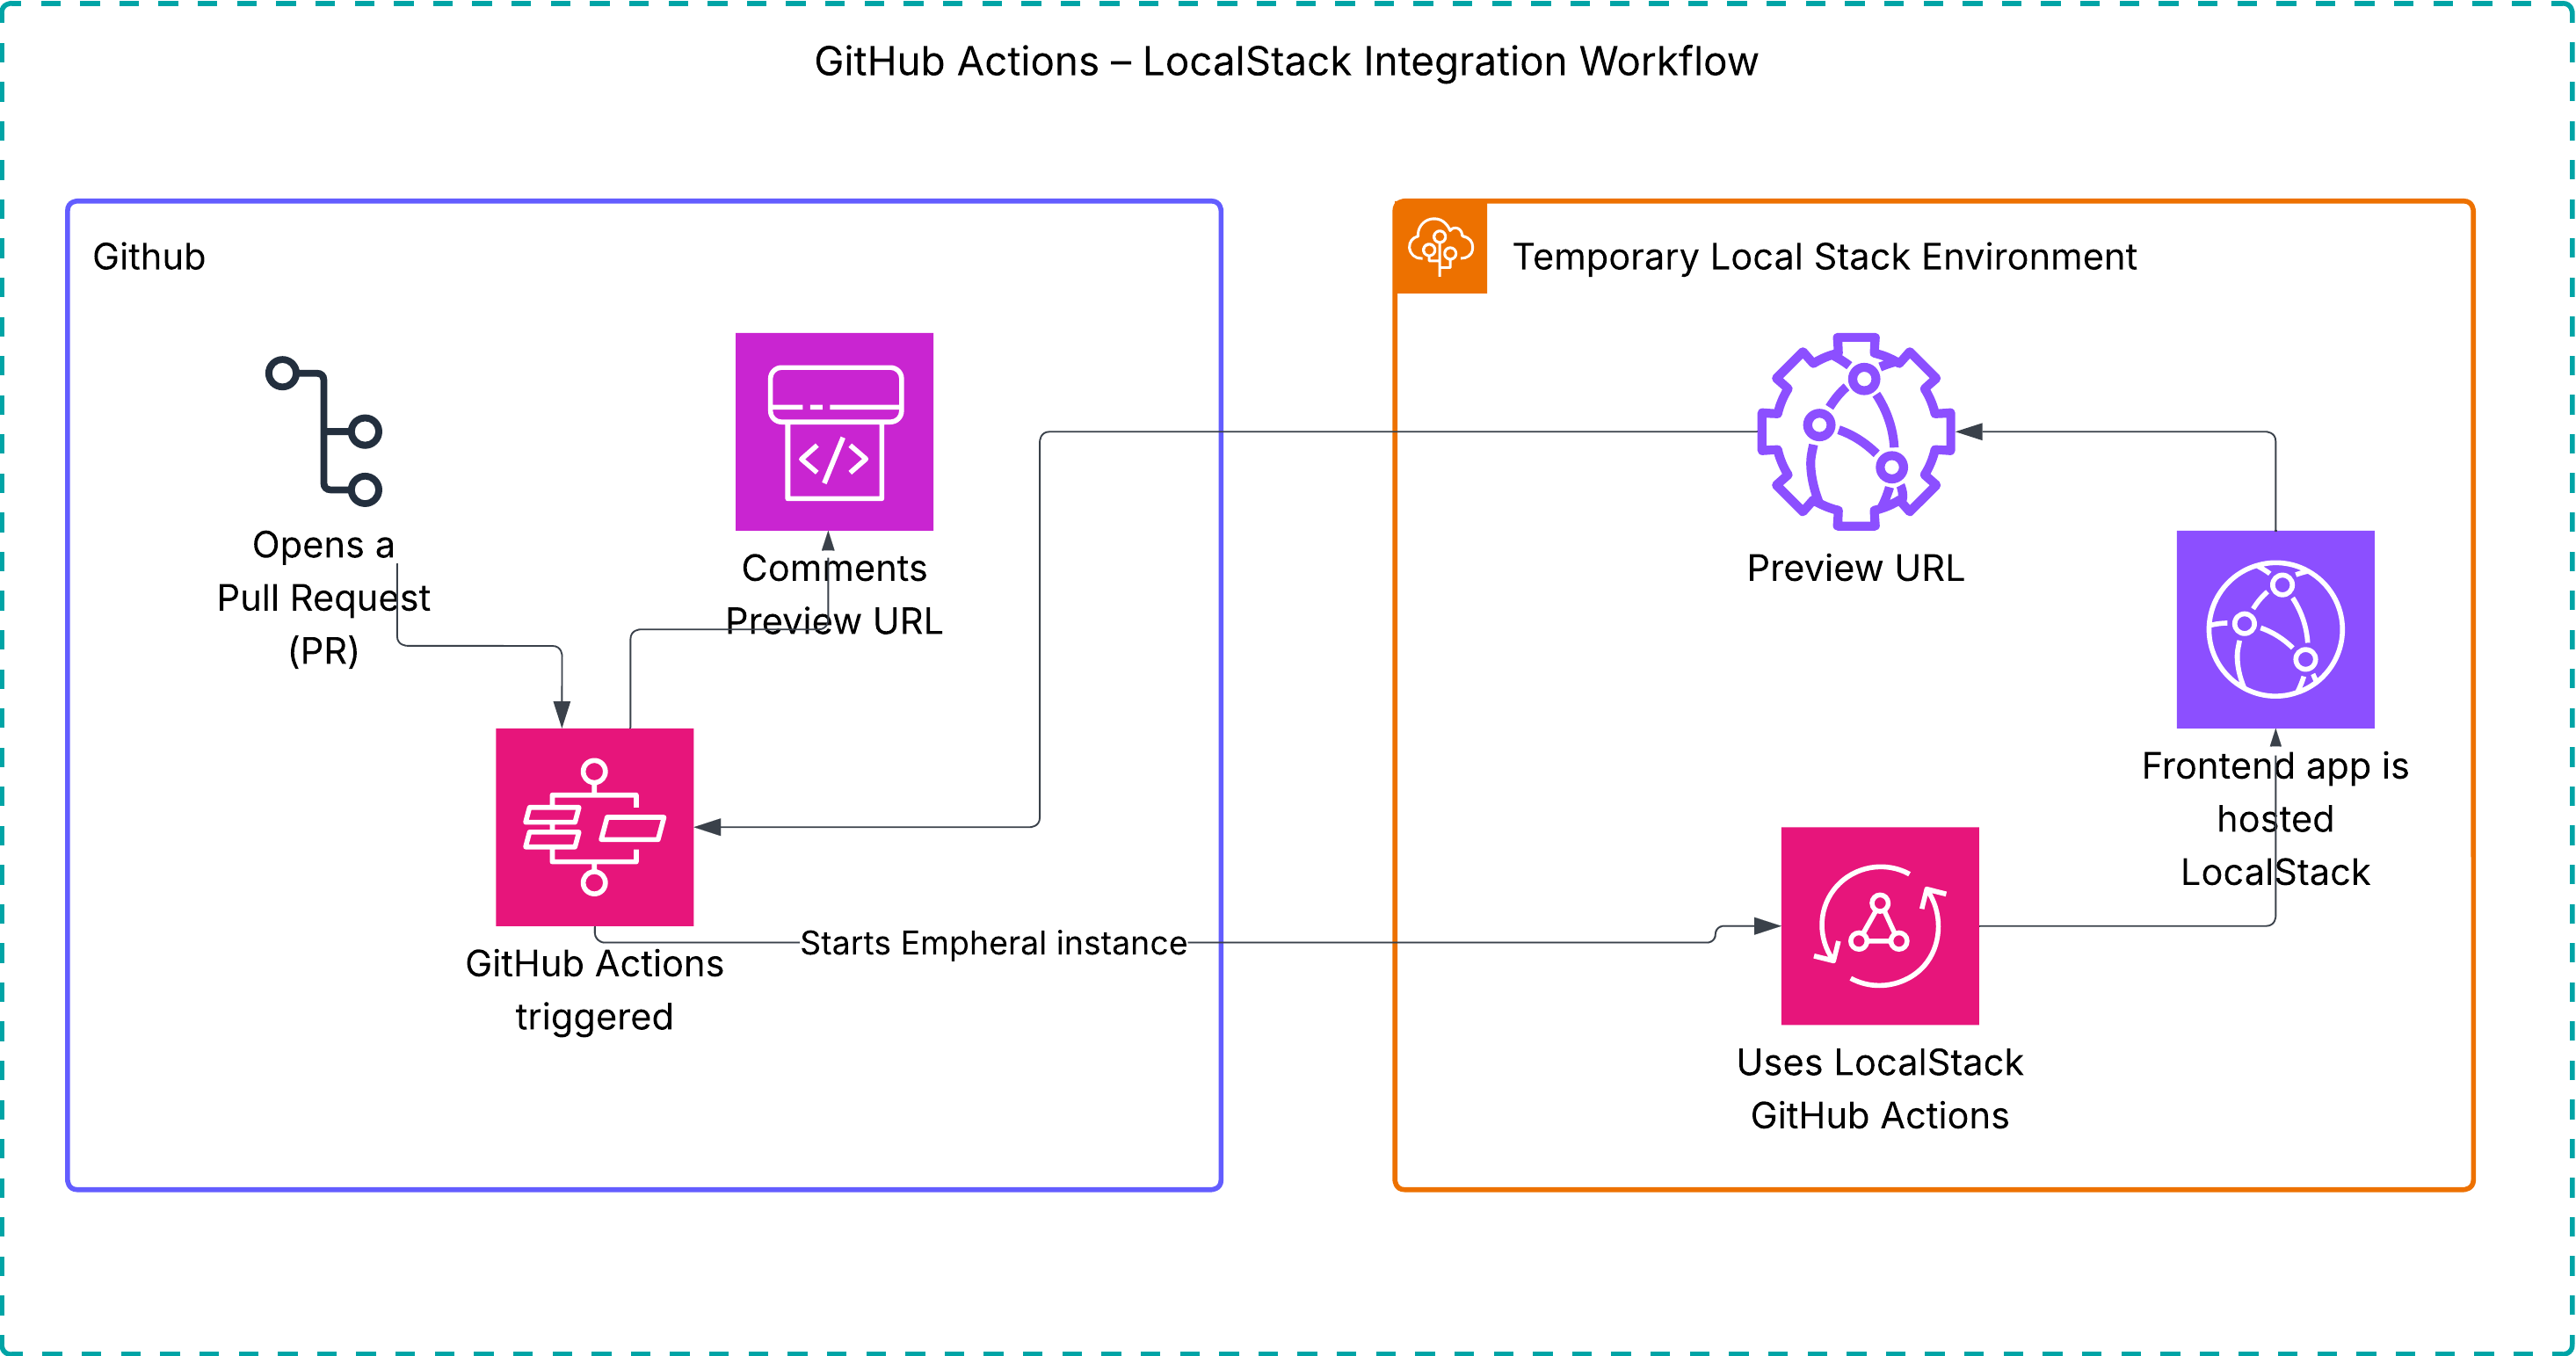
This diagram illustrates the ephemeral preview flow, where a GitHub Pull Request triggers a GitHub Actions workflow that automatically deploys the backend and frontend resources to a temporary LocalStack instance. The ephemeral instance generates a shareable application preview URL, allowing team members to test and validate the application in a production like environment. Once the Pull Request is closed or merged, the ephemeral instance is automatically shut down, ensuring no unnecessary costs are incurred.
Prerequisites
Section titled “Prerequisites”- LocalStack Web Application account
- GitHub Account &
ghCLI (optional)
Tutorial: Setting up Application Previews for your cloud application
Section titled “Tutorial: Setting up Application Previews for your cloud application”This tutorial uses a public LocalStack sample to showcase a simple note-taking application using the modular AWS SDK for JavaScript. The example application deploys several AWS resources including DynamoDB, Lambda, API Gateway, S3, Cognito, and CloudFront, functioning as follows:
- Five Lambda functions handle basic CRUD functionality around note entities.
- The frontend is built with React and served via Cloudfront and an S3 bucket.
- DynamoDB is used as a persistence layer to store the notes.
- API Gateway exposes the Lambda functions through HTTP APIs.
- A Cognito User Pool is used for Authentication and Authorization.
This tutorial guides you through setting up a GitHub Action workflow to create an Application Preview of the sample application by deploying it on an ephemeral instance.
Create the GitHub Action workflow
Section titled “Create the GitHub Action workflow”GitHub Actions serves as a continuous integration and continuous delivery (CI/CD) platform, automating software development workflows directly from GitHub. It allows customization of actions and automation throughout the software development lifecycle.
In this tutorial, you’ll implement a workflow that:
- Checks out the repository from GitHub.
- Installs necessary dependencies.
- Deploys the application on a ephemeral LocalStack Instance using a GitHub Action Runner to generate a sharable application preview.
To begin, fork the LocalStack sample repository on GitHub.
If you’re using GitHub’s gh CLI, fork and clone the repository with this command:
gh repo fork https://github.com/localstack-samples/sample-notes-app-dynamodb-lambda-apigatewayAfter forking and cloning, navigate to the .github/workflows directory in your forked repository and open the preview.yml file.
This file will contain the GitHub Action workflow configuration.
Now you’re set to create your GitHub Action workflow, which will deploy your cloud application on an ephemeral instance using LocalStack.
Set Up the Actions & dependencies
Section titled “Set Up the Actions & dependencies”To achieve the goal, you can utilize a few prebuilt Actions:
actions/checkout: Checkout the application code with Git.setup-localstack/ephemeral/startup: Configure the workflow to generate the application preview.LocalStack/setup-localstack/finish: Add a comment to the PR, which includes a URL to the application preview.
You will find the following content to the preview.yml file that you opened earlier:
name: Create PR Preview
on:  pull_request:    types: [opened, synchronize, reopened]
This configuration ensures that every time a pull request is raised, the action is triggered.
A new job named preview specifies the GitHub-hosted runner to execute our workflow steps, while also checking out the code we need to deploy to the application preview instance:
jobs: preview: permissions: write-all runs-on: ubuntu-latest timeout-minutes: 15 steps: - name: Checkout uses: actions/checkout@v4Deploy the application preview
Section titled “Deploy the application preview”To deploy the application preview, you can utilize the LocalStack/setup-localstack/ephemeral/startup action, which requires the following parameters:
github-token: Automatically configured on the GitHub Action runner.localstack-api-key: Configuration of a LocalStack CI key (LOCALSTACK_API_KEY) to activate licensed features in LocalStack (Note: You may need administrator permission to access creating new CI keys or legacy API keys).preview-cmd: The set of commands necessary to deploy the application, including its infrastructure, on LocalStack.
The following step sets up the dependencies and deploys the application preview on an ephemeral LocalStack instance:
- name: Deploy Preview uses: LocalStack/setup-localstack/ephemeral/startup@v0.2.2 with: github-token: ${{ secrets.GITHUB_TOKEN }} localstack-api-key: ${{ secrets.LOCALSTACK_API_KEY }} preview-cmd: | npm install -g aws-cdk-local aws-cdk pip install awscli-local[ver1] make build make bootstrap make deploy make prepare-frontend-local make build-frontend make bootstrap-frontend make deploy-frontend distributionId=$(awslocal cloudfront list-distributions | jq -r '.DistributionList.Items[0].Id') echo LS_PREVIEW_URL=$AWS_ENDPOINT_URL/cloudfront/$distributionId/ >> $GITHUB_ENVIn the provided workflow:
- Dependencies such as
awslocal, AWS CDK library, and thecdklocalwrapper are installed. Makefiletargets are employed to build the application, bootstrap the CDK stack, and deploy it.- Additionally, the frontend application is built and deployed on an S3 bucket served via a CloudFront distribution.
- The application preview URL is provided by querying the CloudFront distribution ID using
awslocal.
To complete the process, the last step attaches the application preview URL to the Pull Request (PR) as a comment. This allows for quick access to the deployed URL for validating features or enhancements pushed to your application.
- name: Finalize PR comment uses: LocalStack/setup-localstack/finish@v0.2.2 with: github-token: ${{ secrets.GITHUB_TOKEN }} include-preview: true preview-url: ${{ env.PREVIEW_URL }}Configure a CI key for GitHub Actions
Section titled “Configure a CI key for GitHub Actions”Before triggering your workflow, set up a continuous integration (CI) key for LocalStack. LocalStack requires a CI Key for usage in CI or similar automated environments to activate licensed features.
Follow these steps to add your LocalStack CI key to your forked GitHub repository:
- Navigate to the LocalStack Web Application and access the CI Keys page.
- Scroll down to the Generate CI Key card, where you can provide a name, and click Generate CI Key to receive a new key.
- In your GitHub repository secrets, set the Name as
LOCALSTACK_API_KEYand the Secret as the CI Key.
If you do not have access to creating CI keys, contact your LocalStack account administrator. Now, you can commit and push your workflow to your forked GitHub repository.
Run the GitHub Action workflow
Section titled “Run the GitHub Action workflow”Now that the GitHub Action Workflow is set up, each pull request in your cloud application will undergo building, deployment, and packaging as an application preview running within an ephemeral instance. The workflow will automatically update the application preview whenever new commits are pushed to the pull request.

In case your deployment encounters issues and fails on LocalStack, you can troubleshoot by incorporating additional steps to generate a diagnostics report.
After downloading, you can visualize logs and environment variables using a tool like diapretty:
- name: Generate a Diagnostic Report  if: failure()  run: curl -s localhost:4566/_localstack/diagnose | gzip -cf > diagnose.json.gz
- name: Upload the Diagnostic Report  if: failure()  uses: actions/upload-artifact@v4  with:    name: diagnose.json.gz    path: ./diagnose.json.gz
Testing the application
Section titled “Testing the application”Once the Application Preview is successfully deployed on a LocalStack Ephemeral Instance, you can validate that your cloud application is functioning as expected before merging your Pull Request.
Follow the checklist below to verify the preview environment:
Testing the application checklist
Section titled “Testing the application checklist”-
Preview URL Reachability:
Ensure the preview URL added as a comment on your Pull Request is accessible. Open the link to verify that the frontend application loads successfully in your browser. -
Smoke Tests Execution:
Perform basic smoke tests to validate the core functionality of your application. For example, verify that API endpoints respond correctly, CRUD operations succeed, and authentication flows (if applicable) function as intended. -
Backend Resource Validation:
Confirm that key AWS-like resources, such as DynamoDB tables, Lambda functions, and API Gateway endpoints, are deployed and operational within the LocalStack environment. You can use theawslocalCLI to inspect resources, for example:Terminal window awslocal dynamodb list-tablesawslocal lambda list-functionsawslocal apigatewayv2 get-apis -
Frontend Verification:
Test that the deployed frontend connects correctly to the backend APIs exposed via LocalStack and that any user interactions (e.g., creating or retrieving data) work as expected.
After completing these checks and confirming the application behaves as expected, your preview is considered validated and ready for review or merge.
Conclusion
Section titled “Conclusion”In this tutorial, you’ve learned how to utilize LocalStack’s Ephemeral Instances to generate application previews for your cloud applications. You can explore additional use cases with Ephemeral Instances, including:
- Injecting a pre-defined Cloud Pod into an ephemeral instance to rapidly spin up infrastructure.
- Running your automated end-to-end (E2E) test suite to conduct thorough testing before deploying to production.
- Enabling collaboration across different teams by offering a pre-production environment for collaborative work.