Elastic Kubernetes Service (EKS)
Introduction
Section titled “Introduction”Elastic Kubernetes Service (EKS) is a managed Kubernetes service that makes it easy to run Kubernetes on AWS without installing, operating, and maintaining your own Kubernetes control plane or worker nodes. Kubernetes is an open-source system for automating containerized applications’ deployment, scaling, and management.
LocalStack allows you to use the EKS APIs in your local environment to spin up embedded Kubernetes clusters in your local Docker engine or use an existing Kubernetes installation you can access from your local machine (defined in $HOME/.kube/config).
The supported APIs are available on our API Coverage section, which provides information on the extent of EKS’s integration with LocalStack.
Getting started
Section titled “Getting started”This guide is designed for users new to Elastic Kubernetes Service and assumes basic knowledge of the AWS CLI and our awslocal wrapper script.
To interact with the Kubernetes cluster, you should also install kubectl.
Start your LocalStack container using your preferred method. We will demonstrate how you can auto-install an embedded Kubernetes cluster, configure ingress, and deploy a sample service with ECR.
Deploy the necessary networking components
Section titled “Deploy the necessary networking components”First we need to create a VPC for the EKS cluster. You can create a new VPC using the CreateVpc API.
Run the following command:
awslocal ec2 create-vpc --cidr-block 10.0.0.0/16{ "Vpc": { ... "CidrBlock": "10.0.0.0/16", "VpcId": "<vpc-id>", ... }}Next, we need to create a subnet in the VPC. You can create a 2 subnets using the CreateSubnet API. Some extra tags might be required for specific Controllers to work properly. Please refer to their specific documentation for more details.
Run the following command:
awslocal ec2 create-subnet \ --vpc-id <vpc-id> \ --cidr-block 10.0.1.0/24 \ --availability-zone us-east-1a{ "Subnet": { ... "SubnetId": "<subnet-id-1>", "VpcId": "<vpc-id>", "CidrBlock": "10.0.1.0/24" ... }}awslocal ec2 create-subnet \ --vpc-id <vpc-id> \ --cidr-block 10.0.2.0/24 \ --availability-zone us-east-1b{ "Subnet": { ... "SubnetId": "<subnet-id-2>", "VpcId": "<vpc-id>", "CidrBlock": "10.0.2.0/24" ... }}Create an embedded Kubernetes cluster
Section titled “Create an embedded Kubernetes cluster”The default approach for creating Kubernetes clusters using the local EKS API is by setting up an embedded k3d kube cluster within Docker. LocalStack seamlessly manages the download and installation process, making it hassle-free for users. In most cases, the installation is automatic, eliminating the need for any manual customizations.
You can create a new cluster using the CreateCluster API.
Run the following command:
awslocal eks create-cluster \ --name cluster1 \ --role-arn "arn:aws:iam::000000000000:role/eks-role" \ --resources-vpc-config '{"subnetIds":["<subnet-id-1>", "<subnet-id-2>"]}'{ "cluster": { "name": "cluster1", "arn": "arn:aws:eks:us-east-1:000000000000:cluster/cluster1", "createdAt": "2022-04-13T16:38:24.850000+02:00", "roleArn": "arn:aws:iam::000000000000:role/eks-role", "resourcesVpcConfig": { "subnetIds": [ "<subnet-id-1>", "<subnet-id-2>" ] }, "identity": { "oidc": { "issuer": "https://localhost.localstack.cloud/eks-oidc" } }, "status": "CREATING", "clientRequestToken": "cbdf2bb6-fd3b-42b1-afe0-3c70980b5959" }}The cluster creation process may take a few moments as LocalStack sets up the necessary components. Avoid attempting to access the cluster until the status changes to ACTIVE.
Run the following command to wait for the cluster status to become ACTIVE:
awslocal eks wait cluster-active --name cluster1You can use the docker CLI to check that some containers have been created:
docker psCONTAINER ID IMAGE COMMAND CREATED STATUS PORTS NAMES...b335f7f089e4 rancher/k3d-proxy:5.0.1-rc.1 "/bin/sh -c nginx-pr…" 1 minute ago Up 1 minute 0.0.0.0:8081->80/tcp, 0.0.0.0:44959->6443/tcp k3d-cluster1-serverlbf05770ec8523 rancher/k3s:v1.21.5-k3s2 "/bin/k3s server --t…" 1 minute ago Up 1 minute...Creating a managed node group
Section titled “Creating a managed node group”The EKS cluster created in the previous step does not include any worker nodes by default. While you can inspect the server node, it is tainted, and workloads cannot be scheduled on it. To run workloads on the cluster, you must add at least one worker node. One way to do this is by creating a managed node group. When you create a managed node group, LocalStack automatically provisions a Docker container, joins it to the cluster, and provisions a mocked EC2 instance.
You can create a managed node group for your EKS cluster using the CreateNodegroup API.
Run the following command:
awslocal eks create-nodegroup \ --cluster-name cluster1 \ --nodegroup-name nodegroup1 \ --node-role arn:aws:iam::000000000000:role/eks-nodegroup-role \ --subnets <subnet-id-1> <subnet-id-2> \ --scaling-config desiredSize=1{ "nodegroup": { "nodegroupName": "nodegroup1", "nodegroupArn": "arn:aws:eks:us-east-1:000000000000:nodegroup/cluster1/nodegroup1/xxx", "clusterName": "cluster1", "version": "1.21", "releaseVersion": "1.21.7-20220114", "createdAt": "2022-04-13T17:25:45.821000+02:00", "status": "CREATING", "capacityType": "ON_DEMAND", "scalingConfig": { "desiredSize": 1 }, "subnets": [ "<subnet-id-1>", "<subnet-id-2>" ], "nodeRole": "arn:aws:iam::000000000000:role/eks-nodegroup-role", "labels": {}, "health": { "issues": [] }, "updateConfig": { "maxUnavailable": 1 } }}The node group creation process may take a few moments as LocalStack sets up the necessary components.
You can wait for the node group status to become ACTIVE by running the following command:
awslocal eks wait nodegroup-active --cluster-name cluster1 --nodegroup-name nodegroup1At this point, your EKS cluster is fully operational and ready to deploy workloads.
Utilizing ECR Images within EKS
Section titled “Utilizing ECR Images within EKS”You can now use ECR (Elastic Container Registry) images within your EKS environment.
Initial configuration
Section titled “Initial configuration”To modify the return value of resource URIs for most services, including ECR, you can utilize the LOCALSTACK_HOST variable in the configuration.
By default, ECR returns a repositoryUri starting with localhost.localstack.cloud, such as: localhost.localstack.cloud:<port>/<repository-name>.
Once you have configured this correctly, you can seamlessly use your ECR image within EKS as expected.
Deploying a sample application from an ECR image
Section titled “Deploying a sample application from an ECR image”To showcase this behavior, let’s go through a concise step-by-step guide that will lead us to the successful pulling of an image from local ECR.
For the purpose of this guide, we will retag the nginx image to be pushed to a local ECR repository under a different name, and then utilize it for a pod configuration.
You can create a new ECR repository using the CreateRepository API.
Run the following command:
awslocal ecr create-repository --repository-name "fancier-nginx"{ "repository": { "repositoryArn": "arn:aws:ecr:us-east-1:000000000000:repository/fancier-nginx", "registryId": "c75fd0e2", "repositoryName": "fancier-nginx", "repositoryUri": "000000000000.dkr.ecr.us-east-1.localhost.localstack.cloud:4566/fancier-nginx", "createdAt": "2022-04-13T14:22:47+02:00", "imageTagMutability": "MUTABLE", "imageScanningConfiguration": { "scanOnPush": false }, "encryptionConfiguration": { "encryptionType": "AES256" } }}You can now pull the nginx image from Docker Hub using the docker CLI:
docker pull nginxYou can further tag the image to be pushed to ECR:
docker tag nginx 000000000000.dkr.ecr.us-east-1.localhost.localstack.cloud:4566/fancier-nginxFinally, you can push the image to local ECR:
docker push 000000000000.dkr.ecr.us-east-1.localhost.localstack.cloud:4566/fancier-nginxNow, let us set up the EKS cluster using the image pushed to local ECR.
Next, we can configure kubectl to use the EKS cluster, using the UpdateKubeconfig API.
Run the following command:
awslocal eks update-kubeconfig --name cluster1 && \ kubectl config use-context arn:aws:eks:us-east-1:000000000000:cluster/cluster1...Added new context arn:aws:eks:us-east-1:000000000000:cluster/cluster1 to /home/localstack/.kube/configSwitched to context "arn:aws:eks:us-east-1:000000000000:cluster/cluster1"....You can now go ahead and add a deployment configuration for the fancier-nginx image.
cat <<EOF | kubectl apply -f -apiVersion: apps/v1kind: Deploymentmetadata: name: fancier-nginx labels: app: fancier-nginxspec: replicas: 1 selector: matchLabels: app: fancier-nginx template: metadata: labels: app: fancier-nginx spec: containers: - name: fancier-nginx image: 000000000000.dkr.ecr.us-east-1.localhost.localstack.cloud:4566/fancier-nginx:latest ports: - containerPort: 80EOFYou can now describe the pod to see if the image was pulled successfully:
kubectl describe pod fancier-nginxIn the events, we can see that the pull from ECR was successful:
Normal Pulled 10s kubelet Successfully pulled image "000000000000.dkr.ecr.us-east-1.localhost.localstack.cloud:4566/fancier-nginx:latest" in 2.412775896sConfiguring an Ingress for your services
Section titled “Configuring an Ingress for your services”To make an EKS service externally accessible, it is necessary to create an Ingress configuration, which exposes the service on a specific path to the load balancer.
For our sample deployment, we can create an nginx Kubernetes service by applying the following configuration:
cat <<EOF | kubectl apply -f -apiVersion: v1kind: Servicemetadata: name: nginxspec: selector: app: fancier-nginx ports: - name: http protocol: TCP port: 80 targetPort: 80EOFUse the following ingress configuration to expose the nginx service on path /test123:
cat <<EOF | kubectl apply -f -apiVersion: networking.k8s.io/v1kind: Ingressmetadata: name: nginx annotations: ingress.kubernetes.io/ssl-redirect: "false"spec: rules: - http: paths: - path: /test123 pathType: Prefix backend: service: name: nginx port: number: 80EOFYou will be able to send a request to nginx via the load balancer port 8081 from the host:
curl http://localhost:8081/test123<html>...<hr><center>nginx/1.21.6</center>...Enabling HTTPS with local SSL/TLS certificate for the Ingress
Section titled “Enabling HTTPS with local SSL/TLS certificate for the Ingress”To enable HTTPS for your endpoints, you can configure Kubernetes to use SSL/TLS with the certificate for local domain names *.localhost.localstack.cloud.
The local EKS cluster comes pre-configured with a secret named ls-secret-tls, which can be conveniently utilized to define the tls section in the ingress configuration:
apiVersion: networking.k8s.io/v1kind: Ingressmetadata: name: test-ingress annotations: ingress.kubernetes.io/ssl-redirect: "false" traefik.ingress.kubernetes.io/router.entrypoints: web,websecure traefik.ingress.kubernetes.io/router.tls: "true"spec: tls: - secretName: ls-secret-tls hosts: - myservice.localhost.localstack.cloud ...Once you have deployed your service using the mentioned ingress configuration, it will be accessible via the HTTPS endpoint https://myservice.localhost.localstack.cloud.
Remember that the ingress controller does not support HTTP/HTTPS multiplexing within the same Ingress. Consequently, if you want your service to be accessible via HTTP and HTTPS, you must create two separate Ingress definitions — one Ingress for HTTP and another for HTTPS.
Self-managed nodes and Karpenter
Section titled “Self-managed nodes and Karpenter”In addition to managed node groups, LocalStack supports self-managed worker nodes: EC2 instances that join an EKS cluster on their own using the standard EKS bootstrap user-data. This is the same mechanism that Karpenter relies on to provision capacity, so you can run the full Karpenter node lifecycle (SSM AMI lookup, EC2 Fleet provisioning, node bootstrap, and scale-up/scale-down) against a local cluster without any LocalStack-specific configuration.
When an EC2 instance is launched with EKS bootstrap user-data, LocalStack parses it, connects the instance container to the cluster’s internal network, and starts a k3s agent inside it. The instance then registers as a worker node, exactly as a real EKS node would appear to the control plane.
Two AMI families are supported:
- Amazon Linux 2023 (AL2023): configuration is carried as a multipart MIME
application/node.eks.awsNodeConfig document (used bynodeadmand Karpenter). - Bottlerocket: configuration is carried as a plain TOML document under
[settings.kubernetes].
LocalStack reads the same set of fields from both formats and propagates them to the registered node, including node labels, taints, topology metadata (region, zone, instance type), and the provider ID. This matches what real EKS nodes look like from the cluster’s perspective.
Resolving a node AMI
Section titled “Resolving a node AMI”Self-managed nodes must be launched from an EKS-optimized AMI. LocalStack resolves the standard EKS AMI SSM public parameters to a k3s-backed image, so you can look them up the same way Karpenter does.
awslocal ssm get-parameter \ --name /aws/service/eks/optimized-ami/1.35/amazon-linux-2023/x86_64/standard/recommended/image_id \ --query 'Parameter.Value' --output textami-eks-k3d-1.35-amd64-standardawslocal ssm get-parameter \ --name /aws/service/bottlerocket/aws-k8s-1.35/x86_64/latest/image_id \ --query 'Parameter.Value' --output textami-eks-k3d-1.35-amd64The walkthrough below assumes a cluster named cluster1 that is already ACTIVE (see Create an embedded Kubernetes cluster).
Joining a self-managed node
Section titled “Joining a self-managed node”-
Create a user-data file containing a
NodeConfigdocument. At minimum,spec.cluster.namemust match the name of your EKS cluster, which LocalStack uses to resolve which cluster the node should join. Optionally, you can set kubelet configuration and node labels:al2023-userdata.txt MIME-Version: 1.0Content-Type: multipart/mixed; boundary="//"--//Content-Type: application/node.eks.awsapiVersion: node.eks.aws/v1alpha1kind: NodeConfigspec:cluster:name: cluster1kubelet:config:maxPods: 20registerWithTaints:- key: dedicatedvalue: gpueffect: NoScheduleflags:- '--node-labels=role=worker,env=demo'--//-- -
Launch an EC2 instance using the resolved AL2023 AMI and the user-data file:
Launch AL2023 node awslocal ec2 run-instances \--image-id ami-eks-k3d-1.35-amd64-standard \--count 1 \--instance-type t3.medium \--user-data file://./al2023-userdata.txt
-
Bottlerocket carries its bootstrap configuration as a plain TOML document. Create a user-data file with a
[settings.kubernetes]section, settingcluster-nameto your cluster:bottlerocket-userdata.toml [settings.kubernetes]cluster-name = "cluster1"max-pods = 30[settings.kubernetes.node-labels]"role" = "worker""env" = "demo"[settings.kubernetes.node-taints]"dedicated" = ["gpu:NoSchedule"] -
Launch an EC2 instance using the resolved Bottlerocket AMI:
Launch Bottlerocket node awslocal ec2 run-instances \--image-id ami-eks-k3d-1.35-amd64 \--count 1 \--instance-type m5.large \--user-data file://./bottlerocket-userdata.toml
Verifying the node
Section titled “Verifying the node”Point kubectl at the cluster and list the nodes:
awslocal eks update-kubeconfig --name cluster1 && \ kubectl config use-context arn:aws:eks:us-east-1:000000000000:cluster/cluster1After a few seconds, the self-managed instance registers and becomes Ready alongside the cluster’s control-plane node.
The node name is the EC2 instance ID:
kubectl get nodesNAME STATUS ROLES AGE VERSIONi-8a2eb615ddf838df7 Ready <none> 33s v1.35.5+k3s1k3d-cluster1-c2fad0d2-server-0 Ready control-plane 2m v1.35.5+k3s1You can confirm that the configuration from the user-data was applied to the node:
kubectl get node i-8a2eb615ddf838df7 \ -o jsonpath='{.spec.providerID}{"\n"}{.spec.taints}{"\n"}{.status.allocatable.pods}{"\n"}'aws:///us-east-1a/i-8a2eb615ddf838df7[{"effect":"NoSchedule","key":"dedicated","value":"gpu"}]20Supported configuration fields
Section titled “Supported configuration fields”LocalStack reads the following fields from the node bootstrap user-data and reflects them on the registered Kubernetes node. The AL2023 and Bottlerocket columns show where each value comes from in the respective format:
| Behaviour | AL2023 (NodeConfig) |
Bottlerocket (TOML) |
|---|---|---|
| Target cluster | spec.cluster.name |
cluster-name |
| Cluster DNS | kubelet.config.clusterDNS |
cluster-dns-ip |
| Max pods | kubelet.config.maxPods |
max-pods |
| Eviction thresholds | kubelet.config.evictionHard |
[settings.kubernetes.eviction-hard] |
| Node taints | kubelet.config.registerWithTaints |
[settings.kubernetes.node-taints] |
| Node labels | kubelet.flags (--node-labels) |
[settings.kubernetes.node-labels] |
In addition, LocalStack always emits the topology labels topology.kubernetes.io/region, topology.kubernetes.io/zone, and node.kubernetes.io/instance-type (derived from the instance’s placement and type), as well as the provider ID in the form aws:///<az>/<instance-id>.
Using Karpenter
Section titled “Using Karpenter”Because self-managed nodes rely only on standard EC2 and EKS bootstrap behaviour, Karpenter can drive node provisioning against a local cluster without any LocalStack-specific changes. Karpenter looks up node AMIs through the SSM parameters described above, launches instances via EC2 Fleet with the appropriate NodeConfig or Bottlerocket user-data, and the new instances join the cluster as described.
To try this out, follow the upstream Getting started with Karpenter guide, pointing the AWS endpoints at LocalStack.
Use an existing Kubernetes installation
Section titled “Use an existing Kubernetes installation”You can also access the EKS API using your existing local Kubernetes installation.
This can be achieved by setting the configuration variable EKS_K8S_PROVIDER=local and mounting the $HOME/.kube/config file into the LocalStack container.
When using a docker-compose.yml file, you need to add a bind mount like this:
volumes: - "${HOME}/.kube/config:/root/.kube/config"When using the LocalStack CLI, please configure the DOCKER_FLAGS to mount the kubeconfig into the container:
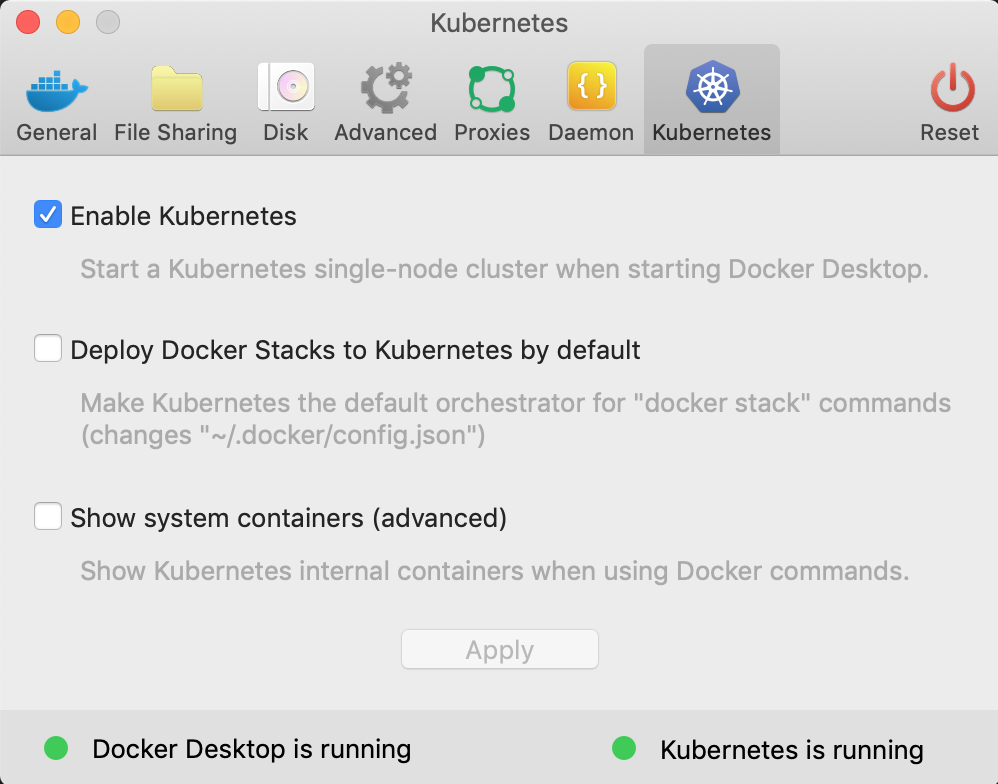
DOCKER_FLAGS="-v ${HOME}/.kube/config:/root/.kube/config" localstack startIn recent versions of Docker, you can enable Kubernetes as an embedded service running inside Docker.
The picture below illustrates the Kubernetes settings in Docker for macOS (similar configurations apply for Linux/Windows).
By default, the Kubernetes API is assumed to run on the local TCP port 6443.
You can create an EKS Cluster configuration using the following command:
awslocal eks create-cluster --name cluster1 --role-arn arn:aws:iam::000000000000:role/eks-role --resources-vpc-config '{}'{ "cluster": { "name": "cluster1", "arn": "arn:aws:eks:eu-central-1:000000000000:cluster/cluster1", "createdAt": "Sat, 05 Oct 2019 12:29:26 GMT", "endpoint": "https://172.17.0.1:6443", "status": "ACTIVE", ... }}And check that it was created with:
awslocal eks list-clusters{ "clusters": [ "cluster1" ]}To interact with your Kubernetes cluster, configure your Kubernetes client (such as kubectl or other SDKs) to point to the endpoint provided in the create-cluster output mentioned earlier.
However, depending on whether you’re calling the Kubernetes API from your local machine or from within a Lambda function, you might need to use different endpoint URLs.
For local machine interactions, use https://localhost:6443 as the endpoint URL.
If you are accessing the Kubernetes API from within a Lambda function, you should use https://172.17.0.1:6443 as the endpoint URL, assuming that 172.17.0.1 is the IP address of the Docker network bridge.
By using the appropriate endpoint URL based on your context, you can effectively communicate with your Kubernetes cluster and manage your resources as needed.
Customizing the Kubernetes Load Balancer Ports
Section titled “Customizing the Kubernetes Load Balancer Ports”By default, the Kubernetes load balancer (LB) is exposed on port 8081.
If you need to customize the port or expose the load balancer on multiple ports, you can utilize the special tag name _lb_ports_ during the cluster creation process.
For instance, if you want to expose the load balancer on ports 8085 and 8086, you can use the following tag definition when creating the cluster:
awslocal eks create-cluster \ --name cluster1 \ --role-arn arn:aws:iam::000000000000:role/eks-role \ --resources-vpc-config '{}' --tags '{"_lb_ports_":"8085,8086"}'Routing Traffic to Services on Different Endpoints
Section titled “Routing Traffic to Services on Different Endpoints”When working with EKS, a common scenario is to access multiple Kubernetes services behind different endpoints.
For instance, you might have multiple microservices, each following a common path versioning scheme, such as API request paths starting with /v1/....
In such cases, path-based routing may not be ideal if you need the services to be accessible in a uniform manner.
To address this requirement, we recommend utilizing host-based routing rules, as demonstrated in the example below:
cat <<EOF | kubectl apply -f -apiVersion: networking.k8s.io/v1kind: Ingressmetadata: name: multi-services annotations: ingress.kubernetes.io/ssl-redirect: "false"spec: rules: - host: eks-service-1.localhost.localstack.cloud http: paths: - path: /v1 pathType: Prefix backend: service: name: service-1 port: number: 80 - host: eks-service-2.localhost.localstack.cloud http: paths: - path: /v1 pathType: Prefix backend: service: name: service-2 port: number: 80EOFThe example defines routing rules for two local endpoints - the first rule points to a service service-1 accessible under /v1, and the second rule points to a service service-2 accessible under the same path /v1.
In the provided example, we define routing rules for two local endpoints.
The first rule directs traffic to a service named service-1, accessible under the path /v1.
Similarly, the second rule points to a service named service-2, also accessible under the same path /v1.
This approach enables us to access the two distinct services using the same path and port number, but with different host names. This host-based routing mechanism ensures that each service is uniquely identified based on its designated host name, allowing for a uniform and organized way of accessing multiple services within the EKS cluster.
curl http://eks-service-1.localhost.localstack.cloud:8081/v1... [output of service 1]curl http://eks-service-2.localhost.localstack.cloud:8081/v1... [output of service 2]It is important to note that the host names eks-service-1.localhost.localstack.cloud and eks-service-2.localhost.localstack.cloud both resolve to 127.0.0.1 (localhost).
Consequently, you can utilize them to communicate with your service endpoints and distinguish between different services within the Kubernetes load balancer.
However, it might encounter issues in scenarios where you intend to run your Load Balancer (LB) on standard ports such as 80/443 since some of these ports may already be occupied on your local machine.
For instance, by default, LocalStack allocates port 443 to expose APIs via the HTTPS endpoint (https://localhost.localstack.cloud).
Hence, it’s crucial to ensure that you expose your LB on a custom, non-standard port to prevent conflicts.
Additionally, note that LocalStack EKS employs Traefik as the Kubernetes ingress controller internally.
Mounting directories from host to pod
Section titled “Mounting directories from host to pod”If you have specific directories which you want to mount from your local dev machine into one of your pods, you can do this with two simple steps:
If you have specific directories that you want to mount from your local development machine into one of your pods, you can achieve this in two simple steps.
When creating your cluster, include the special tag _volume_mount_, which allows you to define the desired volume mounting configuration from your local development machine to the cluster nodes.
awslocal eks create-cluster \ --name cluster1 \ --role-arn arn:aws:iam::000000000000:role/eks-role \ --resources-vpc-config '{}' \ --tags '{"_volume_mount_":"/path/on/host:/path/on/node"}'{ "cluster": { "name": "cluster1", "arn": "arn:aws:eks:eu-central-1:000000000000:cluster/cluster1", "createdAt": "Sat, 05 Oct 2019 12:29:26 GMT", "endpoint": "https://172.17.0.1:6443", "status": "ACTIVE", "tags": { "_volume_mount_" : "/path/on/host:/path/on/node" } ... }}After creating your cluster with the _volume_mount_ tag, you can create your path with volume mounts as usual.
The configuration for the volume mounts can be set up similar to this:
apiVersion: v1kind: Podmetadata: name: testspec: volumes: - name: example-volume hostPath: path: /path/on/node containers: - image: alpine:3.12 command: ["/bin/sh","-c"] args: - echo "Starting the update command"; apk update; echo "Adding the openssh command"; apk add openssh; echo "openssh completed"; sleep 240m; imagePullPolicy: IfNotPresent name: alpine volumeMounts: - mountPath: "/path/on/pod" name: example-volume restartPolicy: AlwaysSupported Versions
Section titled “Supported Versions”LocalStack uses k3s under the hood for creating EKS clusters. Below is the list of supported Kubernetes versions and their corresponding k3s versions.
The default version is 1.35.
| Kubernetes Version | k3s Version | EKS Platform Version |
|---|---|---|
| 1.36 | v1.36.1-k3s1 | eks.3 |
| 1.35 | v1.35.5-k3s1 | eks.13 |
| 1.34 | v1.34.8-k3s1 | eks.23 |
| 1.33 | v1.33.12-k3s1 | eks.37 |
| 1.32 | v1.32.13-k3s1 | eks.44 |
| 1.31 | v1.31.14-k3s1 | eks.60 |
| 1.30 | v1.30.14-k3s2 | eks.68 |
Users can specify the desired version when creating an EKS cluster in LocalStack using the EKS_K3S_IMAGE_TAG configuration variable when starting LocalStack.
Configuring the k3d Cluster Token
Section titled “Configuring the k3d Cluster Token”When LocalStack creates a k3d-backed EKS cluster, it starts the k3s server with an explicit cluster token. This token is used to authenticate agent nodes joining the cluster, enabling dynamic node registration.
By default, LocalStack uses localstack-k3d-cluster-token as the cluster token. You can override this value using the EKS_K3D_CLUSTER_TOKEN configuration variable:
EKS_K3D_CLUSTER_TOKEN=my-custom-token localstack startAny agent nodes added to the cluster — whether via k3d node create or k3s agent — will use the same token to authenticate with the k3s server.
Resource Browser
Section titled “Resource Browser”The LocalStack Web Application provides a Resource Browser for managing EKS clusters. You can access the Resource Browser by opening the LocalStack Web Application in your browser, navigating to the Resource Browser section, and then clicking on EKS under the Compute section.
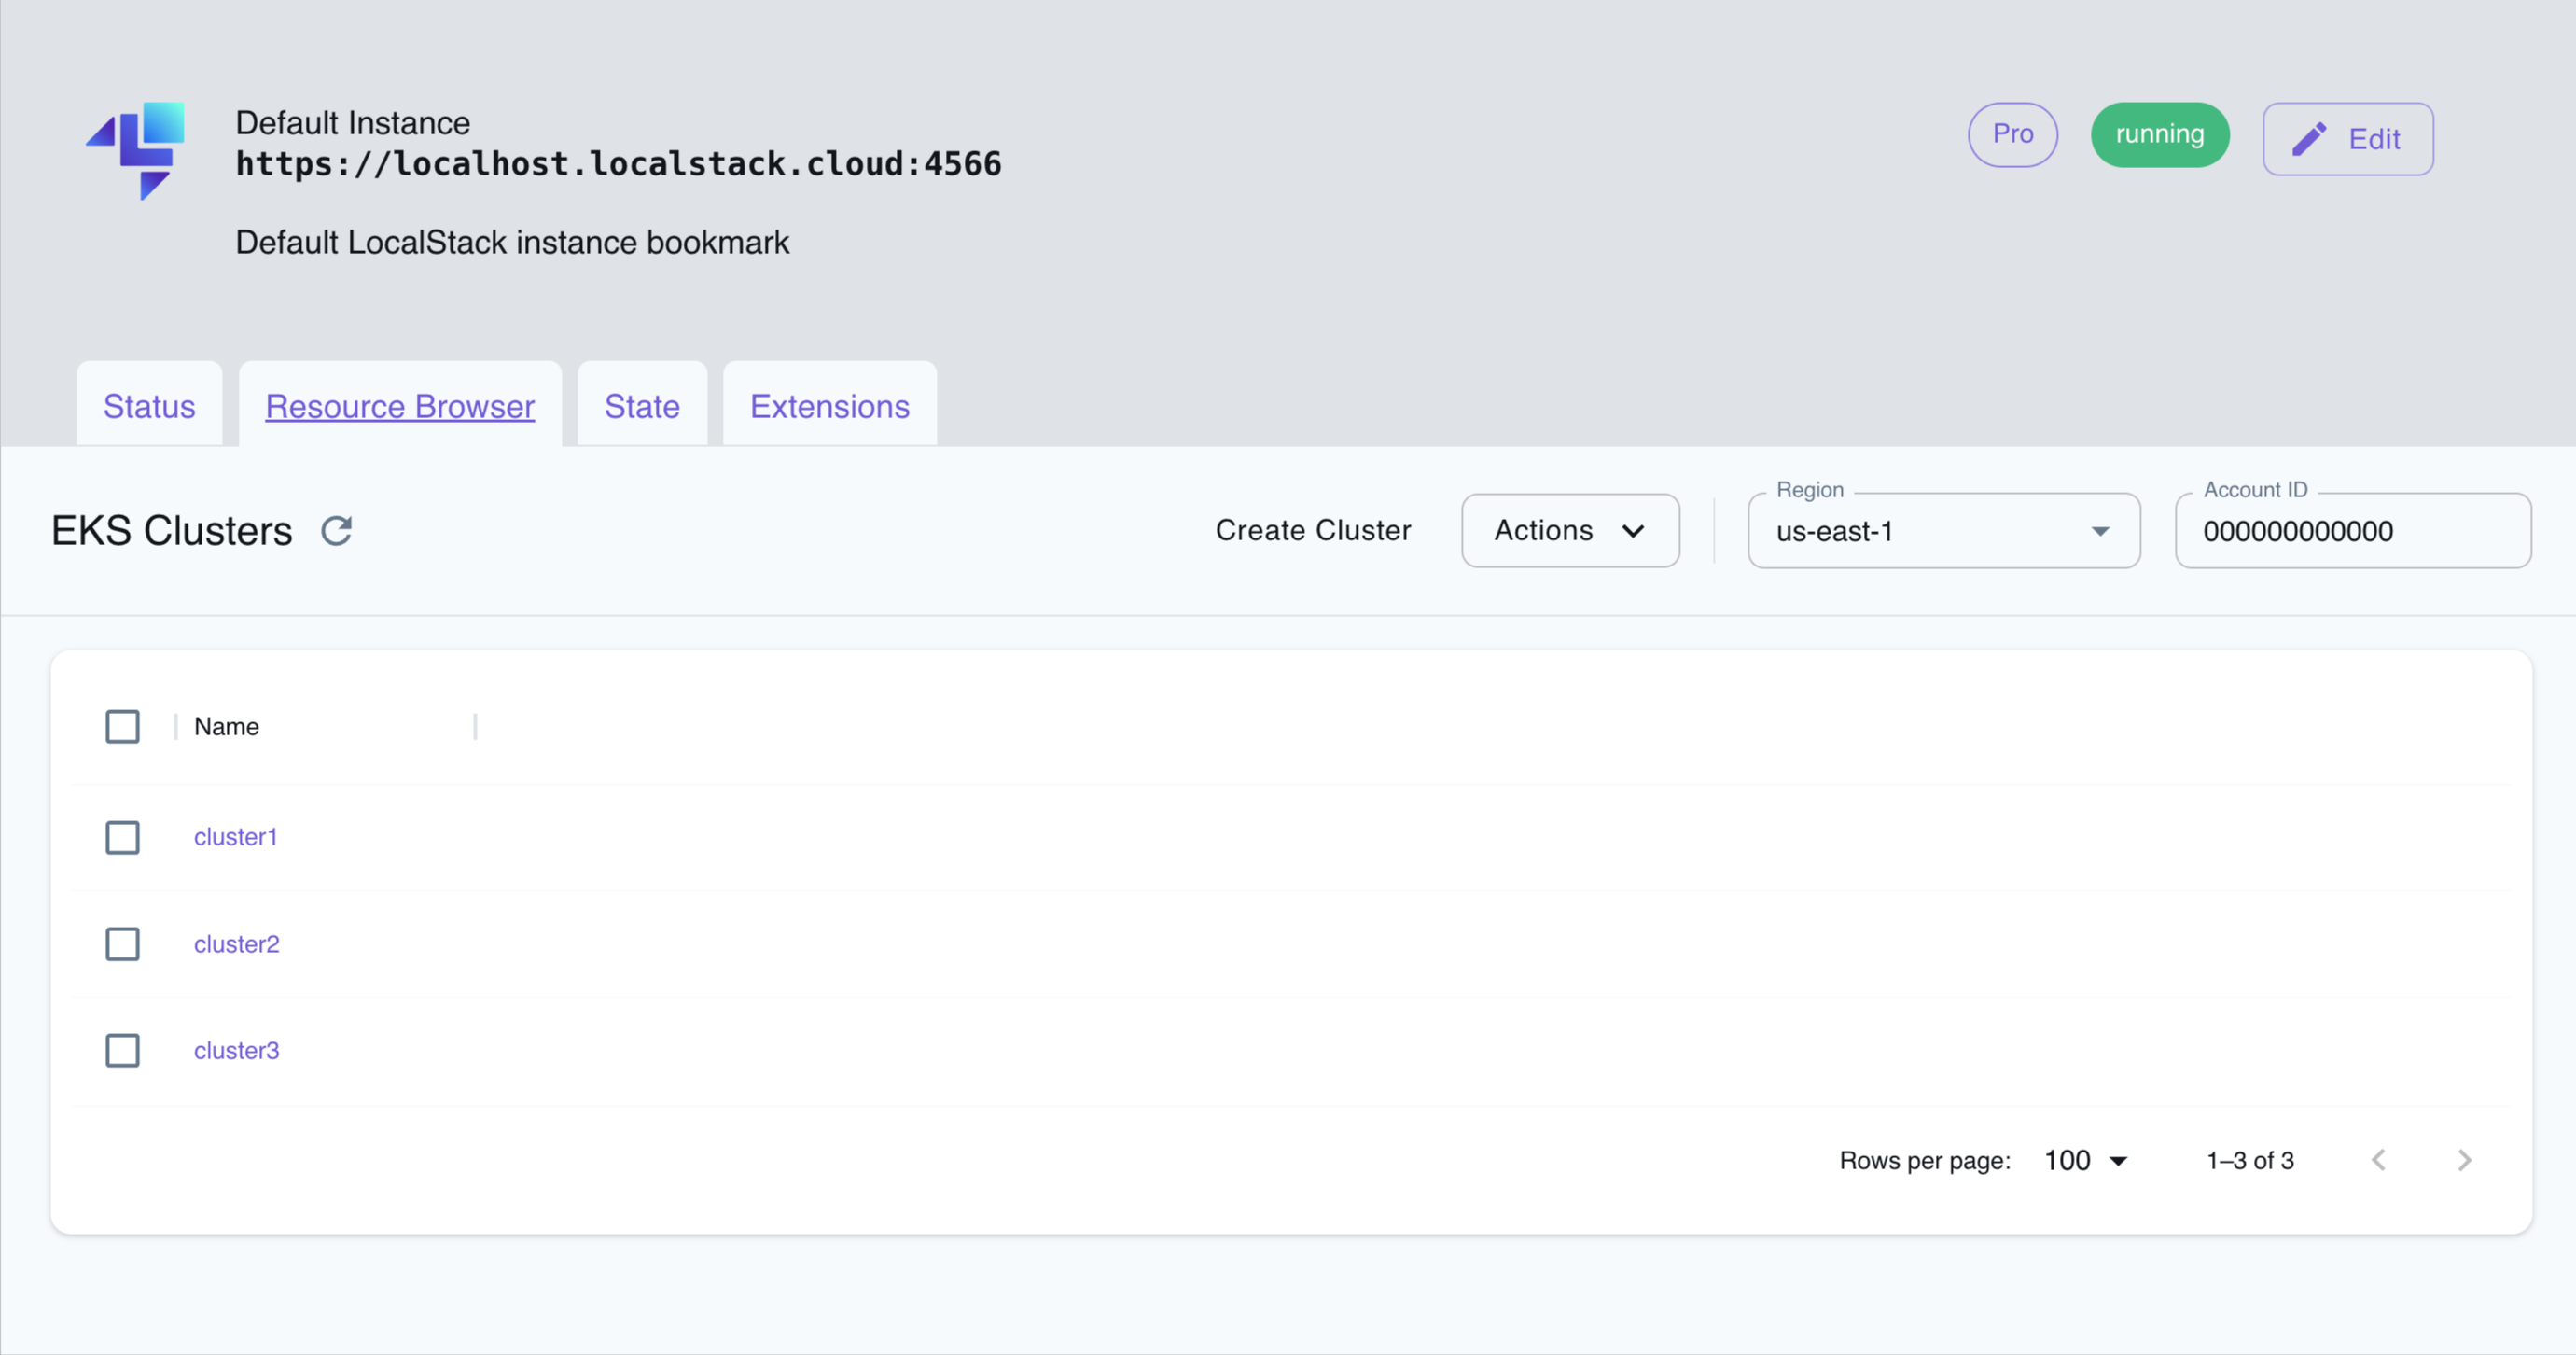
The Resource Browser allows you to perform the following actions:
- Create Cluster: Create a new EKS cluster by clicking on the Create Cluster button and providing the cluster name among other details.
- View Cluster Details: View the details of an existing EKS cluster by clicking on the cluster name.
- Edit Cluster: Edit the configuration of an existing EKS cluster by clicking on the Edit button while viewing the cluster details.
- Delete Cluster: Select the cluster name and click on the Actions button followed by Remove Selected button.
API Coverage
Section titled “API Coverage”| Operation ▲ | Implemented ▼ | Verified on Kubernetes |
|---|