Generate IAM Policies with LocalStack IAM Policy Stream
Introduction
Section titled “Introduction”When you’re developing cloud and serverless applications, you need to grant access to various AWS resources like S3 buckets and RDS databases. To handle this, you create IAM roles and assign permissions through policies. However, configuring these policies can be challenging, especially if you want to ensure minimal access of all principals to your resources.
LocalStack IAM Policy Stream automates the generation of IAM policies for your AWS API requests on your local machine. This stream helps you identify the necessary permissions for your cloud application and allows you to detect logical errors, such as unexpected actions in your policies.
This tutorial will guide you through setting up IAM Policy Stream for a locally running AWS application. We’ll use a basic example involving an S3 bucket, an SQS queue, and a bucket notification configuration. You’ll generate the policy for the bucket notification configuration and insert it into the SQS queue.
Why use IAM Policy Stream?
Section titled “Why use IAM Policy Stream?”LocalStack enables you to create and enforce local IAM roles and policies using the ENFORCE_IAM feature.
However, users often struggle to figure out the necessary permissions for different actions.
It’s important to find a balance, avoiding giving too many permissions while making sure the right ones are granted.
This challenge becomes more complex when dealing with AWS services that make requests not directly visible to users. For instance, if an SNS topic sends a message to an SQS queue and the underlying call fails, there might be no clear error message, causing confusion, especially for those less familiar with the services.
IAM Policy Stream simplifies this by automatically generating the needed policies and showing them to users. This makes it easier to integrate with resources, roles, and users, streamlining the development process. Additionally, it serves as a useful learning tool, helping users understand the permissions linked to various AWS calls and improving the onboarding experience for newcomers to AWS.
Prerequisites
Section titled “Prerequisites”- LocalStack CLI with
LOCALSTACK_AUTH_TOKEN - Docker
- Terraform &
tflocalwrapper - AWS CLI with
awslocalwrapper - LocalStack Web Application account
jq
Architecture diagram
Section titled “Architecture diagram”The following diagram illustrates the architecture of this tutorial:
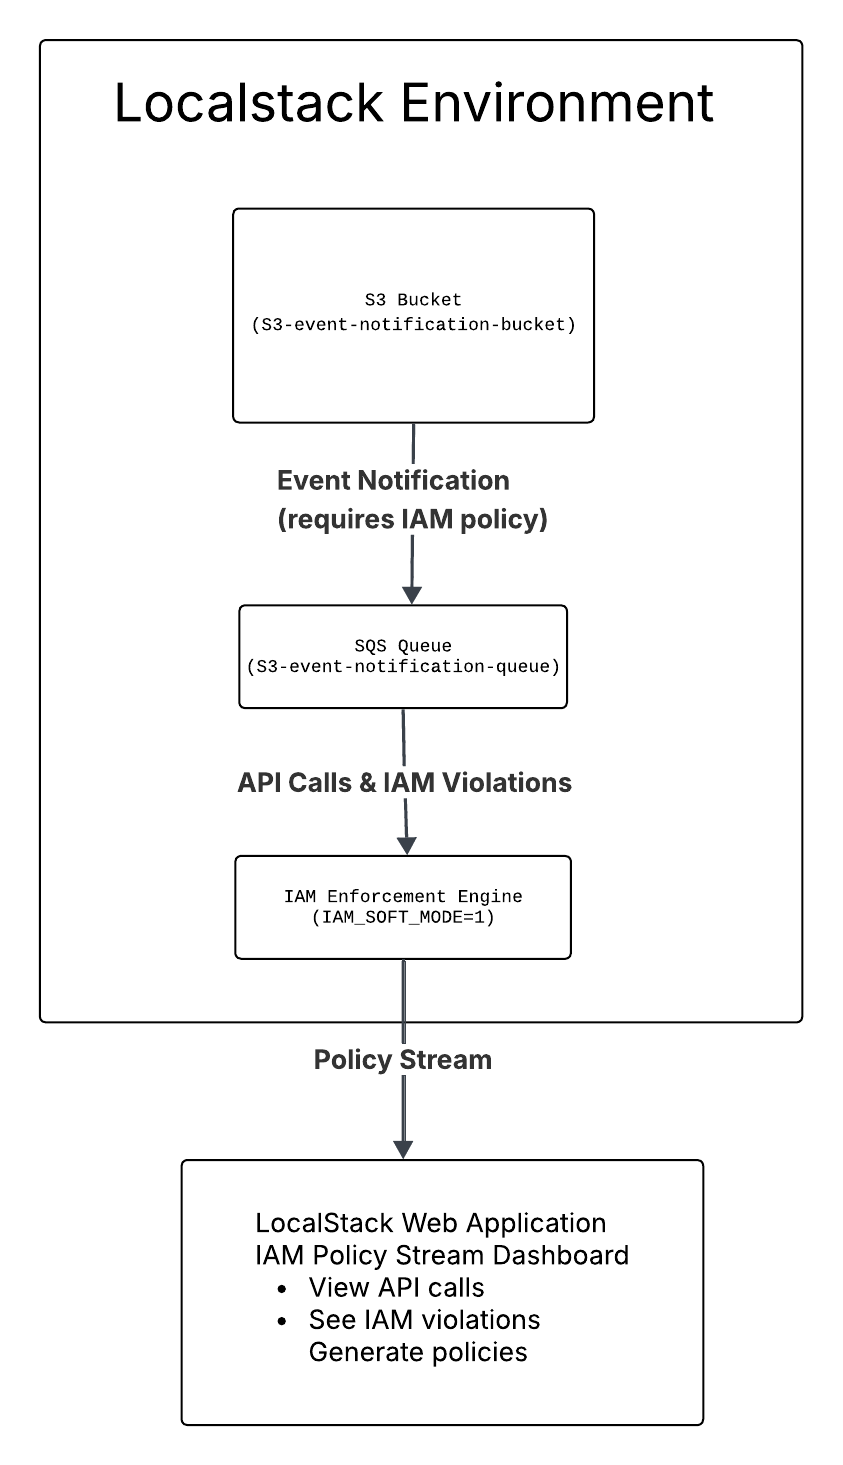
In this architecture:
- An S3 bucket is configured to send event notifications when objects are created
- An SQS queue receives these notifications
- The IAM Enforcement Engine intercepts API calls and checks for proper permissions
- The IAM Policy Stream Dashboard captures all API requests and generates the necessary IAM policies
- When a file is uploaded to the S3 bucket, S3 attempts to send a message to SQS, which initially fails due to missing permissions
- The IAM Policy Stream automatically generates the required policy, which can then be applied to resolve the violation
Tutorial: Configure an S3 bucket for event notifications using SQS
Section titled “Tutorial: Configure an S3 bucket for event notifications using SQS”In this tutorial, you will configure a LocalStack S3 bucket to send event notifications to an SQS queue. You will then use IAM Policy Stream to generate the necessary IAM policy for the SQS queue. You will use Terraform to create the resources and the AWS CLI to interact with them. With LocalStack’s IAM enforcement enabled, you can thoroughly test your policy and ensure that the development setup mirrors the production environment.
Start your LocalStack container
Section titled “Start your LocalStack container”Launch the LocalStack container on your local machine using the specified command:
DEBUG=1 IAM_SOFT_MODE=1 localstack startIn the above command:
DEBUG=1turns on detailed logging to check API calls and IAM violations.IAM_SOFT_MODE=1lets you test IAM enforcement by logging violations without stopping the API calls.
Create the Terraform configuration
Section titled “Create the Terraform configuration”Create a new file called main.tf for the Terraform setup of an S3 bucket and an SQS queue.
Start by using the aws_sqs_queue resource to create an SQS queue named s3-event-notification-queue.
resource "aws_sqs_queue" "queue" { name = "s3-event-notification-queue"}Next, use the aws_s3_bucket resource to create an S3 bucket called s3-event-notification-bucket.
resource "aws_s3_bucket" "bucket" { bucket = "s3-event-notification-bucket"}Finally, use the aws_s3_bucket_notification resource to link the S3 bucket with the SQS queue for sending notifications:
resource "aws_s3_bucket_notification" "bucket_notification" {  bucket = aws_s3_bucket.bucket.id
  queue {    queue_arn = aws_sqs_queue.queue.arn    events    = ["s3:ObjectCreated:*"]  }}
Deploy the Terraform configuration
Section titled “Deploy the Terraform configuration”You can use tflocal to deploy your Terraform configuration within the LocalStack environment.
Run the following commands to initialize and apply the Terraform configuration:
tflocal inittflocal applyYou will be prompted to confirm the changes.
Type yes to continue.
Since LocalStack is used, no real AWS resources are created.
LocalStack will emulate ephemeral development resources that will be removed automatically once you stop the LocalStack container.
After applying the Terraform configuration, the output will appear similar to this:
aws_sqs_queue.queue: Creating...aws_s3_bucket.bucket: Creating...aws_s3_bucket.bucket: Creation complete after 1s [id=s3-event-notification-bucket]aws_sqs_queue.queue: Still creating... [10s elapsed]aws_sqs_queue.queue: Still creating... [20s elapsed]aws_sqs_queue.queue: Creation complete after 26s [id=http://sqs.us-east-1.localhost.localstack.cloud:4566/000000000000/s3-event-notification-queue]aws_s3_bucket_notification.bucket_notification: Creating...aws_s3_bucket_notification.bucket_notification: Creation complete after 0s [id=s3-event-notification-bucket]Apply complete! Resources: 3 added, 0 changed, 0 destroyed.Start the IAM Policy Stream
Section titled “Start the IAM Policy Stream”Access the LocalStack Web Application and go to the IAM Policy Stream dashboard. This feature enables you to directly examine the generated policies, displaying the precise permissions required for each API call.
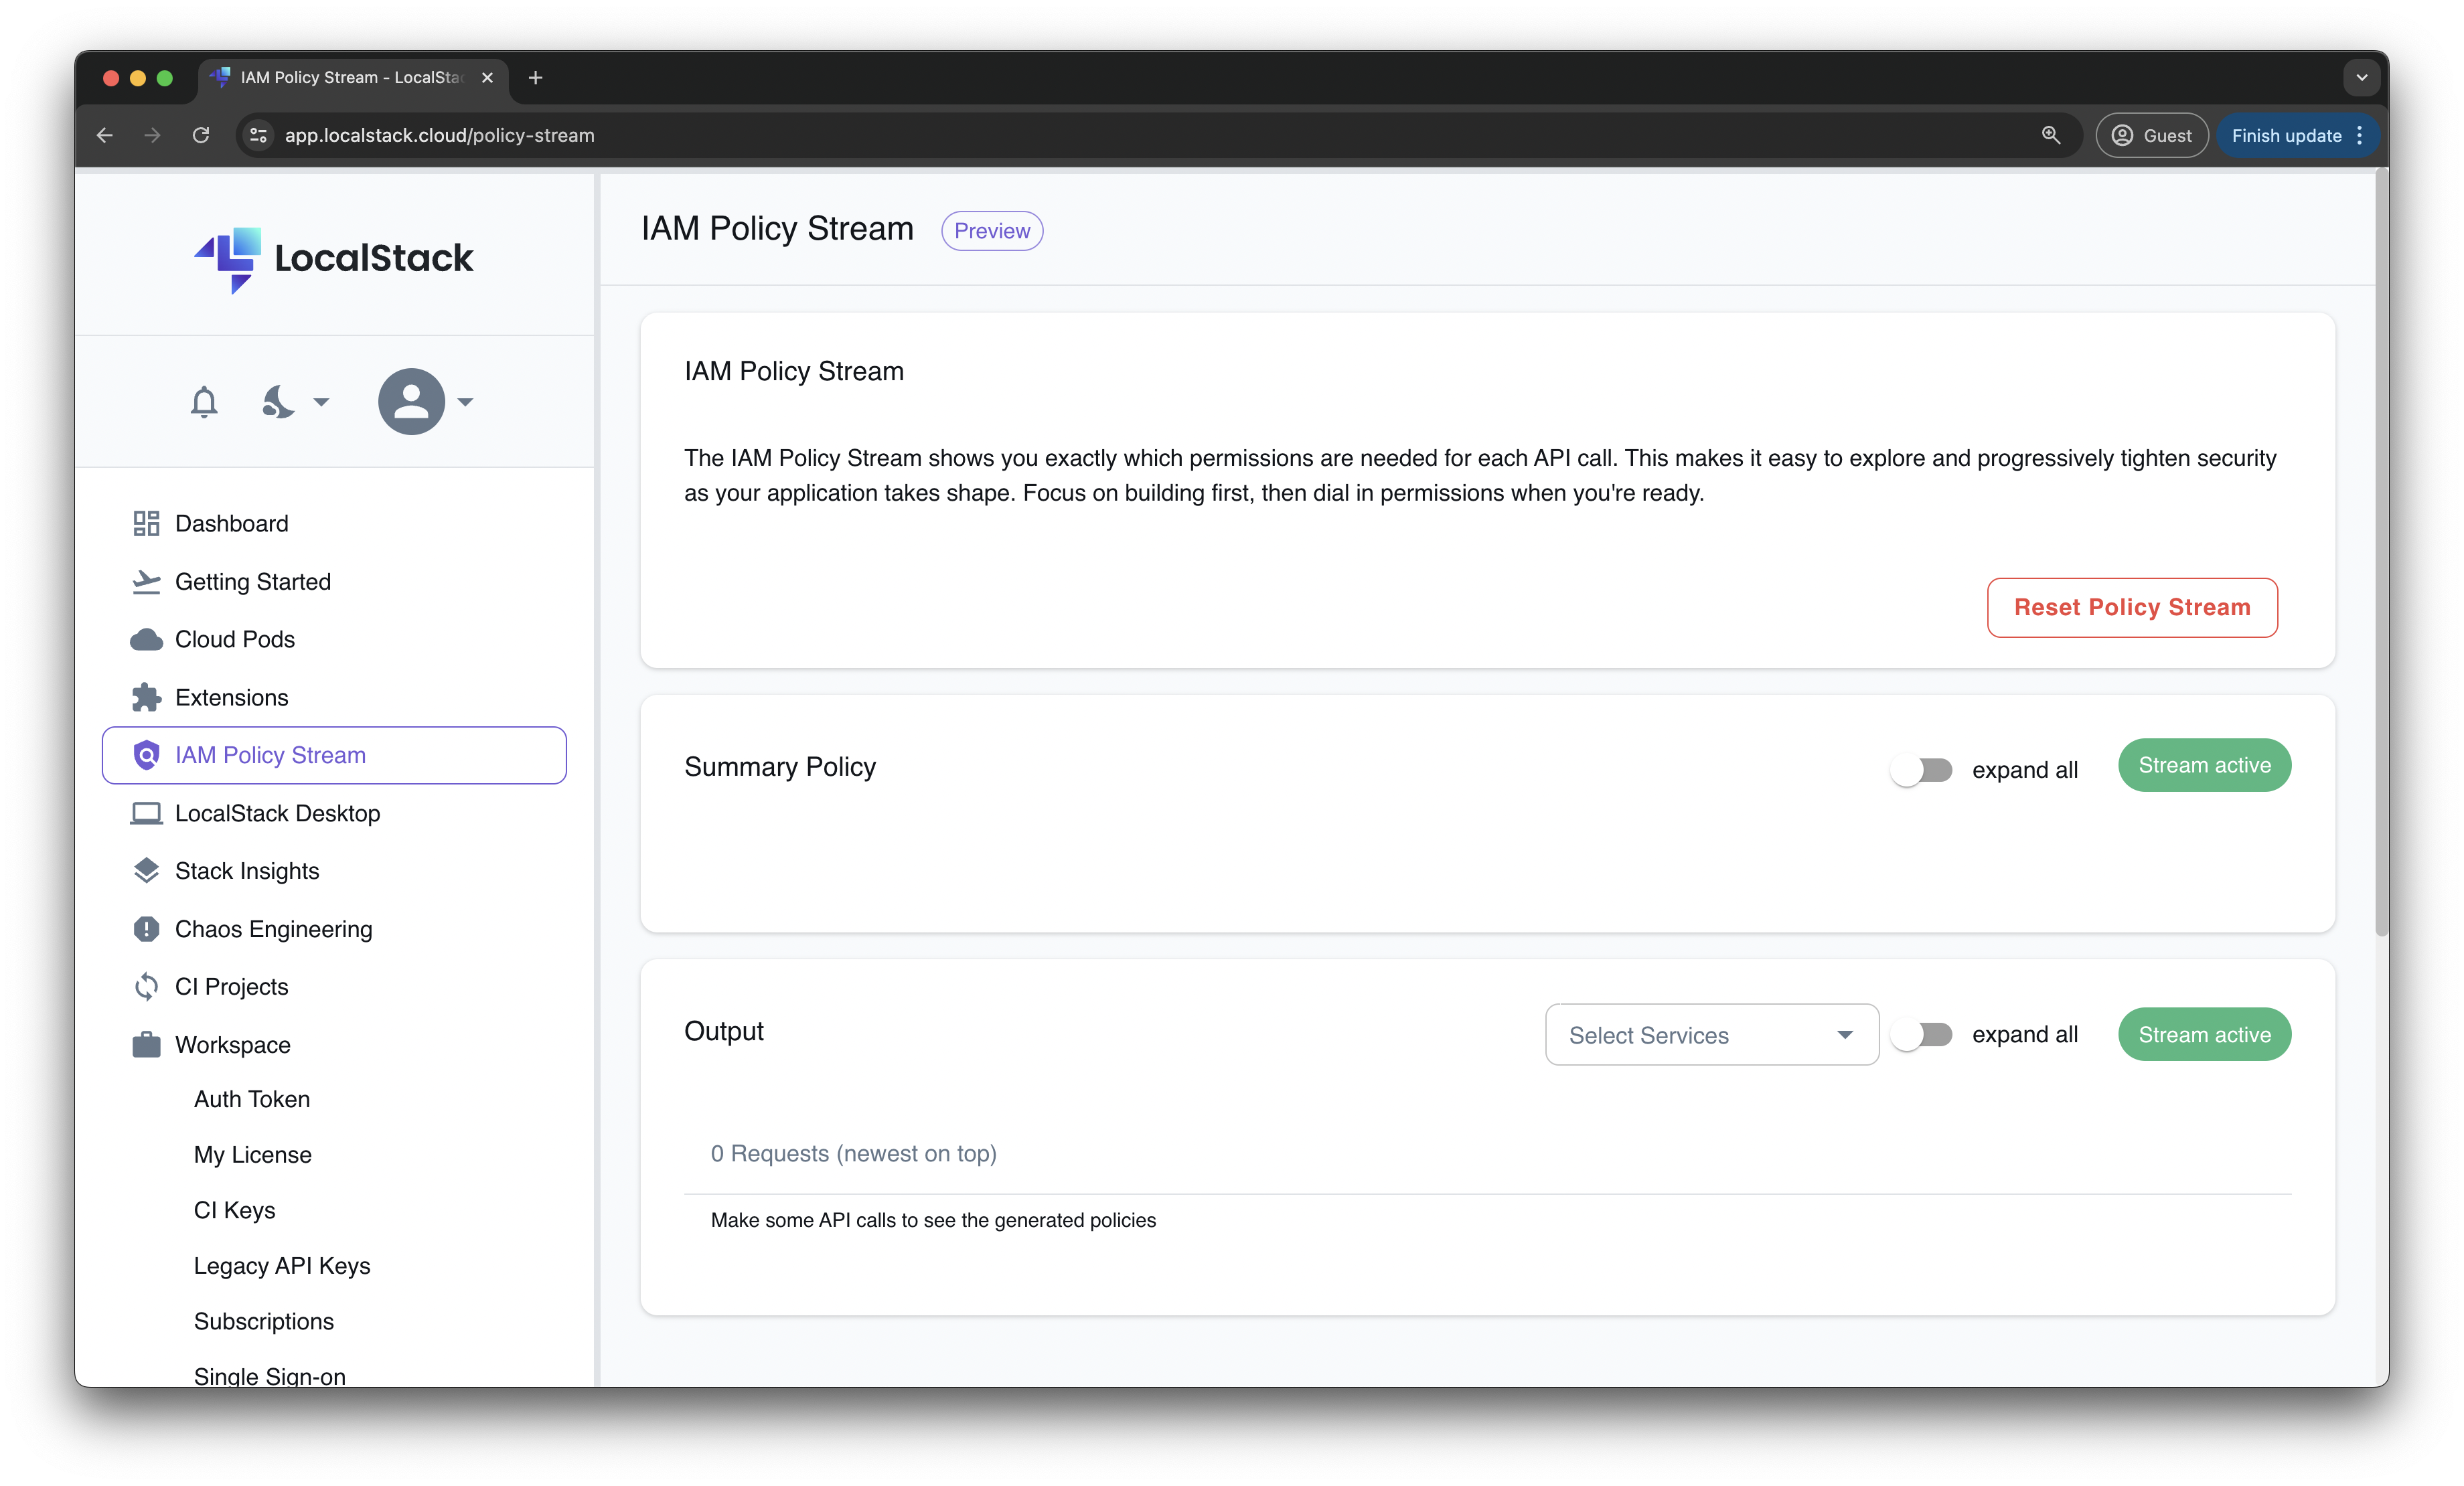
You’ll observe the Stream active status icon, indicating that making any local AWS API request will trigger the generation of an IAM Policy. Now, let’s proceed to upload a file to the S3 bucket to trigger the event notification and generate the IAM policy.
Trigger the event notification
Section titled “Trigger the event notification”Create a new file named some-log-file.log and upload it to the S3 bucket using the AWS CLI:
echo "Hello, LocalStack" > some-log-file.logawslocal s3 cp some-log-file.log s3://s3-event-notification-bucket/Uploading a file will activate an event notification, sending a message to the SQS queue. However, since the SQS queue lacks the necessary permissions, an IAM violation will appear in the IAM Policy Stream dashboard.
You can also navigate to the LocalStack logs and observe the IAM violation message:
2024-07-09T05:30:33.583 INFO --- [et.reactor-4] l.s.i.p.handler : Request for service 'sqs' by principal 's3.amazonaws.com' for operation 'SendMessage' denied.2024-07-09T05:30:33.583 DEBUG --- [et.reactor-4] l.s.i.p.handler : Necessary permissions for this action: ["Action 'sqs:SendMessage' for 'arn:aws:sqs:us-east-1:000000000000:s3-event-notification-queue'"]2024-07-09T05:30:33.583 DEBUG --- [et.reactor-4] l.s.i.p.handler : 0 permissions have been explicitly denied: []2024-07-09T05:30:33.583 DEBUG --- [et.reactor-4] l.s.i.p.handler : 0 permissions have been explicitly allowed: []2024-07-09T05:30:33.583 DEBUG --- [et.reactor-4] l.s.i.p.handler : 1 permissions have been implicitly denied: ["Action 'sqs:SendMessage' for 'arn:aws:sqs:us-east-1:000000000000:s3-event-notification-queue'"]Generate the IAM policy
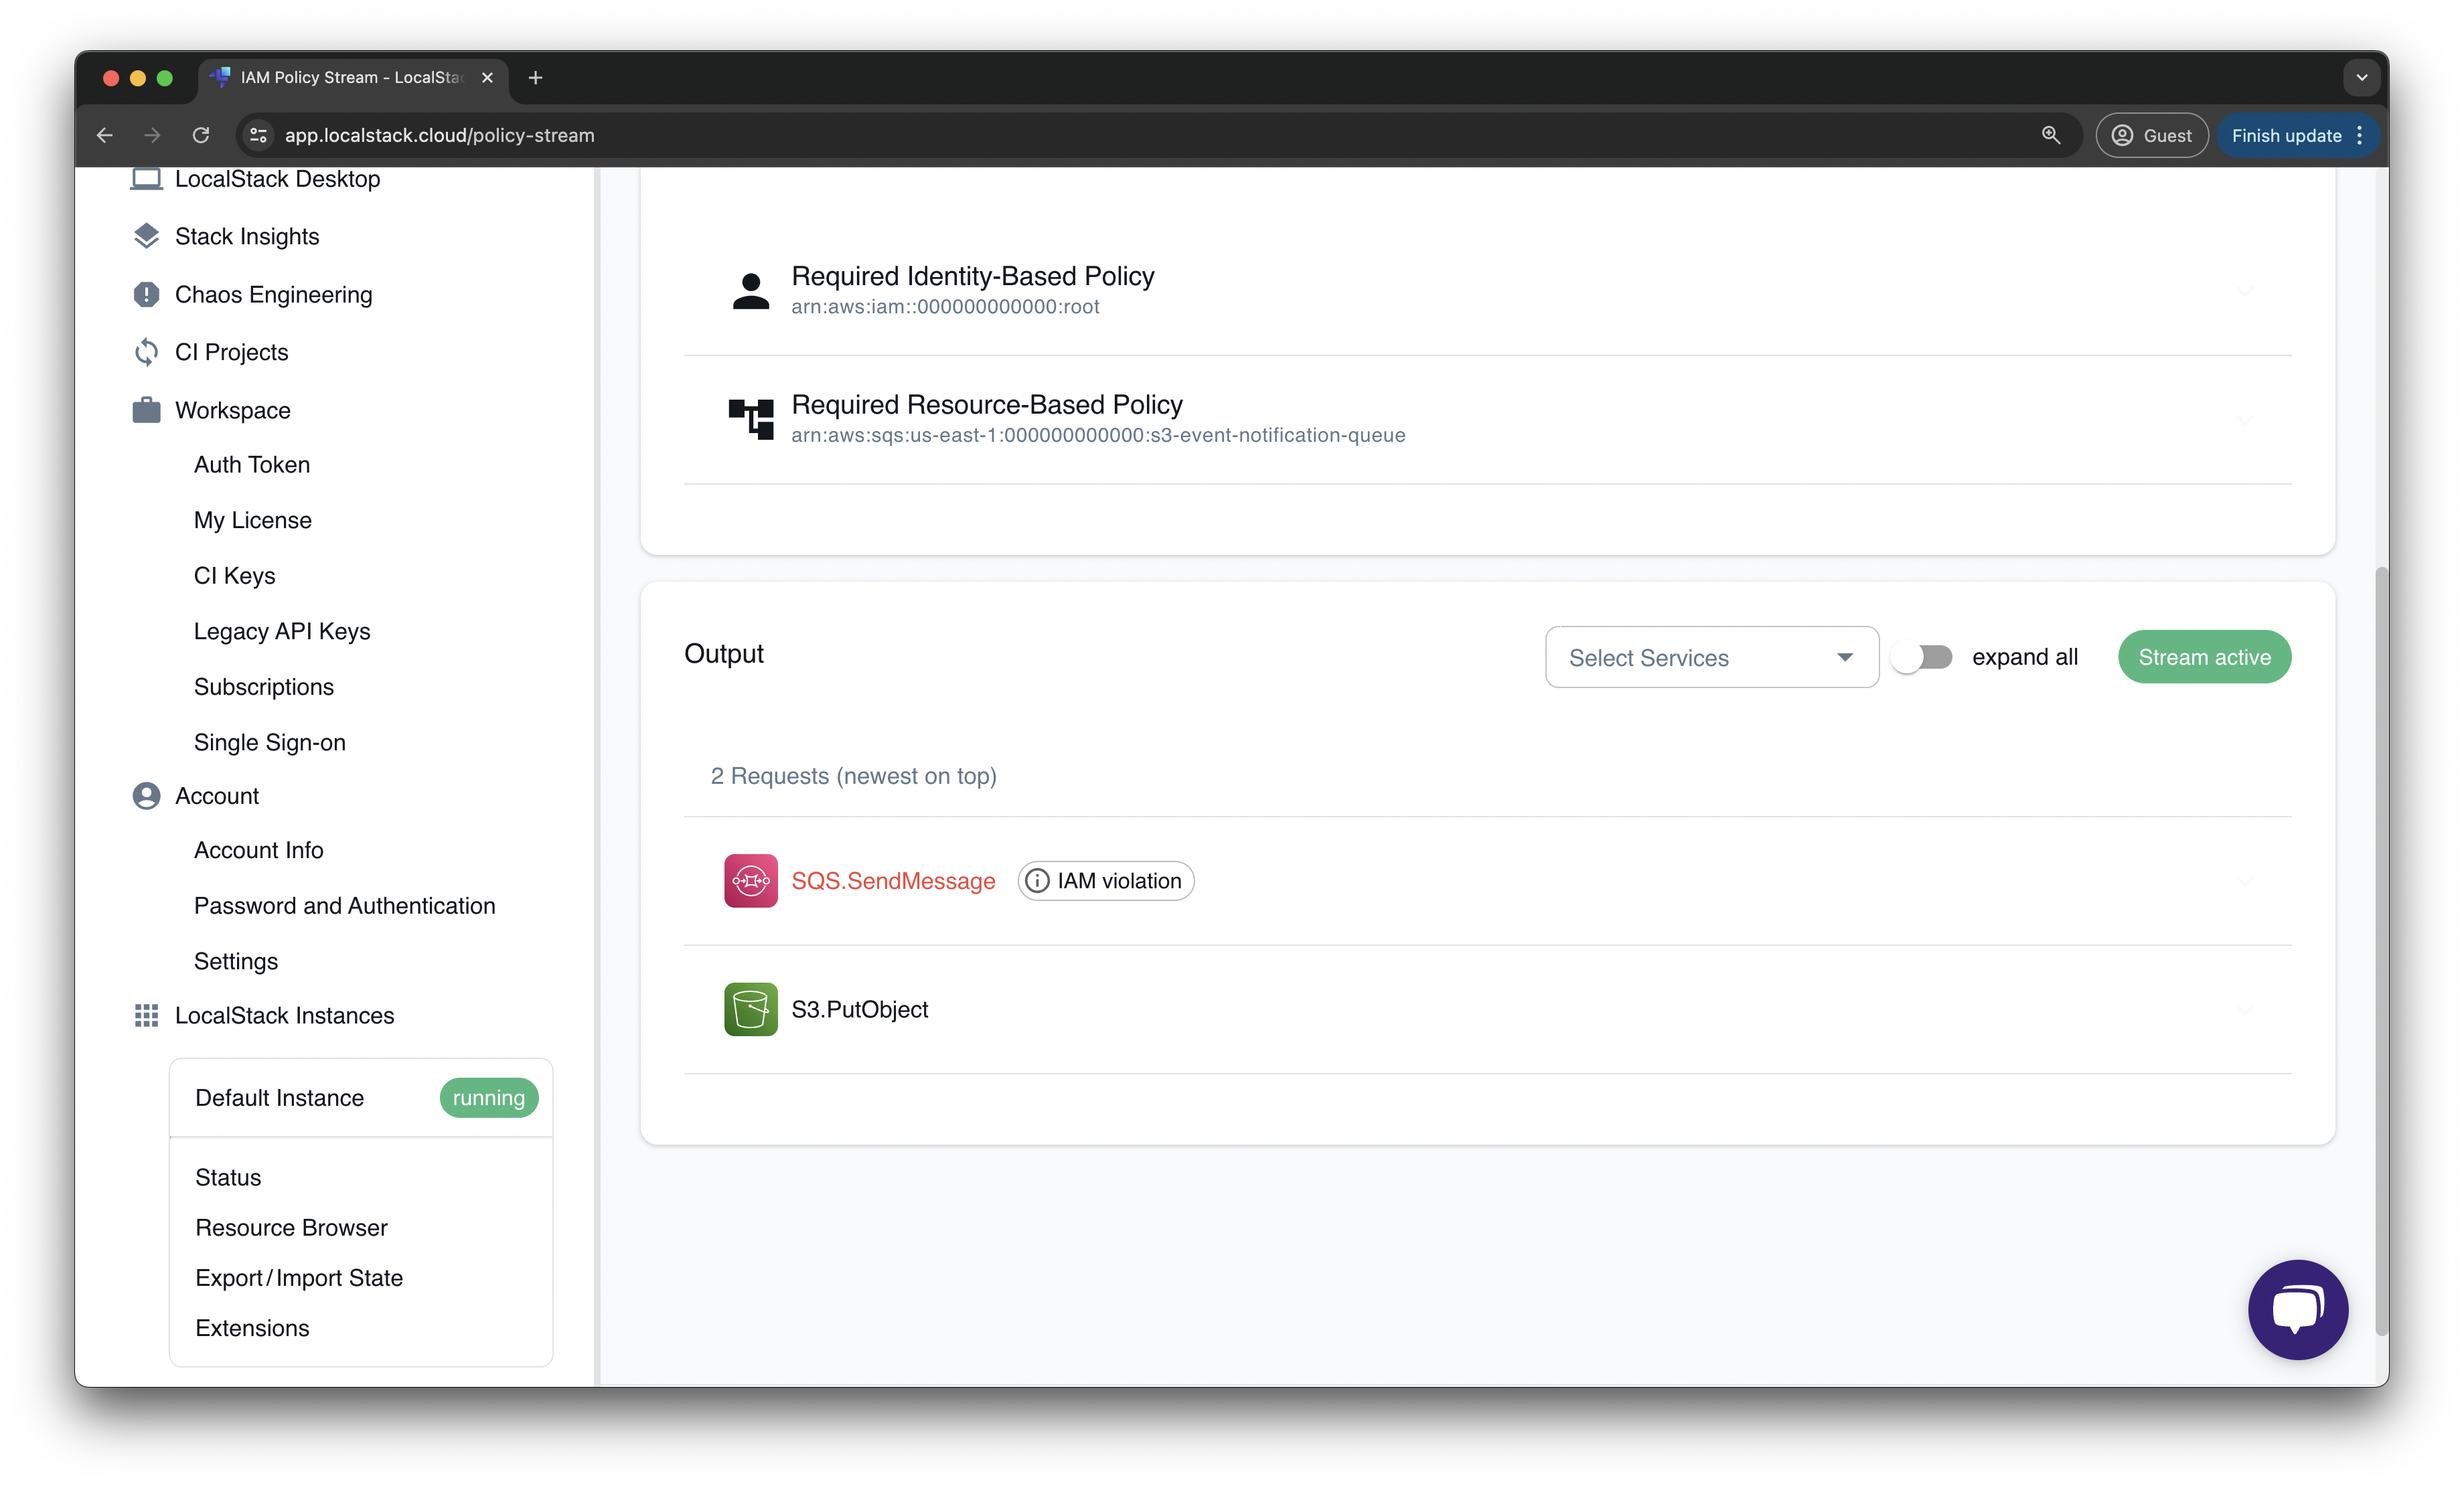
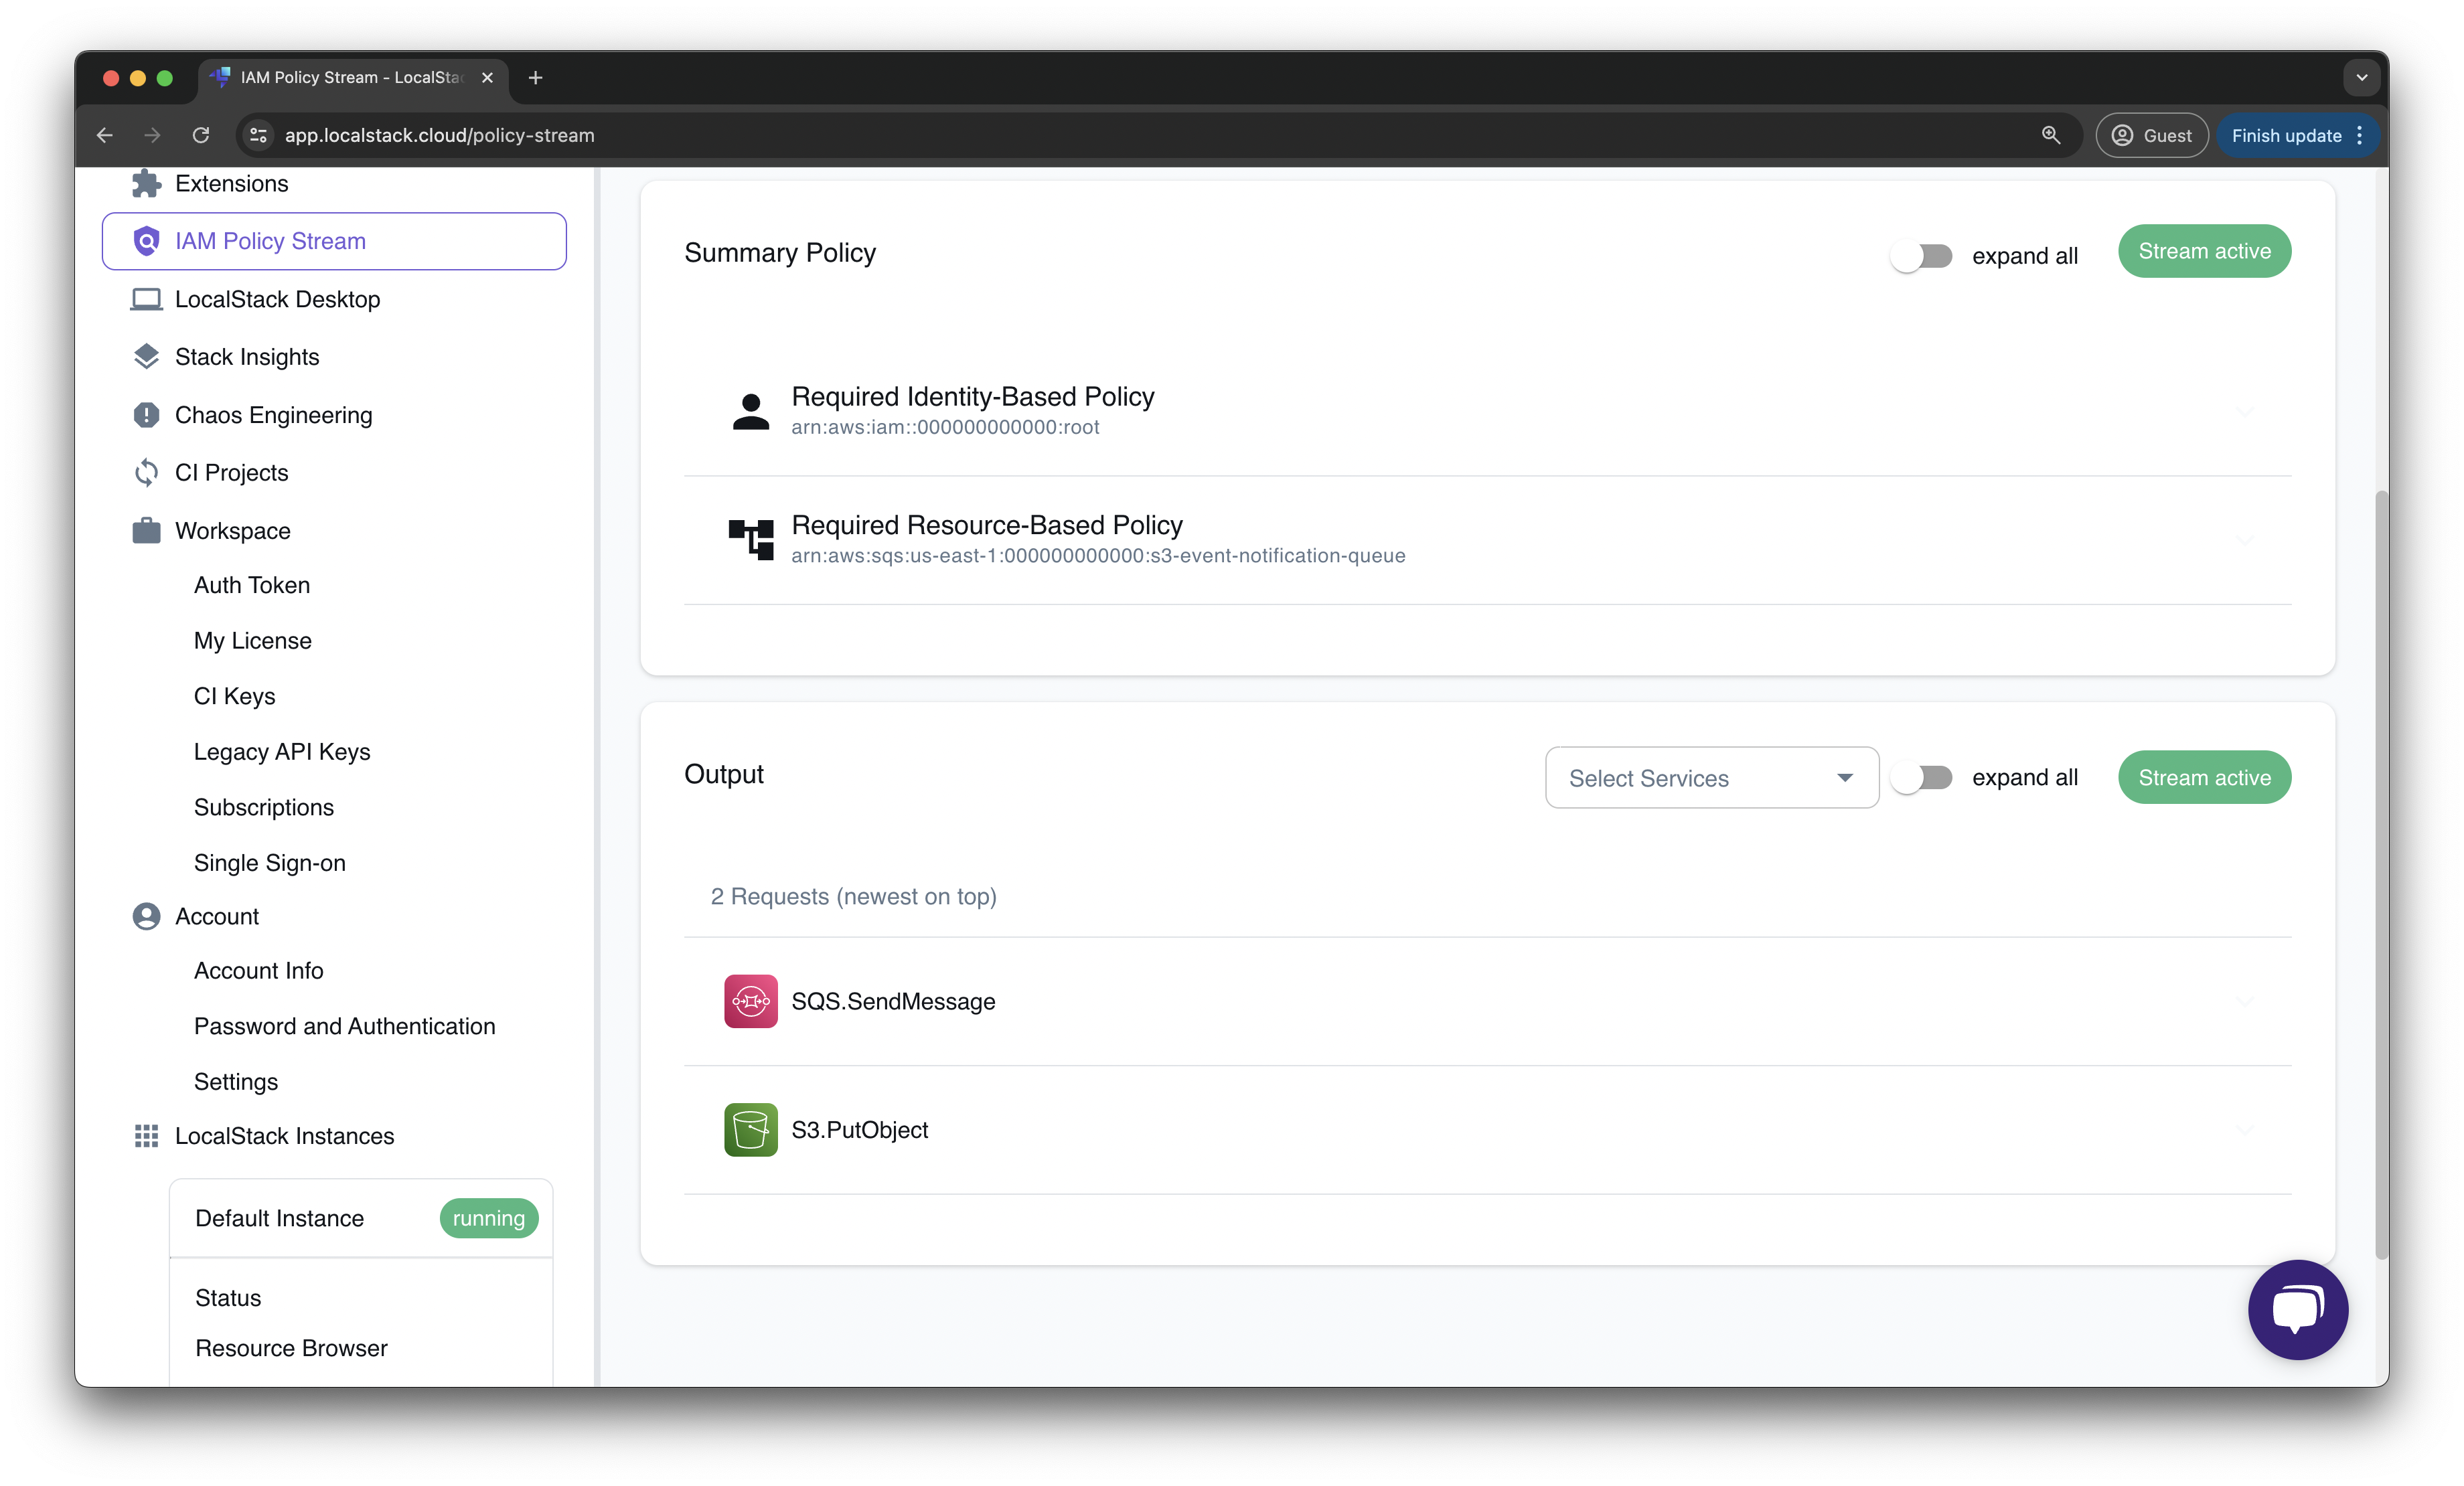
Section titled “Generate the IAM policy”Go to the IAM Policy Stream dashboard and review the API calls such as PutObject, SendMessage, and ReceiveMessage.
Notice that the SendMessage call was denied due to an IAM violation.
Click on the SQS.SendMessage action to see the suggested IAM policy.
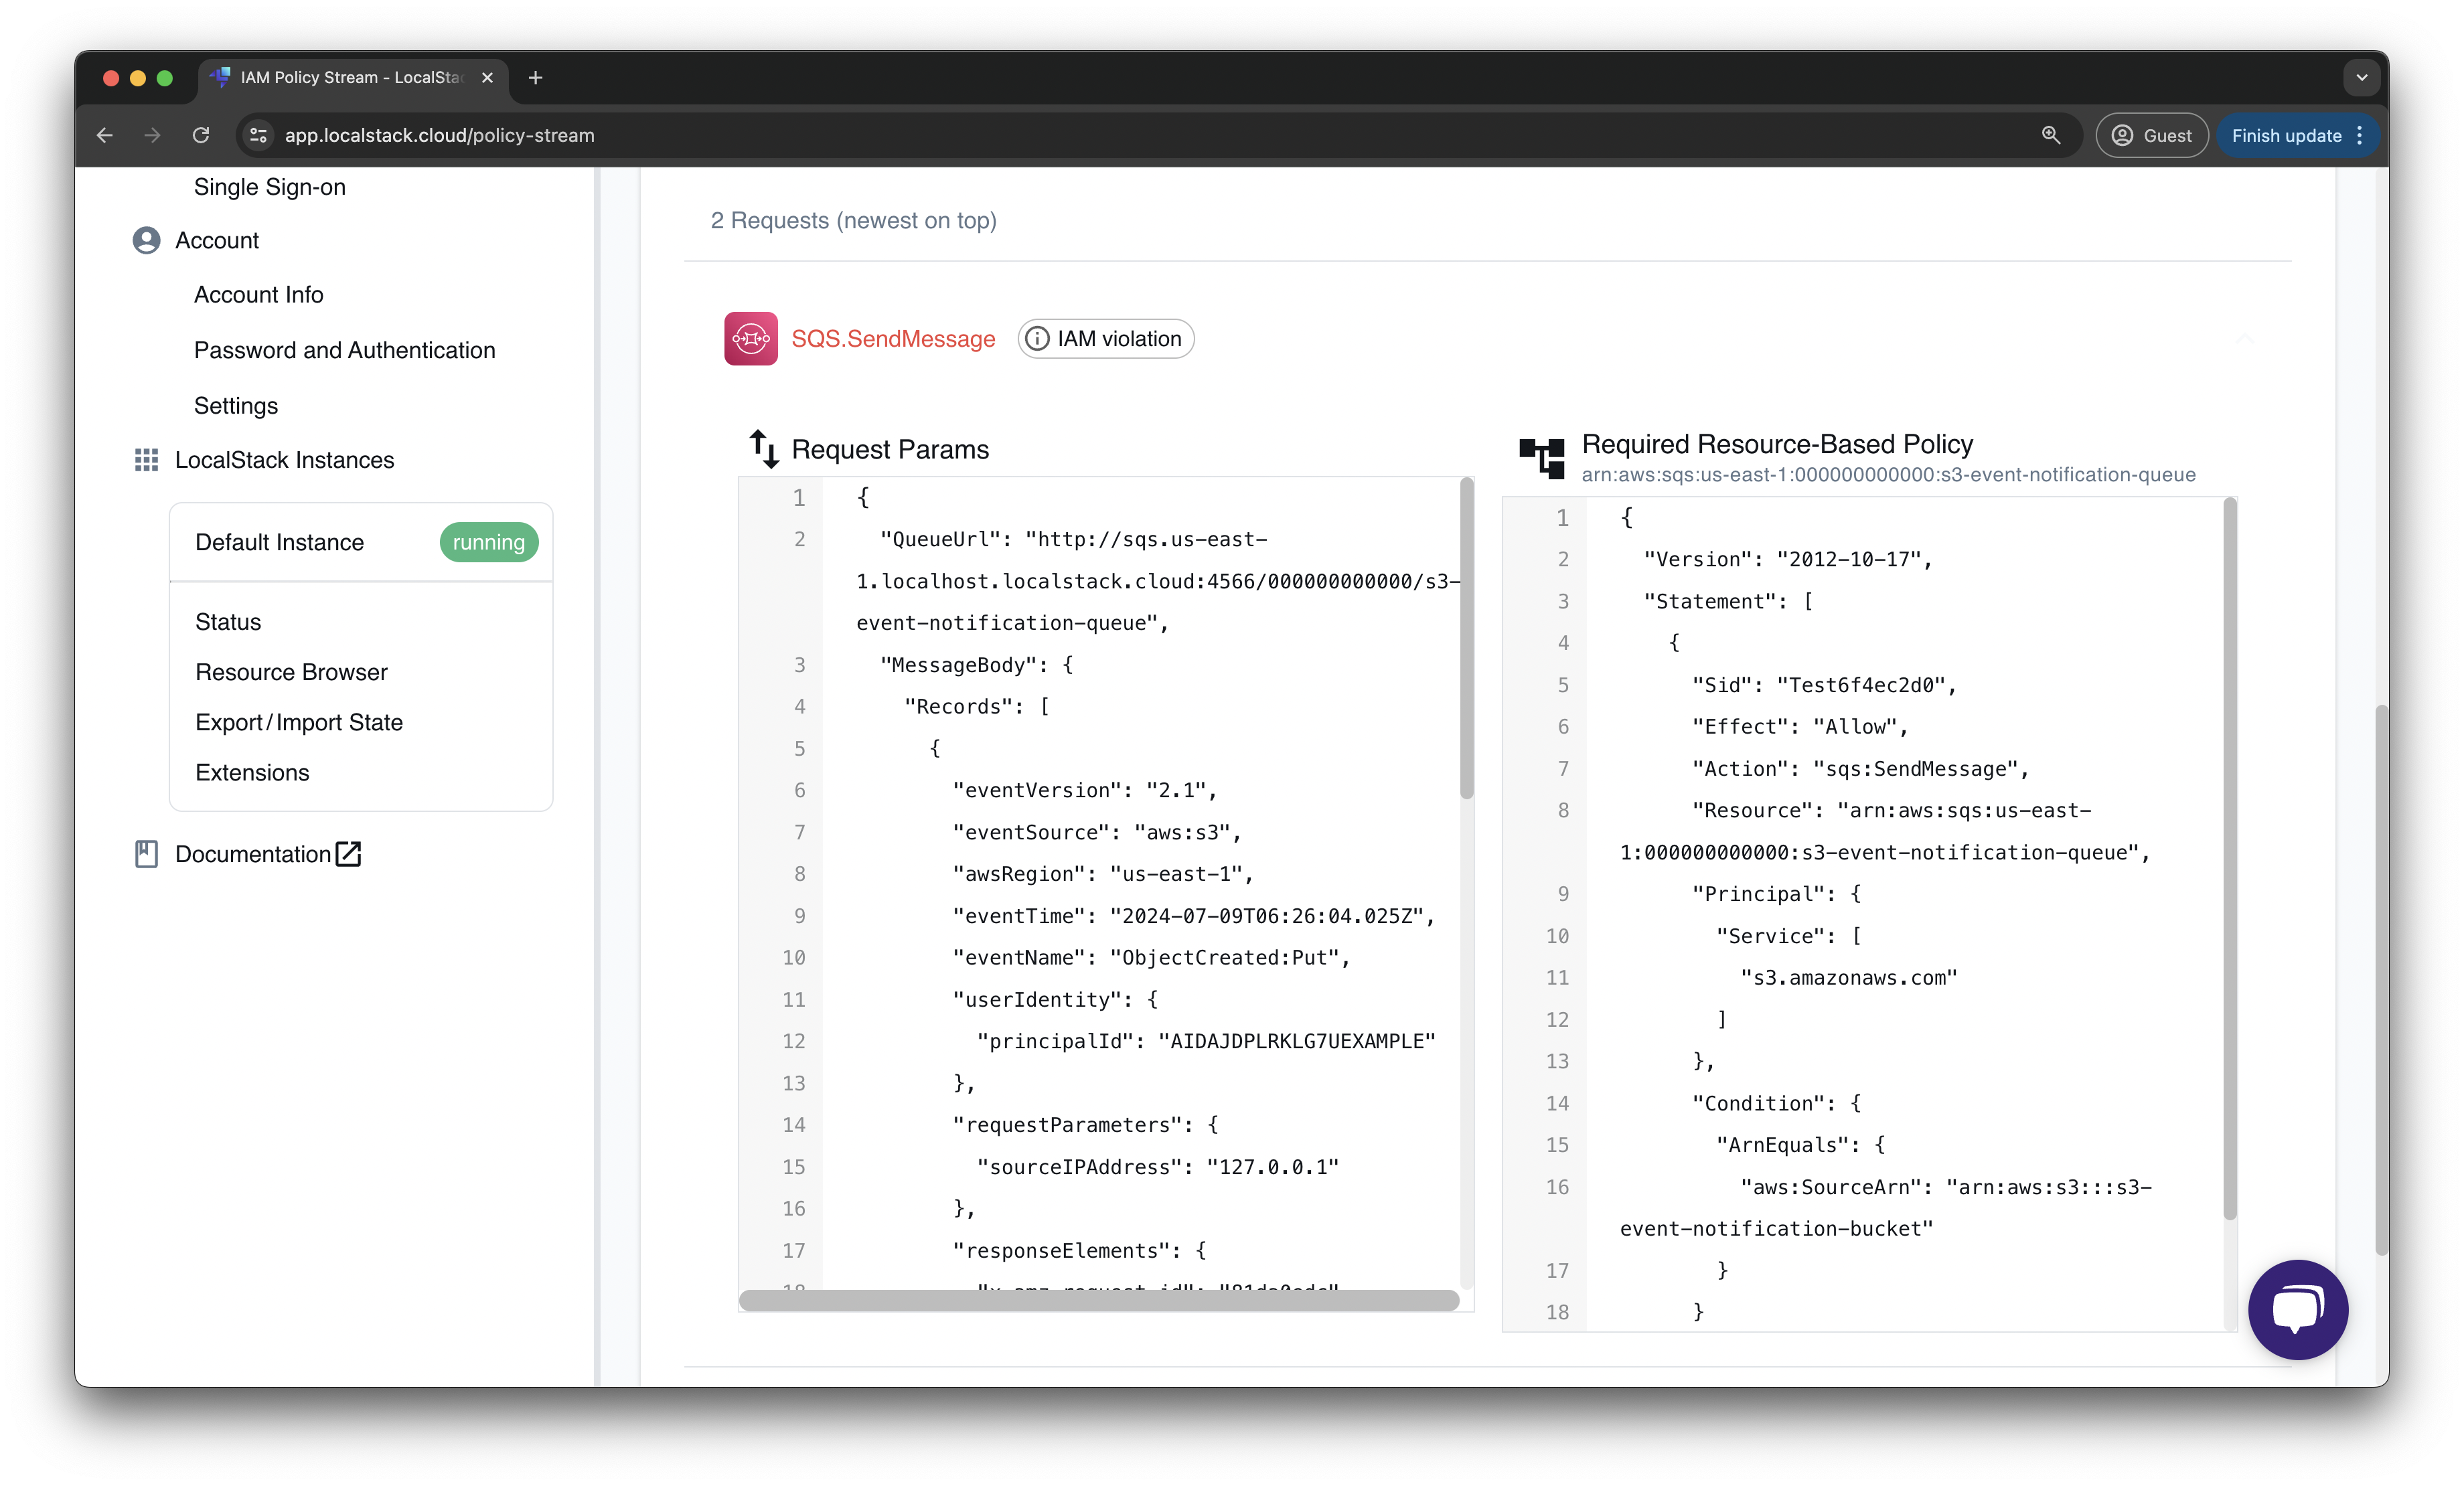
LocalStack automatically recommends a resource-based policy for the SQS queue arn:aws:sqs:us-east-1:000000000000:s3-event-notification-queue.
Copy this policy and incorporate it into your Terraform configuration under the aws_sqs_queue resource by adding the policy attribute:
resource "aws_sqs_queue" "queue" {  name = "s3-event-notification-queue"
  policy = <<POLICY{  "Version": "2012-10-17",  "Statement": [    {      "Sid": "Test22bf6867",      "Effect": "Allow",      "Action": "sqs:SendMessage",      "Resource": "arn:aws:sqs:us-east-1:000000000000:s3-event-notification-queue",      "Principal": {        "Service": [          "s3.amazonaws.com"        ]      },      "Condition": {        "ArnEquals": {          "aws:SourceArn": "arn:aws:s3:::s3-event-notification-bucket"        }      }    }  ]}POLICY}
Now, re-apply the Terraform configuration to update the SQS queue with the new policy:
tflocal applyNext, trigger the event notification again by uploading a file to the S3 bucket. You can confirm that the S3 bucket is correctly set up for event notifications through the SQS queue by checking if the message is received in the SQS queue:
awslocal sqs receive-message \ --queue-url http://sqs.us-east-1.localhost.localstack.cloud:4566/000000000000/s3-event-notification-queueThe following output will show the message sent by the S3 bucket:
{ "Messages": [ { "MessageId": "7c9d6b22-cb35-4a66-98dc-6f48dfc78f33", "ReceiptHandle": "MTM4ZTg2NTYtMGIwNC00ZWE2LWIyM2EtNWNlZTIyOTZmOGE1IGFybjphd3M6c3FzOnVzLWVhc3QtMTowMDAwMDAwMDAwMDA6czMtZXZlbnQtbm90aWZpY2F0aW9uLXF1ZXVlIDdjOWQ2YjIyLWNiMzUtNGE2Ni05OGRjLTZmNDhkZmM3OGYzMyAxNzIwNTAzNjEyLjU2NDEyOTQ=", "MD5OfBody": "10eacb105ec11badc56f7e0198e0c4ad", "Body": "{\"Service\": \"Amazon S3\", \"Event\": \"s3:TestEvent\", \"Time\": \"2024-07-09T05:29:55.923Z\", \"Bucket\": \"s3-event-notification-bucket\", \"RequestId\": \"bfa882c0-a3b0-4549-b4c5-ac34167b3076\", \"HostId\": \"eftixk72aD6Ap51TnqcoF8eFidJG9Z/2\"}" } ]}You can now check the IAM Policy Stream dashboard to confirm that there are no violations and that your AWS API requests have been successfully executed with the correct IAM policies.
Generate a comprehensive policy
Section titled “Generate a comprehensive policy”In scenarios where there are many AWS services, and every AWS API request generates a policy it might be cumbersome to analyze every policy. In such cases, you can generate one comprehensive policy for all your AWS resources together.
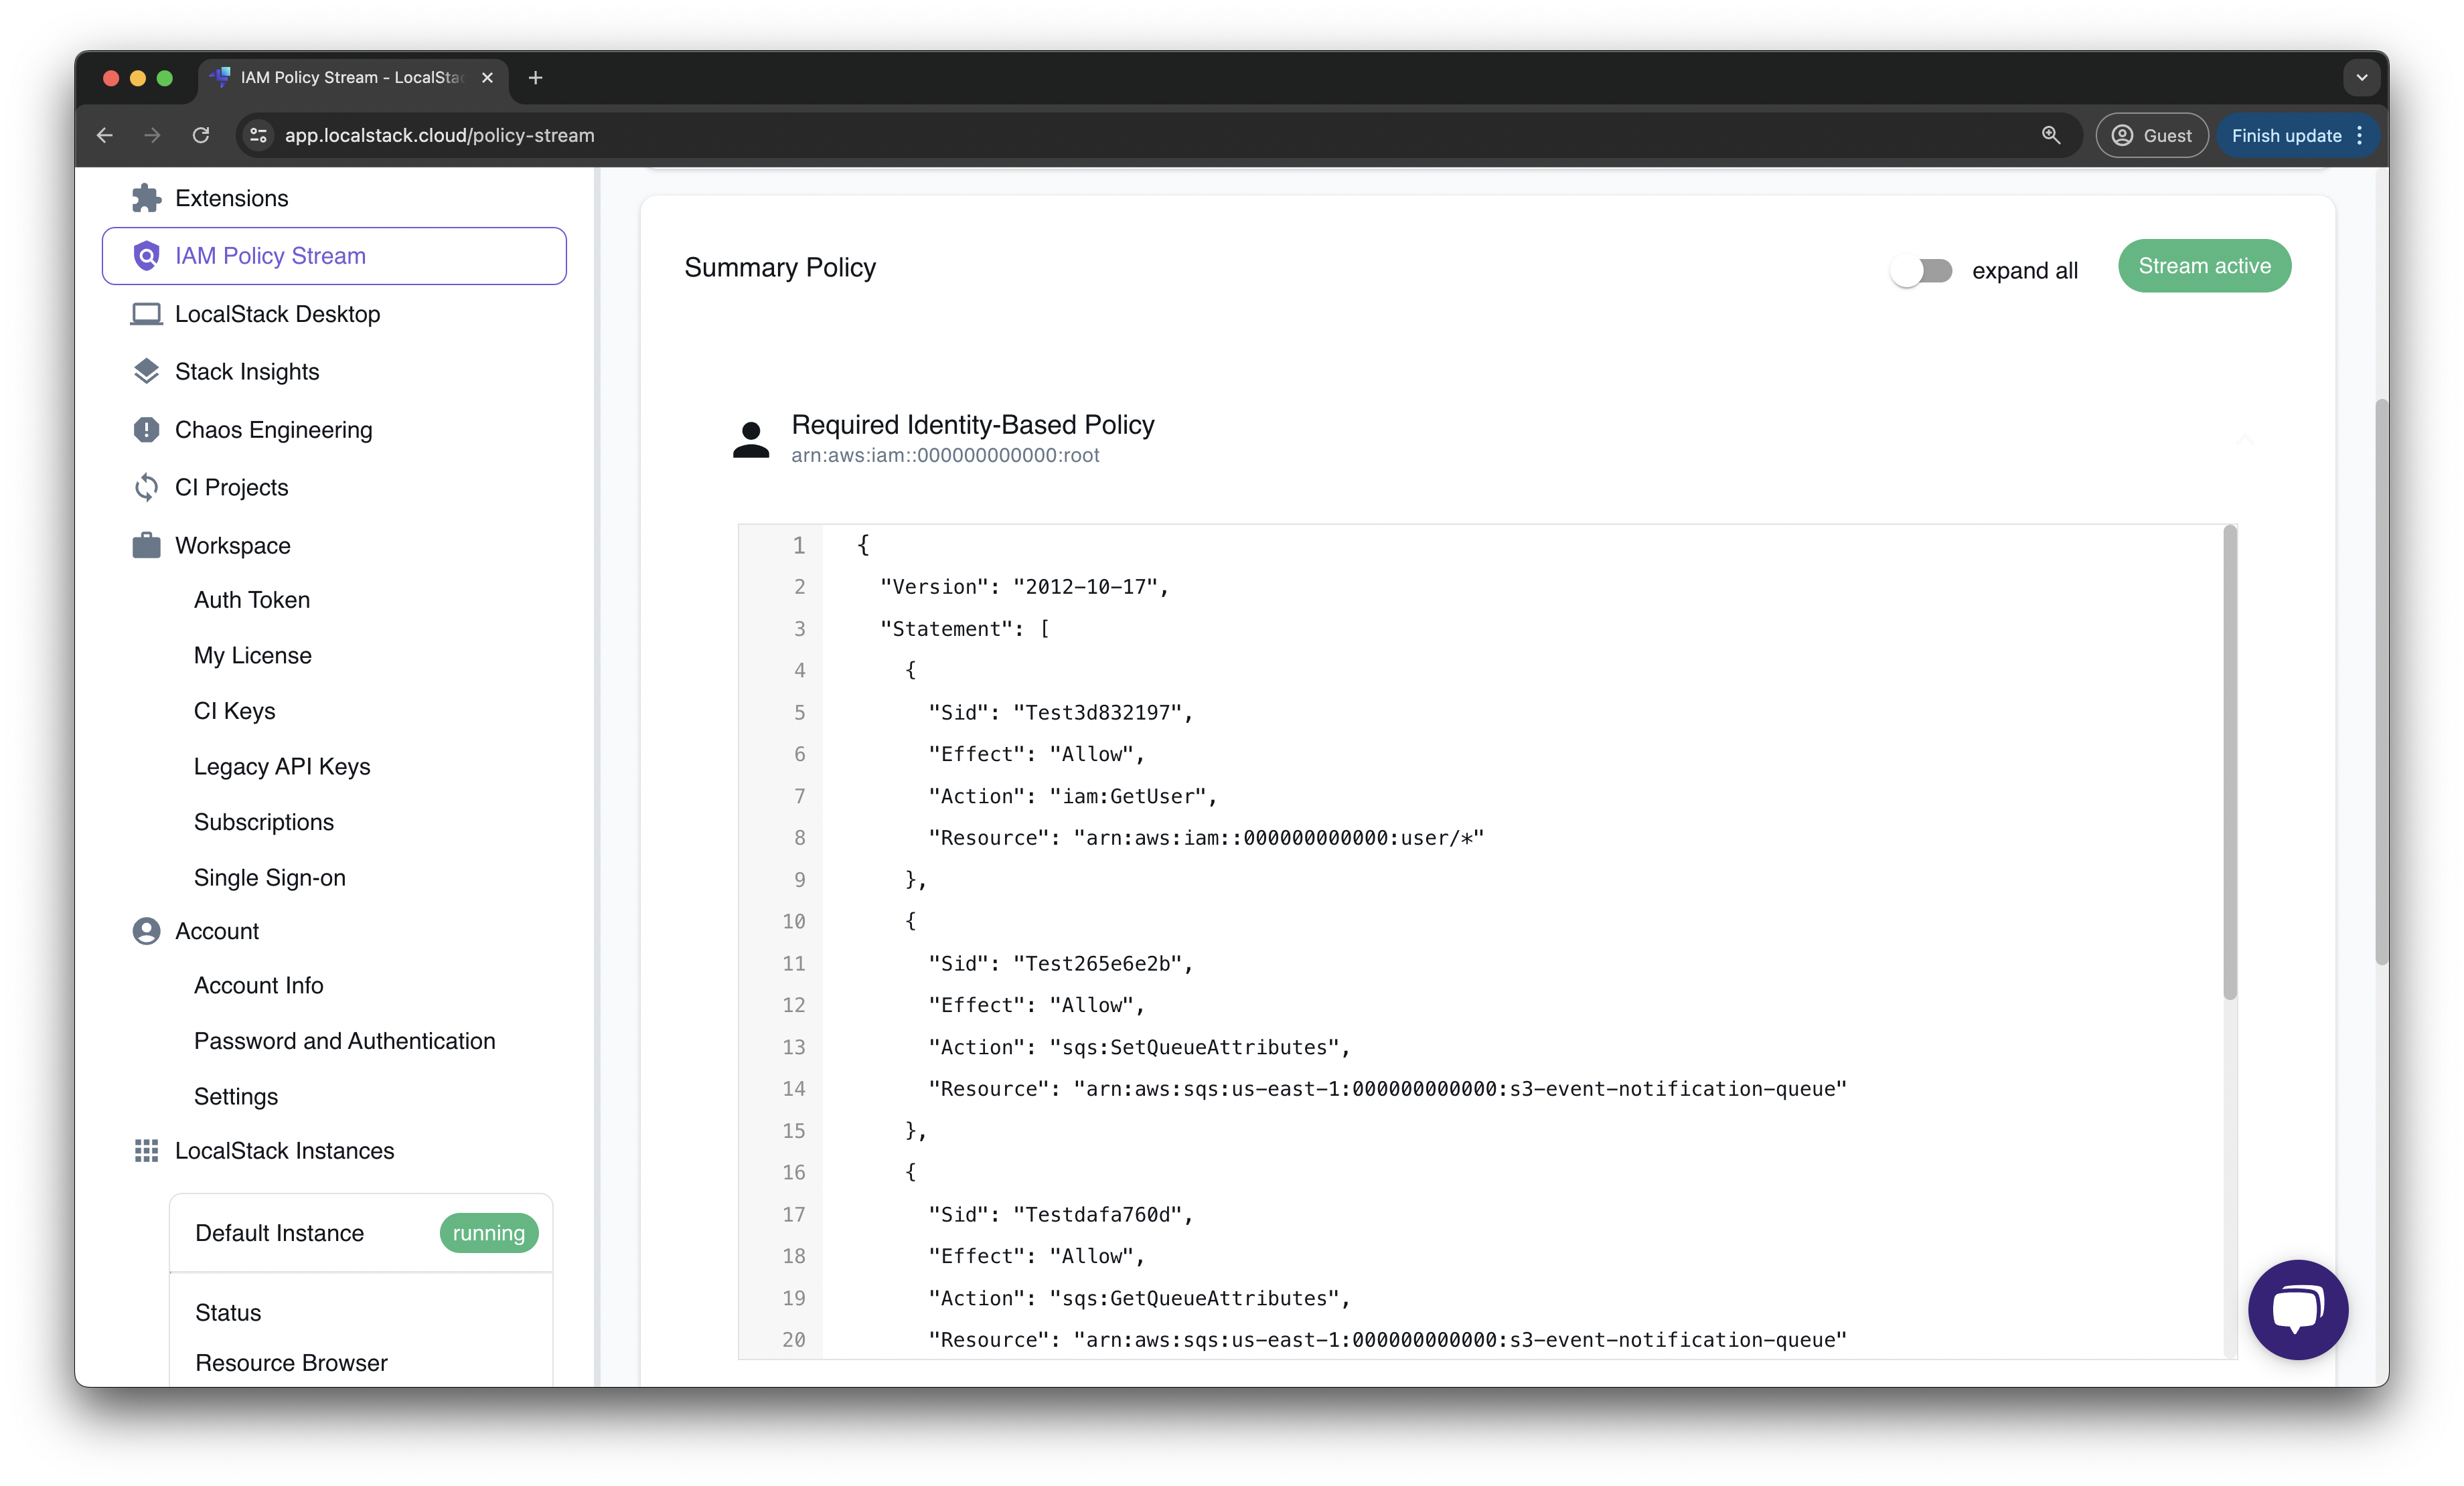
You can navigate to the Summary Policy tab on the IAM Policy Stream dashboard. This concatenates the policy per principle which the policy should be attached to. For the example above, you would be able to see the Identity Policy for the root user which has all the actions and resources inside one single policy file for the operations we performed.
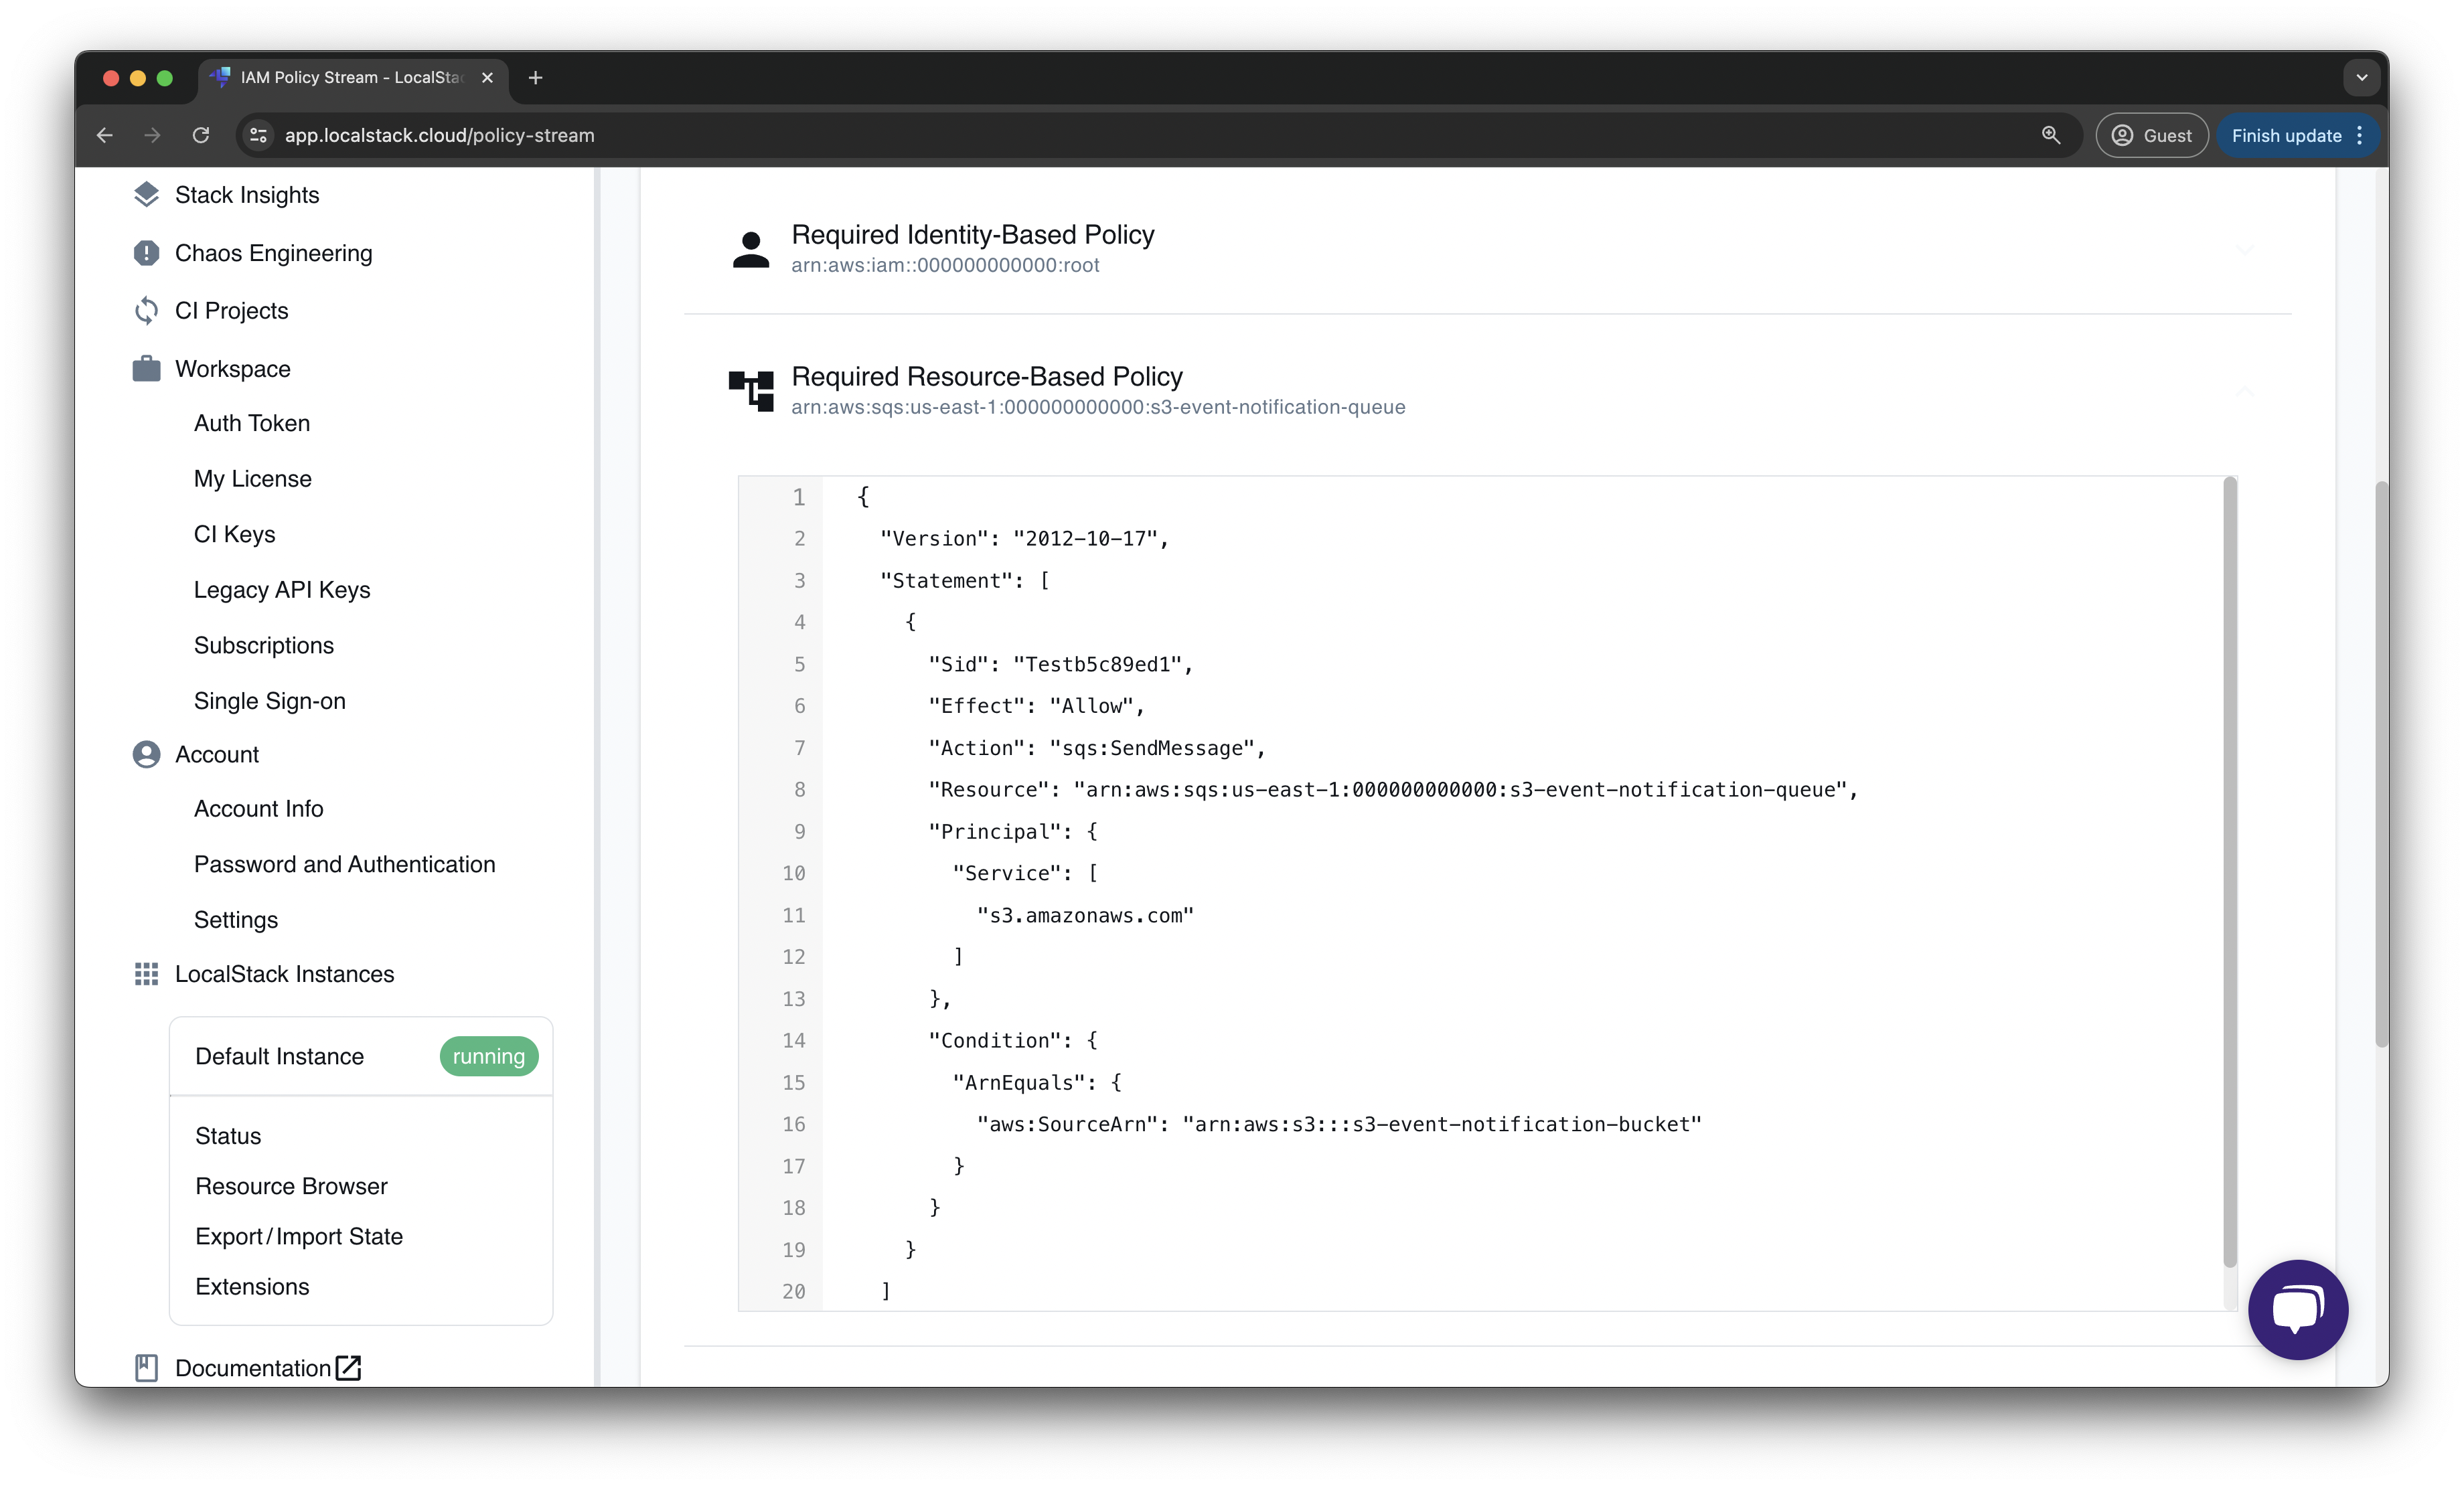
On the other hand, you have the Resource Policy for the SQS queue, where you can see the permission necessary for the subscription. For larger AWS applications, you would be able to find multiple roles and multiple resource-based policies depending on your scenario.
Testing the application
Section titled “Testing the application”This section demonstrates how to test your IAM policies and verify both deny and allow scenarios using LocalStack’s IAM enforcement.
Testing Scenario 1: Deny (Without IAM Policy)
Section titled “Testing Scenario 1: Deny (Without IAM Policy)”When you first upload a file to the S3 bucket without the proper SQS queue policy in place, the S3 service will be denied permission to send messages to the SQS queue.
Upload a test file:
echo "Test file content" > test-file.logawslocal s3 cp test-file.log s3://s3-event-notification-bucket/Expected output - IAM Violation in LocalStack logs:
2024-07-09T05:30:33.583 INFO --- [et.reactor-4] l.s.i.p.handler : Request for service 'sqs' by principal 's3.amazonaws.com' for operation 'SendMessage' denied.2024-07-09T05:30:33.583 DEBUG --- [et.reactor-4] l.s.i.p.handler : Necessary permissions for this action: ["Action 'sqs:SendMessage' for 'arn:aws:sqs:us-east-1:000000000000:s3-event-notification-queue'"]2024-07-09T05:30:33.583 DEBUG --- [et.reactor-4] l.s.i.p.handler : 0 permissions have been explicitly denied: []2024-07-09T05:30:33.583 DEBUG --- [et.reactor-4] l.s.i.p.handler : 0 permissions have been explicitly allowed: []2024-07-09T05:30:33.583 DEBUG --- [et.reactor-4] l.s.i.p.handler : 1 permissions have been implicitly denied: ["Action 'sqs:SendMessage' for 'arn:aws:sqs:us-east-1:000000000000:s3-event-notification-queue'"]IAM Policy Stream Dashboard showing the violation:
The dashboard clearly shows:
- Action:
SQS.SendMessage - Status:
Denied(shown in red) - Principal:
s3.amazonaws.com - Resource:
arn:aws:sqs:us-east-1:000000000000:s3-event-notification-queue
Attempting to receive messages from the queue:
awslocal sqs receive-message \ --queue-url http://sqs.us-east-1.localhost.localstack.cloud:4566/000000000000/s3-event-notification-queueExpected output - No messages (because S3 was denied):
{ "Messages": []}Or you may receive no output at all, indicating an empty queue.
Testing Scenario 2: Allow (With IAM Policy)
Section titled “Testing Scenario 2: Allow (With IAM Policy)”After applying the IAM policy generated by the Policy Stream to your SQS queue, the S3 service will be granted permission to send messages.
The required policy (already applied via Terraform):
{ "Version": "2012-10-17", "Statement": [ { "Sid": "Test22bf6867", "Effect": "Allow", "Action": "sqs:SendMessage", "Resource": "arn:aws:sqs:us-east-1:000000000000:s3-event-notification-queue", "Principal": { "Service": [ "s3.amazonaws.com" ] }, "Condition": { "ArnEquals": { "aws:SourceArn": "arn:aws:s3:::s3-event-notification-bucket" } } } ]}Upload another test file:
echo "Test file with policy" > test-file-2.logawslocal s3 cp test-file-2.log s3://s3-event-notification-bucket/Expected output - Success (no IAM violation):
upload: ./test-file-2.log to s3://s3-event-notification-bucket/test-file-2.logLocalStack logs showing successful permission:
2024-07-09T05:35:22.123 DEBUG --- [et.reactor-2] l.s.i.p.handler : Request for service 'sqs' by principal 's3.amazonaws.com' for operation 'SendMessage' allowed.2024-07-09T05:35:22.123 DEBUG --- [et.reactor-2] l.s.i.p.handler : 1 permissions have been explicitly allowed: ["Action 'sqs:SendMessage' for 'arn:aws:sqs:us-east-1:000000000000:s3-event-notification-queue'"]IAM Policy Stream Dashboard showing no violations:
The dashboard shows all actions with green checkmarks, indicating successful execution.
Receive the message from the queue:
awslocal sqs receive-message \ --queue-url http://sqs.us-east-1.localhost.localstack.cloud:4566/000000000000/s3-event-notification-queueExpected output - Message successfully received:
{ "Messages": [ { "MessageId": "7c9d6b22-cb35-4a66-98dc-6f48dfc78f33", "ReceiptHandle": "MTM4ZTg2NTYtMGIwNC00ZWE2LWIyM2EtNWNlZTIyOTZmOGE1IGFybjphd3M6c3FzOnVzLWVhc3QtMTowMDAwMDAwMDAwMDA6czMtZXZlbnQtbm90aWZpY2F0aW9uLXF1ZXVlIDdjOWQ2YjIyLWNiMzUtNGE2Ni05OGRjLTZmNDhkZmM3OGYzMyAxNzIwNTAzNjEyLjU2NDEyOTQ=", "MD5OfBody": "10eacb105ec11badc56f7e0198e0c4ad", "Body": "{\"Service\": \"Amazon S3\", \"Event\": \"s3:TestEvent\", \"Time\": \"2024-07-09T05:29:55.923Z\", \"Bucket\": \"s3-event-notification-bucket\", \"RequestId\": \"bfa882c0-a3b0-4549-b4c5-ac34167b3076\", \"HostId\": \"eftixk72aD6Ap51TnqcoF8eFidJG9Z/2\"}" } ]}The message body contains the S3 event notification with details about the uploaded file, confirming that the IAM policy is working correctly.
Verification Checklist
Section titled “Verification Checklist”To ensure your IAM policies are correctly configured:
- No IAM violations appear in the IAM Policy Stream dashboard
- Messages are successfully delivered to the SQS queue
- LocalStack logs show “allowed” for the
SendMessageoperation - All API calls display green checkmarks in the Policy Stream dashboard
Conclusion
Section titled “Conclusion”IAM Policy Stream streamlines your development process by minimizing the manual creation of policies and confirming the necessity of granted permissions. However, it is advisable to manually confirm that your policy aligns with your intended actions. Your code may unintentionally make requests, and LocalStack considers all requests made during policy generation as valid.
A practical scenario is automating tests, such as integration or end-to-end testing, against your application using LocalStack. This setup allows LocalStack to automatically generate policies with the required permissions. However, it’s important to note that these generated policies may not cover all possible requests, as only the requests made during testing are included. You can then review and customize the policies to meet your needs, ensuring that overly permissive policies don’t find their way into production environments.