SCIM User Provisioning
SCIM (System for Cross-domain Identity Management) allows you to automate user provisioning, deprovisioning, and license assignment in LocalStack through your identity provider (IdP). LocalStack’s SCIM implementation follows the SCIM v2.0 specification and has been developed and tested with the Okta SCIM client.
SCIM is a sub-feature of SSO and requires an active SSO configuration with at least one Identity Provider already set up. See the Single Sign-On documentation before proceeding.
All integration details — including the SCIM Base Connector URL, Bearer Auth Token, and group names per subscription — are available in the LocalStack web app under Settings → Single Sign-On.
Prerequisites
Section titled “Prerequisites”- An active Enterprise subscription with the SCIM feature enabled
- A configured SSO Identity Provider (OIDC or SAML)
- Admin access to your organization in the LocalStack web app
Enabling SCIM
Section titled “Enabling SCIM”In the LocalStack web app, navigate to Settings → Single Sign-On. For each configured Identity Provider, you will see a SCIM User Provisioning toggle. Enable it for the IdP you want to use for SCIM provisioning.
Once enabled, click View SCIM Configuration to access the SCIM Base Connector URL and Bearer Auth Token needed to configure your IdP.
Setup and Configuration
Section titled “Setup and Configuration”The settings contain the SCIM API Base Connector URL and the Bearer Auth Token as shown in the image below. You can copy these values to configure your SCIM client.
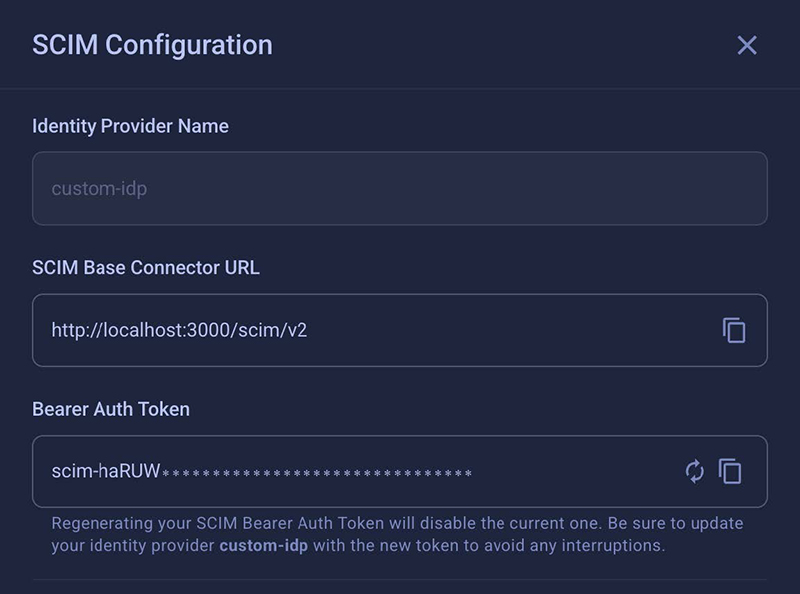
SCIM clients authenticate using a long-lived bearer token. The token starts with scim- and is displayed (masked) in the SCIM configuration panel. Use the copy icon to copy it to your clipboard.
You can regenerate the token at any time using the refresh icon. Regenerating the token immediately invalidates the previous one — update your IdP configuration with the new token to avoid interruptions.
Configuring SCIM with Okta
Section titled “Configuring SCIM with Okta”Use the following steps to configure SCIM Base Connector URL and Bearer Auth Token:
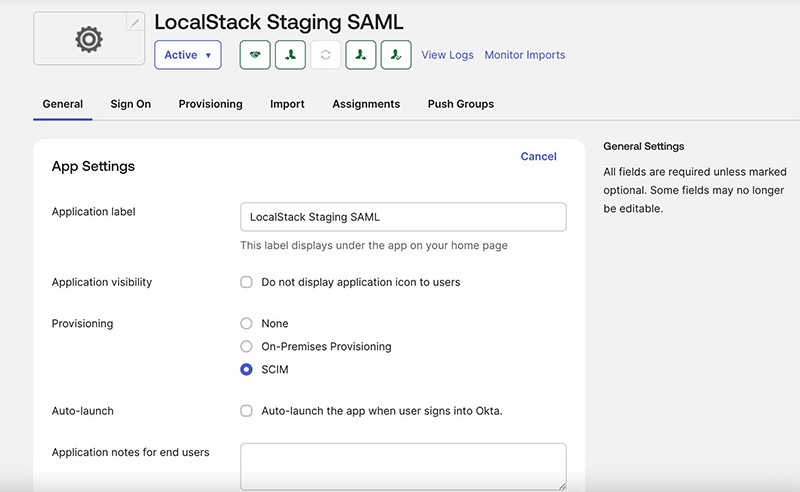
- Select your application — Go to Applications → Applications and select the application you want to enable SCIM provisioning for.
- Navigate to Provisioning settings — In the application settings, go to the Provisioning tab and click Integration or Edit (wording may vary).
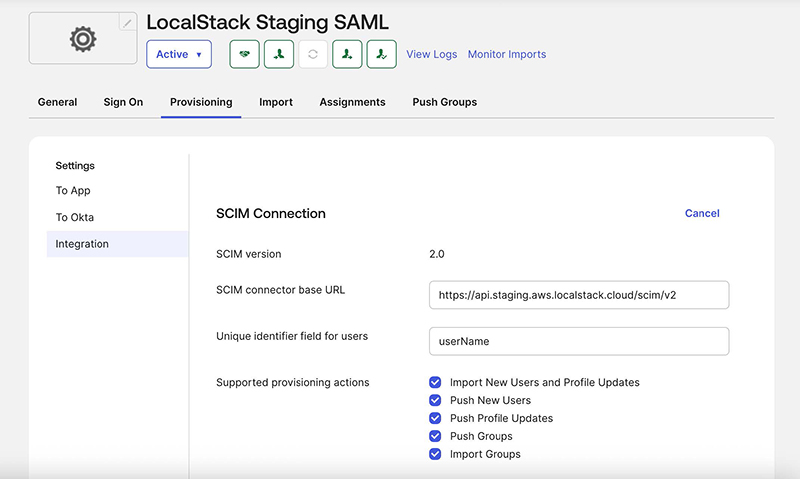
- Enter the SCIM connection details:
- SCIM connector base URL: Paste the SCIM Base Connector URL from the LocalStack SCIM configuration panel.
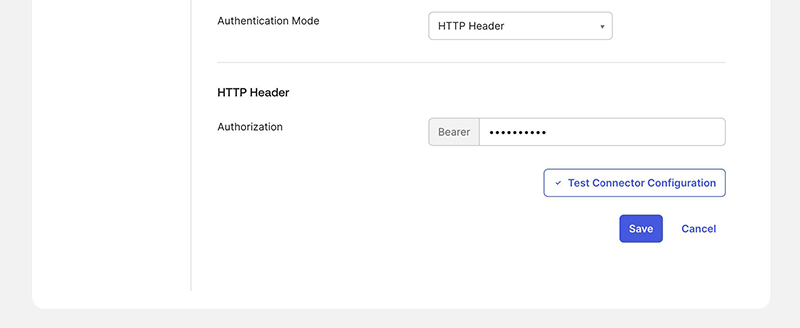
- Authentication Mode: Select HTTP Header.
- Bearer Token: Paste the SCIM bearer token from the LocalStack SCIM configuration panel.
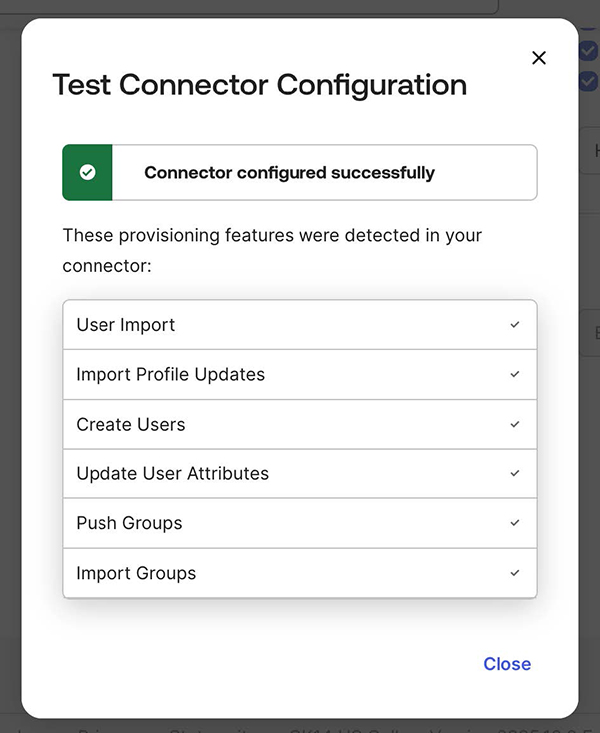
- Test the connection — Click Test Connector Configuration to confirm Okta can connect successfully.
- Enable provisioning features (optional) — Once the connection succeeds, enable the desired provisioning actions (Create Users, Update User Attributes, Deactivate Users) under the To App settings tab. There is no need to enable Sync Password, as SSO does not require a password.
- Save — Save and apply the integration settings.
Provisioning Individual Users
Section titled “Provisioning Individual Users”LocalStack supports full provisioning and deprovisioning of individual user accounts via SCIM.
- In the Okta Admin Console, go to your application and click the Assignments tab.
- Select Assign → Assign to People.
- Search for and select the users you want to provision, then click Assign and Done.
- Okta will automatically send a SCIM request to LocalStack to create the user account. The user will be visible in LocalStack and their account details will sync from Okta.
Updating User Accounts
Section titled “Updating User Accounts”Changes to user attributes (first name, last name, email) in Okta are automatically pushed to LocalStack via SCIM while the integration is active.
Deprovisioning Users
Section titled “Deprovisioning Users”- In Okta, go to your application’s Assignments tab.
- Find the user you want to remove and click Remove next to their name.
- Confirm the action.
Okta will send a SCIM deprovisioning request and the user will be removed from LocalStack.
Provisioning Groups of Users
Section titled “Provisioning Groups of Users”Groups in Okta can be used to provision multiple users to LocalStack at once.
Assigning a Group
Section titled “Assigning a Group”- In the Okta Admin Console, go to your application and click the Assignments tab.
- Select Assign → Assign to Groups.
- Search for and select the groups you want to provision, then click Assign and Done.
Okta will send a SCIM request to LocalStack to create a user account for each member of the group. Changes to a group’s membership in Okta are automatically pushed to LocalStack via SCIM.
Deprovisioning a Group
Section titled “Deprovisioning a Group”- In Okta, return to your application’s Assignments tab.
- Find the group and click Remove next to its name.
- Confirm the action.
Okta will send a SCIM request to remove the group’s users from LocalStack. Users who were provisioned solely through this group assignment will also be deprovisioned.
Migrating an Existing OpenID Connect or SAML Application
Section titled “Migrating an Existing OpenID Connect or SAML Application”If you have an existing OIDC or SAML app in Okta that already has SSO users assigned, follow these steps to add SCIM provisioning:
-
On the General tab of your Okta application, set Provisioning to SCIM.
-
Go to the Provisioning tab and click Edit to configure the SCIM connection:
- SCIM connector base URL: Paste the URL from LocalStack.
- Unique identifier field for users: Enter
userName(the Okta default). - Supported provisioning actions: Enable all available options.
-
Select HTTP Header as the Authentication Mode and paste the Bearer token from the LocalStack SCIM configuration panel. Click Save.
-
After a successful connection test, go to the To App tab, click Edit, and enable Create Users, Update User Attributes, and Deactivate Users. Save your changes.
-
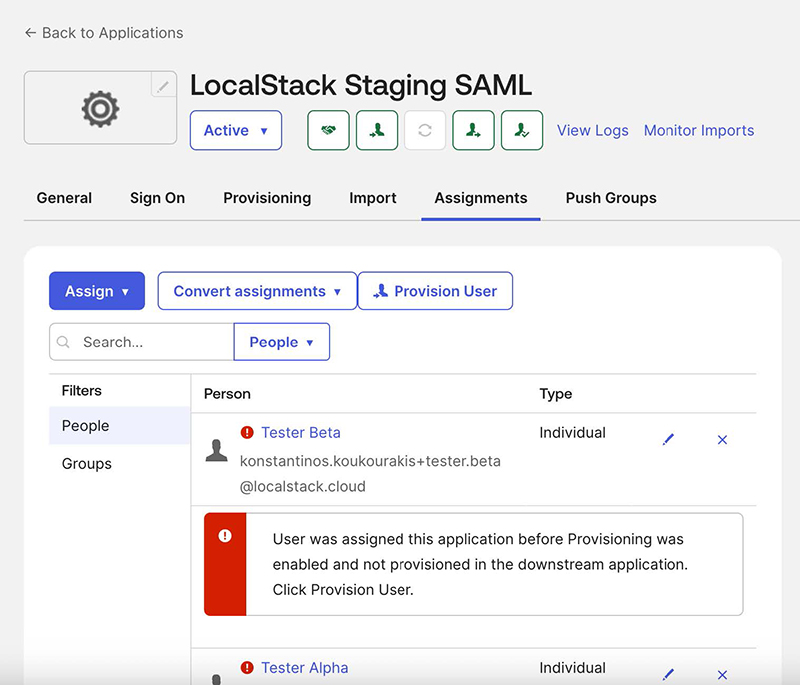
Click the Assignments tab. Okta will show error messages for users who were assigned before provisioning was enabled. Click Provision User and confirm the action to sync all existing users. If the task fails, you can retry it under Dashboard → Tasks.
-
After syncing completes, refresh the page — the error messages should be gone and all users will be fully managed via Okta SCIM.
License Assignment
Section titled “License Assignment”Licenses are assigned to users by pushing specifically named SCIM groups that correspond to your LocalStack subscriptions.
Group Name Format
Section titled “Group Name Format”License group names follow this format:
{PLAN}-{EMULATOR}-{SUBSCRIPTION_ID}For example: Enterprise Plan-AWS-sub_1RqpMYGCs0LNOzY9UszOGJkL
The exact group name for each subscription is displayed in the SCIM configuration panel in the LocalStack web app. Use the subscription dropdown to select the plan you want to manage, and the correct group name will be shown for you to copy.
Creating and Pushing a License Group in Okta
Section titled “Creating and Pushing a License Group in Okta”- Create a new Okta group named exactly as shown in the LocalStack SCIM configuration panel.
- Add users to the group (users must already be assigned to the LocalStack SCIM application).
- In your application, go to the Push Groups tab.
- Push the group to LocalStack via SCIM.
- Once synced, LocalStack will recognize the group and assign the corresponding license to all members.
Migrating Users with Existing Licenses
Section titled “Migrating Users with Existing Licenses”If your organization already has users with assigned licenses and you want to manage them through SCIM:
- Create a license group in Okta with the correct name.
- Add it to the application via the Push Groups tab.
- Add the existing licensed users to that group through the application. Once added, they will be automatically synced (Push Status becomes Active) and managed through SCIM going forward.
Web App Roles and Permissions
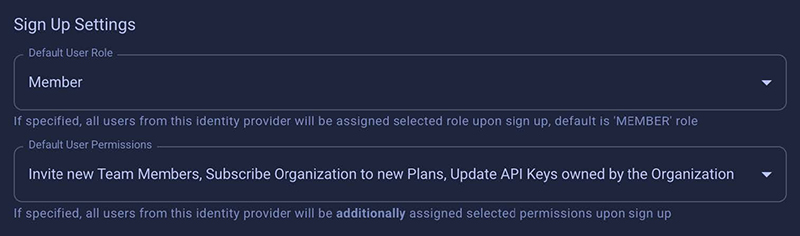
Section titled “Web App Roles and Permissions”LocalStack supports configuring default roles and permissions that are applied when a user is provisioned via SCIM. These can for example be used to grant users access CI credentials or to make them workspace admins.
Granting users permissions or assigning them to groups (e.g. ‘Member’, ‘Admin’) is not supported via SCIM but the settings in the LocalStack web app allow you to set presets that are applied when a user is provisioned via SCIM. These settings are inherited from the SSO settings.
Limitations
Section titled “Limitations”- One license group per user: Each user can be assigned to only one license group (subscription) per organization.
- One SCIM provider at a time: Only one Identity Provider can have SCIM enabled at a time.
- Provisioning is one-way: SCIM sync goes from your IdP to LocalStack only. There is no synchronization from LocalStack back to your IdP.
- LocalStack UI does not block manual edits: The LocalStack web app does not prevent you from manually editing SCIM-provisioned users or their license assignments. It is strongly recommended to manage SCIM-provisioned users exclusively through your IdP to avoid inconsistencies.
- Re-provisioning removed users requires re-invitation: If a user was provisioned via SCIM and later removed, they cannot be re-provisioned via SCIM directly. They must be re-invited through the LocalStack Users & Licenses page and accept the invitation before being reassigned.
API Reference
Section titled “API Reference”LocalStack’s SCIM API is available at /scim/v2 and implements the SCIM v2.0 specification (RFC 7644).
User Endpoints (/scim/v2/Users)
Section titled “User Endpoints (/scim/v2/Users)”| Method | Endpoint | Description |
|---|---|---|
POST | /scim/v2/Users | Create a SCIM user, or idempotently return an existing member when the email matches. Enforces global email uniqueness and userName uniqueness per org and IdP. |
GET | /scim/v2/Users | List active SCIM-provisioned users. Supports filter=userName eq "...", startIndex, and count for pagination. |
GET | /scim/v2/Users/{id} | Retrieve a SCIM user only if they are SCIM-provisioned and active in the org; returns 404 otherwise. |
PATCH | /scim/v2/Users/{id} | RFC 7644 PatchOp for selected fields (name, emails) and deactivation via active:false. Reactivation via SCIM is not supported. Patching userName or externalId is not supported. |
PUT | /scim/v2/Users/{id} | Full replace of mutable fields (name, email) with support for deactivation via active:false. Reactivation via SCIM is ignored. |
Group Endpoints (/scim/v2/Groups)
Section titled “Group Endpoints (/scim/v2/Groups)”| Method | Endpoint | Description |
|---|---|---|
POST | /scim/v2/Groups | Bind an existing subscription as a SCIM group via displayName (format: {PLAN}-{EMULATOR}-{subscription_id}). Optionally assign members. Validates membership and enforces one-group-per-user per org. Returns 201 on success; 409 for insufficient seats or conflicts. |
GET | /scim/v2/Groups | List groups (subscriptions) with their SCIM members. Supports filter=displayName eq "...", startIndex, and count (max 1000). |
GET | /scim/v2/Groups/{id} | Retrieve a group by its subscription ID with SCIM members. Returns 404 if not found. |
PATCH | /scim/v2/Groups/{id} | RFC 7644 PatchOp (add, remove, replace) for members. Supports capacity checks and rollback on partial failures. |
PUT | /scim/v2/Groups/{id} | Full replace of group membership. Omitting or passing an empty members array clears all members. Supports rollback on errors. |
DELETE | /scim/v2/Groups/{id} | Delete the group binding and unassign SCIM members. Non-SCIM assignments are unaffected. Returns 204 on success. |
Metadata Endpoints
Section titled “Metadata Endpoints”| Method | Endpoint | Description |
|---|---|---|
GET | /scim/v2/ResourceTypes | List all supported SCIM resource types (User, Group). |
GET | /scim/v2/Schemas | List supported SCIM schemas for user and group resources. |
GET | /scim/v2/ServiceProviderConfig | Return service provider configuration and supported capabilities. |