Glue
Introduction
Section titled “Introduction”The Glue API in LocalStack for AWS allows you to run ETL (Extract-Transform-Load) jobs locally, maintaining table metadata in the local Glue data catalog, and using the Spark ecosystem (PySpark/Scala) to run data processing workflows.
LocalStack allows you to use the Glue APIs in your local environment. The supported APIs are available on our API Coverage section, which provides information on the extent of Glue’s integration with LocalStack.
Getting started
Section titled “Getting started”This guide is designed for users new to Glue and assumes basic knowledge of the AWS CLI and our awslocal wrapper script.
Start your LocalStack container using your preferred method. We will demonstrate how to create databases and table metadata in Glue, run Glue ETL jobs, import databases from Athena, and run Glue Crawlers with the AWS CLI.
Creating Databases and Table Metadata
Section titled “Creating Databases and Table Metadata”The commands below illustrate the creation of some very basic entries (databases, tables) in the Glue data catalog:
awslocal glue create-database --database-input '{"Name":"db1"}'awslocal glue create-table --database db1 --table-input '{"Name":"table1"}'awslocal glue get-tables --database db1{ "TableList": [ { "Name": "table1", "DatabaseName": "db1" } ]}Running Scripts with Scala and PySpark
Section titled “Running Scripts with Scala and PySpark”Create a new PySpark script named job.py with the following code:
from pyspark.sql import SparkSession
def init_spark():   spark = SparkSession.builder.appName("HelloWorld").getOrCreate()   sc = spark.sparkContext   return spark,sc
def main():   spark,sc = init_spark()   nums = sc.parallelize([1,2,3,4])   print(nums.map(lambda x: x*x).collect())

if __name__ == '__main__':   main()
You can now copy the script to an S3 bucket:
awslocal s3 mb s3://glue-testawslocal s3 cp job.py s3://glue-test/job.pyNext, you can create a job definition:
awslocal glue create-job \ --name job1 \ --role arn:aws:iam::000000000000:role/glue-role \ --command '{"Name": "pythonshell", "ScriptLocation": "s3://glue-test/job.py"}'You can finally start the job execution:
awslocal glue start-job-run --job-name job1The returned JobRunId can be used to query the status job the job execution, until it becomes SUCCEEDED:
awslocal glue get-job-run --job-name job1 --run-id <JobRunId>{ "JobRun": { "Id": "733b76d0", "Attempt": 1, "JobRunState": "SUCCEEDED" }}For a more detailed example illustrating how to run a local Glue PySpark job, please refer to this sample repository.
Importing Athena Tables into Glue Data Catalog
Section titled “Importing Athena Tables into Glue Data Catalog”The Glue data catalog is integrated with Athena, and the database/table definitions can be imported via the import-catalog-to-glue API.
Assume you are running the following Athena queries to create databases and table definitions:
CREATE DATABASE db2CREATE EXTERNAL TABLE db2.table1 (a1 Date, a2 STRING, a3 INT) LOCATION 's3://test/table1'CREATE EXTERNAL TABLE db2.table2 (a1 Date, a2 STRING, a3 INT) LOCATION 's3://test/table2'Then this command will import these DB/table definitions into the Glue data catalog:
awslocal glue import-catalog-to-glueAfterwards, the databases and tables will be available in Glue.
You can query the databases with the get-databases operation:
awslocal glue get-databases{ "DatabaseList": [ ... { "Name": "db2", "Description": "Database db2 imported from Athena", "TargetDatabase": { "CatalogId": "000000000000", "DatabaseName": "db2" } } ]}And you can query the databases with the get-databases operation:
awslocal glue get-tables --database-name db2{ "TableList": [ { "Name": "table1", "DatabaseName": "db2", "Description": "Table db2.table1 imported from Athena", "CreateTime": ... }, { "Name": "table2", "DatabaseName": "db2", "Description": "Table db2.table2 imported from Athena", "CreateTime": ... } ]}Crawlers
Section titled “Crawlers”Glue crawlers allow extracting metadata from structured data sources.
LocalStack Glue currently supports S3 targets (configurable via S3Targets), as well as JDBC targets (configurable via JdbcTargets).
Support for other target types is in our pipeline and will be added soon.
S3 Crawler Example
Section titled “S3 Crawler Example”The example below illustrates crawling tables and partition metadata from S3 buckets.
You can first create an S3 bucket with a couple of items:
awslocal s3 mb s3://testprintf "1, 2, 3, 4\n5, 6, 7, 8" > /tmp/file.csvawslocal s3 cp /tmp/file.csv s3://test/table1/year=2021/month=Jan/day=1/file.csvawslocal s3 cp /tmp/file.csv s3://test/table1/year=2021/month=Jan/day=2/file.csvawslocal s3 cp /tmp/file.csv s3://test/table1/year=2021/month=Feb/day=1/file.csvawslocal s3 cp /tmp/file.csv s3://test/table1/year=2021/month=Feb/day=2/file.csvYou can then create and trigger the crawler:
awslocal glue create-database --database-input '{"Name":"db1"}'awslocal glue create-crawler \ --name c1 \ --database-name db1 \ --role arn:aws:iam::000000000000:role/glue-role \ --targets '{"S3Targets": [{"Path": "s3://test/table1"}]}'awslocal glue start-crawler --name c1Finally, you can query the table metadata that has been created by the crawler:
awslocal glue get-tables --database-name db1{ "TableList": [{ "Name": "table1", "DatabaseName": "db1", "PartitionKeys": [ ... ]...You can also query the created table partitions:
awslocal glue get-partitions --database-name db1 --table-name table1{ "Partitions": [{ "Values": ["2021", "Jan", "1"], "DatabaseName": "db1", "TableName": "table1",...JDBC Crawler Example
Section titled “JDBC Crawler Example”When using JDBC crawlers, you can point your crawler towards a Redshift database created in LocalStack.
Below is a rough outline of the steps required to get the integration for the JDBC crawler working. You can first create the local Redshift cluster via:
awslocal redshift create-cluster \ --cluster-identifier c1 \ --node-type dc1.large \ --master-username test \ --master-user-password test \ --db-name db1The output of this command contains the endpoint address of the created Redshift database:
... "Endpoint": { "Address": "localhost.localstack.cloud", "Port": 4510 },...Then you can use any JDBC or Postgres client to create a table mytable1 in the Redshift database, and fill the table with some data.
Next, you’re creating the Glue database, the JDBC connection, as well as the crawler:
awslocal glue create-database --database-input '{"Name":"gluedb1"}'awslocal glue create-connection --connection-input \ {"Name":"conn1","ConnectionType":"JDBC","ConnectionProperties":{"USERNAME":"test","PASSWORD":"test","JDBC_CONNECTION_URL":"jdbc:redshift://localhost.localstack.cloud:4510/db1"}}'awslocal glue create-crawler \ --name c1 \ --database-name gluedb1 \ --role arn:aws:iam::000000000000:role/glue-role \ --targets '{"JdbcTargets":[{"ConnectionName":"conn1","Path":"db1/%/mytable1"}]}'awslocal glue start-crawler --name c1Once the crawler has started, you have to wait until the State turns to READY when querying the current state:
awslocal glue get-crawler --name c1Once the crawler has finished running and is back in READY state, the Glue table within the gluedb1 DB should have been populated and can be queried via the API.
Schema Registry
Section titled “Schema Registry”The Glue Schema Registry allows you to centrally discover, control, and evolve data stream schemas. With the Schema Registry, you can manage and enforce schemas and schema compatibilities in your streaming applications. It integrates nicely with Managed Streaming for Kafka (MSK).
You can create a schema registry with the following command:
awslocal glue create-registry --registry-name demo-registryYou can create a schema in the newly created registry with the create-schema command:
awslocal glue create-schema --schema-name demo-schema \ --registry-id RegistryName=demo-registry \ --data-format AVRO \ --compatibility FORWARD \ --schema-definition '{"type":"record","namespace":"Demo","name":"Person","fields":[{"name":"Name","type":"string"}]}'{ "RegistryName": "demo-registry", "RegistryArn": "arn:aws:glue:us-east-1:000000000000:file-registry/demo-registry", "SchemaName": "demo-schema", "SchemaArn": "arn:aws:glue:us-east-1:000000000000:schema/demo-registry/demo-schema", "DataFormat": "AVRO", "Compatibility": "FORWARD", "SchemaCheckpoint": 1, "LatestSchemaVersion": 1, "NextSchemaVersion": 2, "SchemaStatus": "AVAILABLE", "SchemaVersionId": "546d3220-6ab8-452c-bb28-0f1f075f90dd", "SchemaVersionStatus": "AVAILABLE"}Once the schema has been created, you can create a new version:
awslocal glue register-schema-version \ --schema-id SchemaName=demo-schema,RegistryName=demo-registry \ --schema-definition '{"type":"record","namespace":"Demo","name":"Person","fields":[{"name":"Name","type":"string"}, {"name":"Address","type":"string"}]}'{ "SchemaVersionId": "ee38732b-b299-430d-a88b-4c429d9e1208", "VersionNumber": 2, "Status": "AVAILABLE"}You can find a more advanced sample in our localstack-pro-samples repository on GitHub, which showcases the integration with AWS MSK and automatic schema registrations (including schema rejections based on the compatibilities).
Delta Lake Tables
Section titled “Delta Lake Tables”LocalStack Glue supports Delta Lake, an open-source storage framework that extends Parquet data files with a file-based transaction log for ACID transactions and scalable metadata handling.
To illustrate this feature, we take a closer look at a Glue sample job that creates a Delta Lake table, puts some data into it, and then queries data from the table.
First, we define the PySpark job in a file named job.py (see below).
The job first creates a database db1 and table table1, then inserts data into the table via both a dataframe and an INSERT INTO query, and finally fetches the inserted rows via a SELECT query:
from awsglue.context import GlueContextfrom pyspark import SparkContext, SparkConf
conf = SparkConf()conf.set("spark.sql.extensions", "io.delta.sql.DeltaSparkSessionExtension")conf.set("spark.sql.catalog.spark_catalog", "org.apache.spark.sql.delta.catalog.DeltaCatalog")glue_context = GlueContext(SparkContext.getOrCreate(conf=conf))spark = glue_context.spark_session
# create database and tablespark.sql("CREATE DATABASE db1")spark.sql("CREATE TABLE db1.table1 (name string, key long) USING delta PARTITIONED BY (key) LOCATION 's3a://test/data/'")
# create dataframe and write to table in S3df = spark.createDataFrame([("test1", 123)], ["name", "key"])df.write.format("delta").options(path="s3a://test/data/") \    .mode("append").partitionBy("key").saveAsTable("db1.table1")
# insert data via 'INSERT' queryspark.sql("INSERT INTO db1.table1 (name, key) VALUES ('test2', 456)")
# get and print results, to run assertions further belowresult = spark.sql("SELECT * FROM db1.table1")print("SQL result:", result.toJSON().collect())
You can now run the following commands to create and start the Glue job:
awslocal s3 mb s3://testawslocal s3 cp job.py s3://test/job.pyawslocal glue create-job --name job1 --role arn:aws:iam::000000000000:role/test \ --glue-version 4.0 \ --command '{"Name": "pythonshell", "ScriptLocation": "s3://test/job.py"}'awslocal glue start-job-run --job-name job1Retrieve the job run ID from the output of the start-job-run command.
The execution of the Glue job can take a few moments - once the job has finished executing, you should see a log line with the query results in the LocalStack container logs, similar to the output below:
2023-10-17 12:59:20,088 INFO scheduler.DAGScheduler: Job 15 finished: collect at /private/tmp/script-90e5371e.py:28, took 0,158257 sSQL result: ['{"name":"test1","key":123}', '{"name":"test2","key":456}']In order to see the logs above, make sure to enable DEBUG=1 in the LocalStack container environment.
Alternatively, you can also retrieve the job logs programmatically via the CloudWatch Logs API - for example, using the job run ID from the above command.
awslocal logs get-log-events \ --log-group-name /aws-glue/jobs/logs-v2 \ --log-stream-name <JobRunId>Resource Browser
Section titled “Resource Browser”The LocalStack Web Application provides a Resource Browser for Glue. You can access the Resource Browser by opening the LocalStack Web Application in your browser, navigating to the Resources section, and then clicking on Glue under the Analytics section.
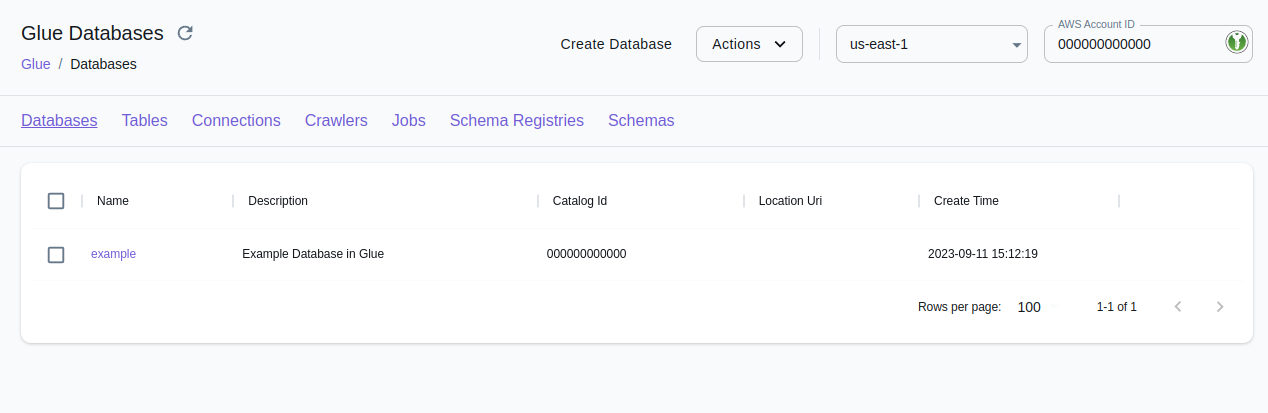
The Resource Browser allows you to perform the following actions:
- Manage Databases: Create, view, and delete databases in your Glue catalog Databases tab.
- Manage Tables: Create, view, edit, and delete tables in a database in your Glue catalog clicking on the Tables tab.
- Manage Connections: Create, view, and delete Connections in your Glue catalog by clicking on the Connections tab.
- Manage Crawlers: Create, view, and delete Crawlers in your Glue catalog by clicking on the Crawlers tab.
- Manage Jobs: Create, view, and delete Jobs in your Glue catalog by clicking on the Jobs tab.
- Manage Schema Registries: Create, view, and delete Schema Registries in your Glue catalog by clicking on the Schema Registries tab.
- Manage Schemas: Create, view, and delete Schemas in your Glue catalog by clicking on the Schemas tab.
Examples
Section titled “Examples”The following code snippets and sample applications provide practical examples of how to use Glue in LocalStack for various use cases:
- localstack-pro-samples/glue-etl-jobs
- Simple demo application illustrating the use of the Glue API to run local ETL jobs using LocalStack.
- localstack-pro-samples/glue-redshift-crawler
- Simple demo application illustrating the use of AWS Glue Crawler to populate the Glue metastore from a Redshift database.
Further Reading
Section titled “Further Reading”The AWS Glue API is a fairly comprehensive service - more details can be found in the official AWS Glue Developer Guide.
Current Limitations
Section titled “Current Limitations”Support for triggers is currently limited - the basic API endpoints are implemented, but triggers are currently still under development (more details coming soon).
API Coverage
Section titled “API Coverage”| Operation ▲ | Implemented ▼ | Verified on Kubernetes |
|---|