How To: Terraform Init Hooks for Automation & Production-Identical Test Environments
Introduction: The importance of integration testing and how to streamline it
Section titled “Introduction: The importance of integration testing and how to streamline it”LocalStack is a robust tool that emulates a local AWS cloud stack, allowing engineers to test and develop apps using AWS services directly on their local environments. This tool is essential for enhancing developer experience, reducing development costs and increasing efficiency.
In LocalStack, initialization hooks are scripts that customize or initialize your LocalStack instance at different stages of its lifecycle.
Up until now, the supported hooks could be shell or Python scripts executed at predefined lifecycle phases — BOOT, START, READY, and SHUTDOWN.
By placing scripts in the respective directories (/etc/localstack/init/{stage}.d), developers can automate tasks like setting up initial states, configuring services, or performing clean-up activities.
Terraform, is one of the most widely adopted tools for provisioning AWS infrastructure, so naturally, enabling Terraform configuration files to be used directly as initialization hooks boosts LocalStack’s utility. The direct use of Terraform scripts as init hooks allows developers to replicate production environments accurately and automate integration tests more effectively. This capability ensures that the test environment mirrors the production setup as closely as possible.
This tutorial guides you through using LocalStack’s new extension that supports Terraform configuration files as initialization hooks, and will show you how to leverage this new feature, and integrate it with Testcontainers for seamless testing. This approach simplifies the development and testing cycle, making it more efficient and closely aligned with real AWS infrastructure practices.
Prerequisites
Section titled “Prerequisites”For this tutorial, you will need:
- LocalStack for AWS to emulate the AWS services and to use LocalStack Extensions. If you don’t have LocalStack for AWS yet, you can sign up on our webapp to get a trial license for free.
- Docker
- LocalStack CLI
- AWS CLI
- Optional for building the Lambda functions: Java 17
- Optional for building the Lambda functions: Apache Maven 3.9.8
- Optional: Terraform and tflocal
Project overview
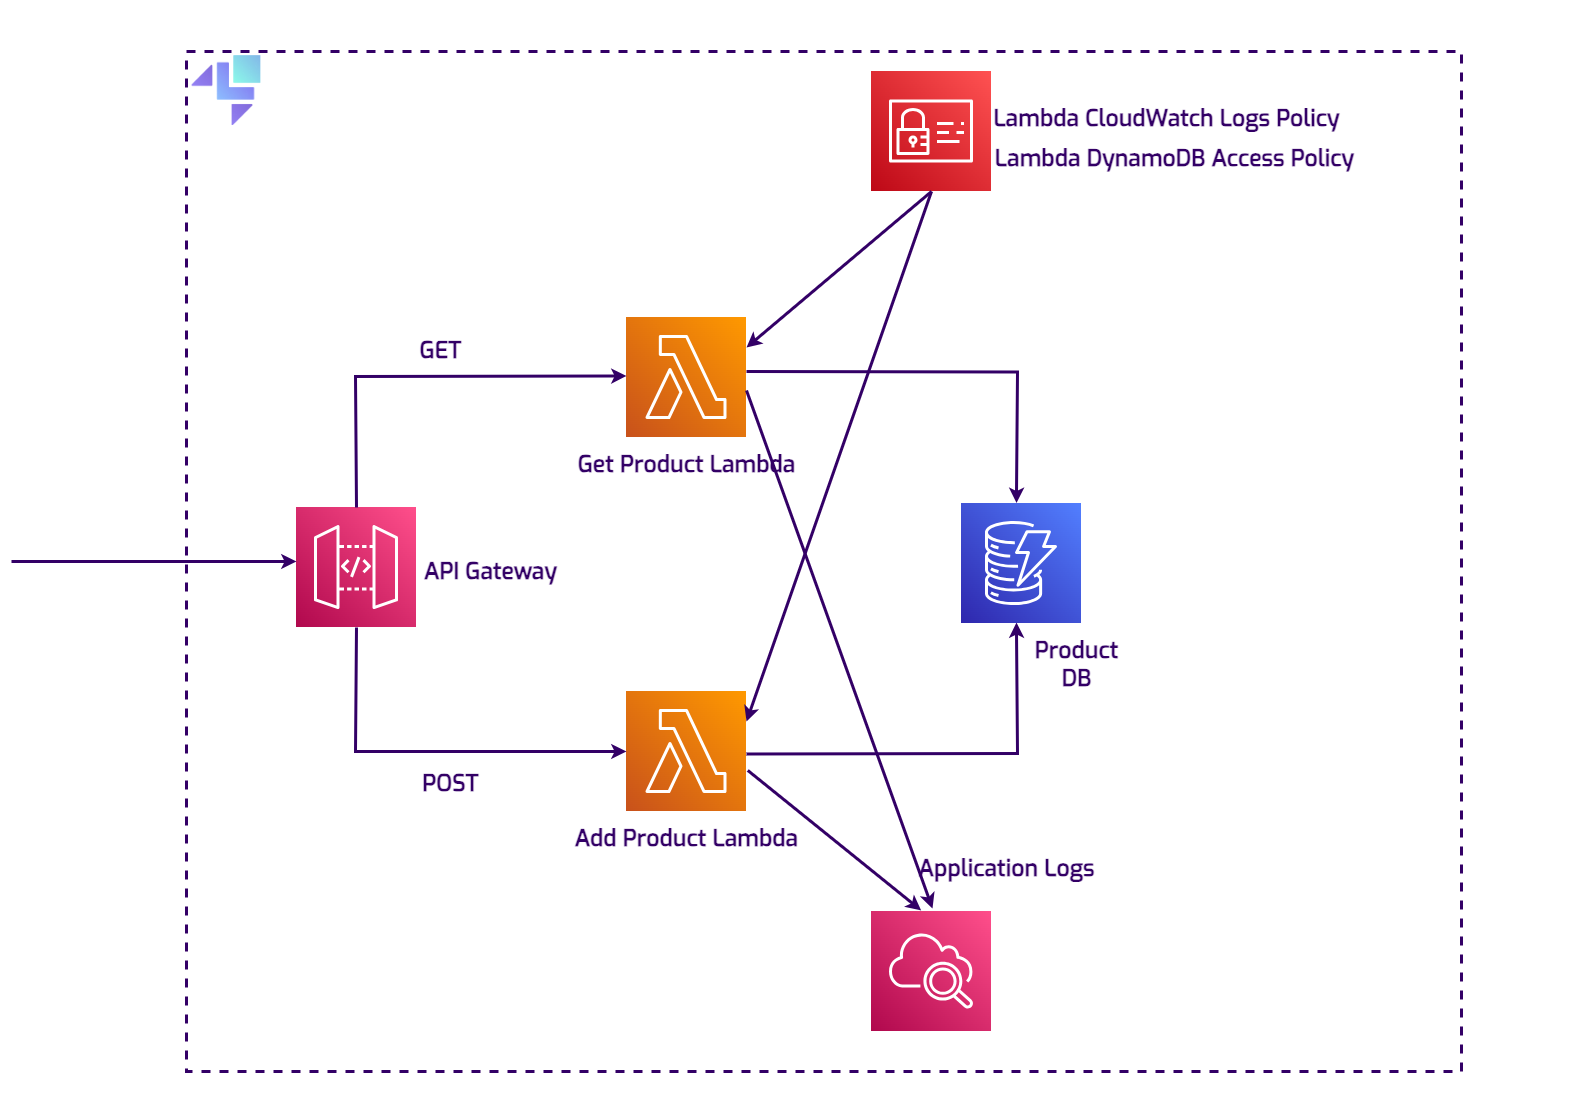
Section titled “Project overview”You can get hands-on with this setup by cloning the demo repository. The diagram below illustrates how everything within the project connects.
The application is simple, yet it reflects a realistic scenario: there’s an API Gateway that directs requests to two Lambda functions. One Lambda function fetches product details by ID, and the other saves new products to a DynamoDB database. A CloudWatch Logs instance is used to store and access the Lambda log files.
Using Terraform init hooks
Section titled “Using Terraform init hooks”Using init hooks directly
Section titled “Using init hooks directly”Let’s first take a look at how you can use Terraform init hooks to create AWS resources automatically when LocalStack starts up. After establishing this foundation, we will proceed to integrate this feature with Testcontainers to further enhance our development and testing workflow.
LocalStack CLI
Section titled “LocalStack CLI”In the root folder of the demo project run:
export LOCALSTACK_AUTH_TOKEN=<your_auth_token>localstack start -e EXTENSION_AUTO_INSTALL=localstack-extension-terraform-init \ -v ./terraform/main.tf:/etc/localstack/init/This is the easiest way to quickly spin up the desired services at startup.
The command starts LocalStack with the configuration to automatically install the localstack-extension-terraform-init extension and
mount the necessary files into the container: the Terraform configuration file and the Lambda JAR file.
The extension will install both terraform and tflocal into your LocalStack container, and enable the init hook runners to detect Terraform files.
You can also organize your Terraform files into subdirectories if you want.
If Docker gives you any trouble regarding mounting permissions, you can add $(pwd) in front of the local paths, to turn them into
absolute paths.
Since the initialization hook runs terraform init, the AWS Terraform provider will be downloaded in the container every time. You can avoid this by mounting a directory instead of a single file. Any Terraform state including the .terraform folder that contains the provider, will be cached on your host directory, however they may require sudo permissions to modify or delete, as they are created by the container.
Docker compose
Section titled “Docker compose”Another way of starting LocalStack with the desired services is using docker compose.
In the root folder, you’ll find the essential configs in the docker-compose.yml file:
services: localstack: container_name: "${LOCALSTACK_DOCKER_NAME:-localstack-main}" image: localstack/localstack-pro:latest # required for Pro ports: - "127.0.0.1:4566:4566" # LocalStack Gateway - "127.0.0.1:4510-4559:4510-4559" # external services port range - "127.0.0.1:443:443" # LocalStack HTTPS Gateway (Pro) environment: # Activate LocalStack for AWS: https://docs.localstack.cloud/getting-started/auth-token/ - LOCALSTACK_AUTH_TOKEN=${LOCALSTACK_AUTH_TOKEN:?} # required for Pro # LocalStack configuration: https://docs.localstack.cloud/references/configuration/ - DEBUG=1 - PERSISTENCE=${PERSISTENCE:-0} - EXTENSION_AUTO_INSTALL=localstack-extension-terraform-init volumes: - "${LOCALSTACK_VOLUME_DIR:-./volume}:/var/lib/localstack" - "/var/run/docker.sock:/var/run/docker.sock" - "./terraform:/etc/localstack/init/ready.d" - "./target/product-lambda.jar:/etc/localstack/init/ready.d/target/product-lambda.jar"Environment Variables:
- LOCALSTACK_AUTH_TOKEN: Required for using LocalStack for AWS.
- DEBUG: Set to 1 to enable verbose logging of the container.
- EXTENSION_AUTO_INSTALL: Automatically installs specified LocalStack extensions, in this case,
localstack-extension-terraform-initwhich allows Terraform files to be directly used as init hooks.
Volumes:
- Docker Socket: Mounts the Docker socket
/var/run/docker.sockfrom the host into the container. This allows LocalStack to manage Docker containers directly, facilitating functionalities like spinning up Lambda containers. - Terraform Configuration: Mounts a directory containing Terraform files (./terraform) from the host to
/etc/localstack/init/ready.din the container. This enables the use of init hooks, as well as the AWS provider (plugins and modules) which is downloaded once and reused in subsequent startups. - Lambda Function JAR: Places the
product-lambda.jarfile from the host into the/etc/localstack/init/ready.d/targetdirectory in the container, making it available for use, as described inmain.tf.
After running docker compose up, we should keep an eye on the container logs until the Ready. message appears.
Now we can test the functionality of our stack by running the following commands:
aws apigateway get-rest-apis \ --query 'items[?name==`product-api-gateway`].id' \ --endpoint http://localhost.localstack.cloud:4566[ "ixqd52qrip"]This will get us the ID of the API Gateway, which is necessary to build the URL:
curl --location "http://ixqd52qrip.execute-api.localhost.localstack.cloud:4566/dev/productApi" \ --header 'Content-Type: application/json' \ --data '{ "id": "34534", "name": "EcoFriendly Water Bottle", "description": "A durable, eco-friendly water bottle designed to keep your drinks cold for up to 24 hours.", "price": "29.99" }'Product added/updated successfully.To check if the product object has been persisted to the database, we can fire a GET request against the same URL, using the product ID as a query param:
curl --location "http://ixqd52qrip.execute-api.localhost.localstack.cloud:4566/dev/productApi?id=34534"{"price":"29.99","name":"EcoFriendly Water Bottle","description":"A durable, eco-friendly water bottle designed to keep your drinks cold for up to 24 hours.","id":"34534"}Integrating with Testcontainers
Section titled “Integrating with Testcontainers”The setup
Section titled “The setup”Now that we’ve established how seamlessly LocalStack integrates with Terraform using initialization hooks, let’s explore how we can leverage this feature to enhance our testing processes using Testcontainers. This demo is a Java project, but the framework supports multiple other programming languages. We can now automate and streamline our LocalStack initialization, ensuring that every test suite includes a fresh, fully configured AWS environment. This helps users build confidence in moving on to deploy to the AWS platform, as the IaC files remain unchanged.
To get started with Testcontainers, you need to include a few dependencies in the Maven pom.xml file:
<dependencies> <dependency> <groupId>org.testcontainers</groupId> <artifactId>testcontainers</artifactId> </dependency> <dependency> <groupId>org.testcontainers</groupId> <artifactId>junit-jupiter</artifactId> <scope>test</scope> </dependency> <dependency> <groupId>org.testcontainers</groupId> <artifactId>localstack</artifactId> <scope>test</scope> </dependency> . . . <dependencyManagement> <dependencies> <dependency> <groupId>org.testcontainers</groupId> <artifactId>testcontainers-bom</artifactId> <version>1.19.8</version> <type>pom</type> <scope>import</scope> </dependency> </dependencies> </dependencyManagement></dependencies>If you intend to make changes to the code, you may build the project by running the following command and the JAR file will be recreated in the target folder.
However, you don’t need to, as the built file is already provided.
mvn clean packageIn the provided code snippet, we configure a LocalStackContainer object using Testcontainers.
Don’t forget to set the LOCALSTACK_AUTH_TOKEN as an environment variable.
This configuration is abstracted in a superclass to be reusable across different test cases.
@Container protected static LocalStackContainer localStack = new LocalStackContainer(DockerImageName.parse("localstack/localstack-pro:latest")) .withEnv("LAMBDA_REMOVE_CONTAINERS", "1") .withEnv("EXTENSION_AUTO_INSTALL", "localstack-extension-terraform-init") .withEnv("LOCALSTACK_AUTH_TOKEN", System.getenv("LOCALSTACK_AUTH_TOKEN")) .withFileSystemBind("./target/product-lambda.jar", "/etc/localstack/init/ready.d/target/product-lambda.jar") .withFileSystemBind("./terraform", "/etc/localstack/init/ready.d") .withEnv("DEBUG", "1") .withStartupTimeout(Duration.of(2, ChronoUnit.MINUTES));Here’s what each configuration line does:
- LAMBDA_REMOVE_CONTAINERS=“1”: Ensures that Lambda containers are removed after execution to free up resources and avoid clutter.
- EXTENSION_AUTO_INSTALL=“localstack-extension-terraform-init”: Automatically installs the Terraform init hooks extension.
- LOCALSTACK_AUTH_TOKEN: Fetches the LocalStack Auth Token from environment variables.
- DEBUG=“1”: Enables verbose logging for troubleshooting and ensuring detailed logs are available for debugging.
The withFileSystemBind commands mount the product-lambda.jar and the directory containing the Terraform files from the host machine into the appropriate init hook directory within the LocalStack container.
The last line specifies a timeout for the container startup, set to 2 minutes.
This ensures that the container has enough time to initialize all services.
Normally, the process runs a lot faster, but this prevents a worse case scenario that could include any delays cause by hardware resources or network issues.
This is very similar to the docker-compose.yml file we’ve seen before.
The tests
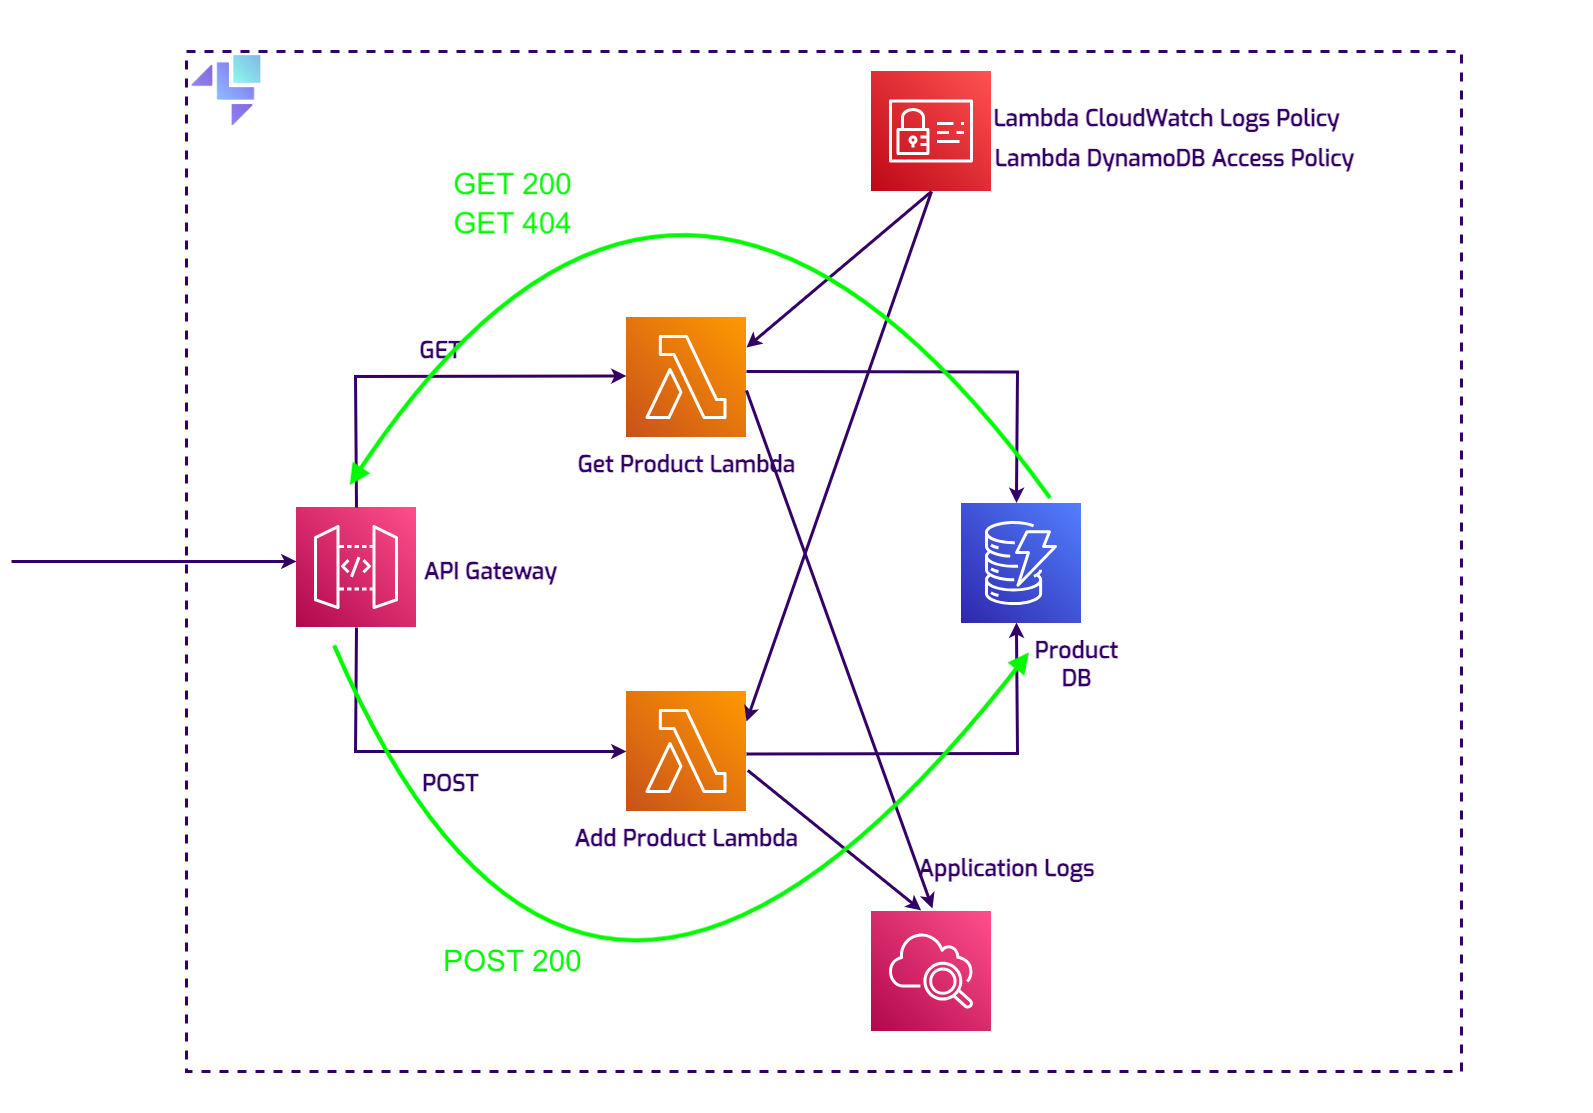
Section titled “The tests”The test suite in the ProductAppTests class is checking three scenarios:
- Product Persistence: Tests the ability to successfully save a new product to DynamoDB via a Lambda function, confirming the POST request and the response.
- Product Retrieval: Ensures the system can accurately fetch a product by its ID from DynamoDB through a GET request.
- Non-Existent Product Handling: Validates the system’s response to a request for a non-existent product, ensuring the Lambda function properly returns the appropriate error message “Product not found”.
Since the app runs entirely inside the LocalStack container, an HTTP client is used to make calls against the service.
  @Test    @Order(1)    void testSuccessfulPostAction() {
        var postUrl =                localStackEndpoint + "/restapis/" + apiGWId + "/dev/_user_request_/productApi";
        var expectedResponse =                "Product added/updated successfully.";
        try (CloseableHttpClient httpClient = HttpClients.createDefault()) {
            // add headers to a POST request            var httpPost = new HttpPost(postUrl);            httpPost.setHeader(new BasicHeader("Content-Type", "application/json"));            // create the JSON request body            var jsonRequestBody = "{\n" +                    "  \"id\": \"34534\",\n" +                    "  \"name\": \"EcoFriendly Water Bottle\",\n" +                    "  \"description\": \"A durable, eco-friendly water bottle.\",\n" +                    "  \"price\": \"29.99\"\n" +                    "}";
            // set the request body            var entity = new StringEntity(jsonRequestBody);            httpPost.setEntity(entity);            // execute the request            try (CloseableHttpResponse response = httpClient.execute(httpPost)) {                String responseBody = EntityUtils.toString(response.getEntity());                //assert 200 OK status & response message                Assertions.assertEquals(HttpStatus.SC_OK, response.getStatusLine().getStatusCode());                Assertions.assertEquals(expectedResponse, responseBody);            }        } catch (IOException e) {            throw new RuntimeException(e);        }    }
It is now incredibly straightforward to utilize our Terraform configuration file to construct the exact, production-ready environment needed for effective testing.
About owner permissions
Section titled “About owner permissions”It’s important to note that this extension is still new and primarily intended for straightforward Terraform configurations.
It is subject to change and improvements in the future.
We already mentioned that if you mount a directory instead of a single file, the AWS Terraform provider will not be downloaded each time the init command runs.
Any state files created will be in your host directory, potentially requiring sudo to modify or delete.
The reason for this is that the container user that creates these files is root, and on Linux systems this will propagate to your local files.
MacOS, on the other hand, will not allow this to happen and your locally created files will belong to your user.
Here’s how it looks like:
In the LocalStack container
Section titled “In the LocalStack container”drwxr-xr-x 8 root root 256 Jul 10 15:26 .drwxr-xr-x 1 root root 4096 Jul 10 15:24 ..drwxr-xr-x 3 root root 96 Jul 10 07:28 .terraform-rw-r--r-- 1 root root 1406 Jul 10 07:28 .terraform.lock.hcl-rwxrwxrwx 1 root root 5563 Jul 7 06:51 main.tfdrwxr-xr-x 3 root root 96 Jul 10 07:28 target-rw-r--r-- 1 root root 23620 Jul 10 15:26 terraform.tfstate-rw-r--r-- 1 root root 23620 Jul 10 15:25 terraform.tfstate.backupOn MacOS
Section titled “On MacOS”drwxr-xr-x@ 9 user staff 288 Jul 10 00:28 ./drwxr-xr-x@ 19 user staff 608 Jul 10 00:28 ../drwxr-xr-x 3 user staff 96 Jul 10 00:28 .terraform/-rw-r--r-- 1 user staff 1406 Jul 10 00:28 .terraform.lock.hcl-rw------- 1 user staff 202 Jul 10 00:28 .terraform.tfstate.lock.info-rw-r--r-- 1 user staff 3798 Jul 10 00:28 localstack_providers_override.tf-rwxrwxrwx@ 1 user staff 5563 Jul 6 23:51 main.tfdrwxr-xr-x 3 user staff 96 Jul 10 00:28 target/-rw-r--r-- 1 user staff 17338 Jul 10 00:29 terraform.tfstateUsing multiple TF files
Section titled “Using multiple TF files”Organizing multiple Terraform files into subfolders can be a highly effective strategy. This approach allows you to manage multiple Terraform projects within a single structure efficiently.
The scripts are executed using a preorder traversal method, where each level of the directory hierarchy is processed in alphabetical order. This ensures a consistent and predictable execution sequence. For example, consider the following directory structure:
ready.d/myscript.shready.d/a/script_0.shready.d/a/aa/script_0.shready.d/a/aa/script_2.shready.d/b/script_0.shThis alphabetical and hierarchical execution strategy helps maintain an organized and logical flow, making it easier to manage and execute complex Terraform projects.
Conclusion
Section titled “Conclusion”Terraform init hooks will not only allow us to replicate our production infrastructure within our testing environments, but will also bring great value in terms of automation - configurations being automatically applied, self-contained tests, and reproducibility - we can easily reproduce the setup every time. This is crucial for maintaining the integrity and reliability of our systems, as it enables thorough testing under conditions that closely mirror the actual deployment scenario. By preserving this production-ready setup throughout the testing phase, we can confidently validate changes and catch potential issues early, enhancing our deployment quality and operational stability.